Numerical Propagation |
Numerical propagation is the process of taking a state containing positions, masses, and other quantities for which there are differential equations defined and integrating their values forward or backward in time. With a NumericalPropagator, complex force models which have no direct analytical solution can be used to predict the trajectory of a dynamical body.
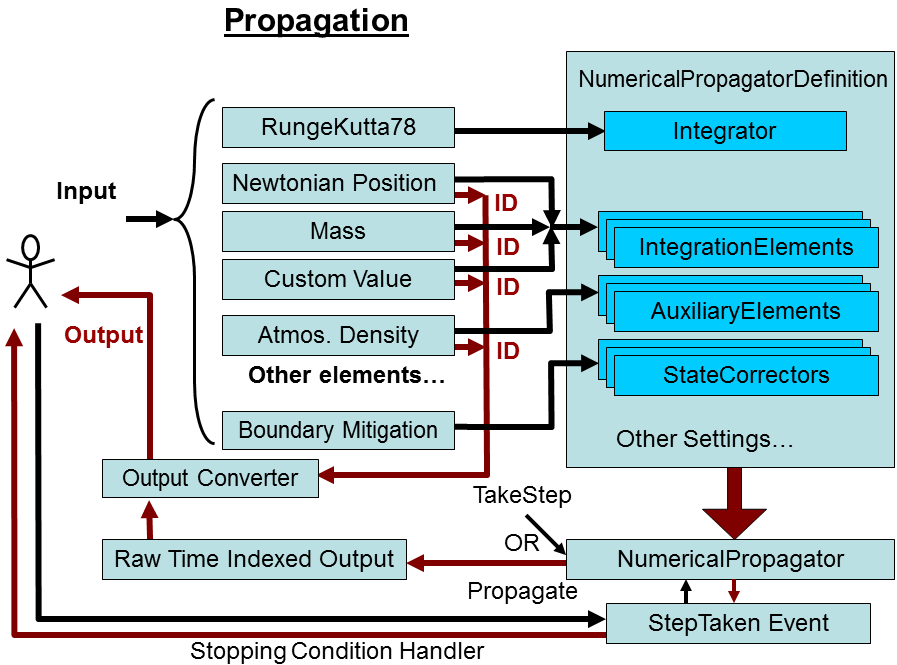
In order to create a NumericalPropagator, the user first needs to configure a NumericalPropagatorDefinition with a set of elements to integrate and a specified NumericalIntegrator. Once the propagator is created, it can propagate the state forward or backward in time, producing output history at the desired sparsity over an interval, or simply producing the state at the final time.
There are several different ways to propagate with a NumericalPropagator. By specifying an output frequency and an overall propagation interval, the propagator will propagate from the current state and epoch for the specified interval and then attempt to Restep the last step in order to match the final time. In addition, similar to a BackgroundCalculation, you can specify a ITrackCalculationProgress progress tracker in order to dynamically monitor the progress of the propagation from another thread. Also note that if the duration of the time interval for propagation is negative, the propagator will propagate the state backward from the current state. The result of this propagation (forward or backward) is either a single state at the end of the specified interval, or a NumericalPropagationStateHistory containing the time indexed collection of raw state information at the specified output frequency along with metadata. If the output frequency specified is null, the output will occur at the end of each natural step taken by the integrator.
Besides propagating over intervals, it's also possible to manually step the propagator one integration step at a time by calling TakeStep. The CurrentState and CurrentTime represent the ephemeris point at the end of the last step taken. When stepping manually, the user is responsible for recording the ephemeris. The main advantage of stepping manually is to be able to analyze the state in between steps in order to stop after passing some arbitrary metric, after which the Restep method can be used with a root finder to find an exact stopping condition.
If a user wants to implement a stopping condition without having to step manually, the propagator exposes a StepTaken event which is fired every time the propagator takes a step (either while propagating or because of a call to TakeStep or Restep). This event includes information about the current time and state at the end of the current step and provides a means of stopping propagation.
The output produced by the propagator contains the absolute time and a double array containing the raw state information. In most cases this raw state may be slightly difficult to parse. The state may contain several different elements and their derivatives are organized for computational efficiency. In order to provide a simple way to convert the raw state information into useful output, the PropagationStateConverter on the propagator stores the mapping between the Identification on each element and the raw state. However, since there is no simple way to expose the various coordinate types generically for all elements, the user needs to specify the coordinate type associated with the element being identified for output. If the ID corresponds to a valid element in the state and the coordinate type corresponds to that element, the converter will produce valid ephemeris. Otherwise, it will throw a verbose error message stating what went wrong.
After producing a DateMotionCollection<T>, you can either use that information to produce an output file, such as an StkEphemerisFile in the case of position, or produce a Point for use with other analysis. Since the ephemeris produced by the numerical propagator can vary in its frequency, frame, and fidelity, it's up to the user to determine what kind of interpolation method to use to create a point. In general, the simplest approach is to use a PointInterpolator using the same frame that was used for propagation. However, it is worth noting that if the ephemeris is too sparse or the order of the interpolator is too high, there may be some error associated with the interpolation above and beyond the numerical error associated with the propagation itself.
The following example demonstrates how to propagate, and create a Point.
int outputSparsity = 1; // 1 indicates to output after every integration step, 2 every other step, etc, etc
Duration propagationTime = Duration.FromSeconds(totalTime);
NumericalPropagationStateHistory rawData = propagator.Propagate(propagationTime, outputSparsity);

// Recover the position, velocity, (and acceleration if specified on the position before creating the propagator)
DateMotionCollection<Cartesian> ephemeris = rawData.GetDateMotionCollection<Cartesian>(positionID);

DateMotionCollection<double> densityData = rawData.GetDateMotionCollection<double>(densityID);

Point platformPosition = new PointInterpolator(position.IntegrationFrame, InterpolationAlgorithmType.Hermite, 6, ephemeris);

// Perform analysis using other libraries...