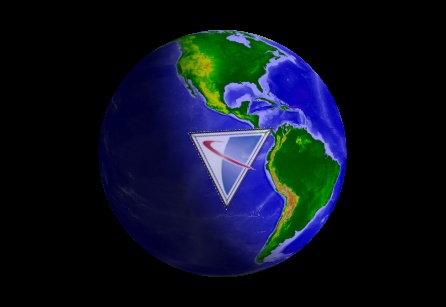
Screen Overlays |
Screen Overlays are used to render objects in 2D screen-space on top of a 3D scene. For example, screen overlays can be used to display your company's logo, create a translucent heads-up display (HUD), or display a video feed from an Unmanned Aerial Vehicle (UAV). Screen overlays support pixel and fractional units, translation, scale, and rotation transformations, and a user defined z-order.
TextureScreenOverlay is used to render a texture on the screen. The following example renders a texture overlay in the bottom, left corner of the screen.
TextureScreenOverlay overlay = new TextureScreenOverlay(0.0, 0.0, 128.0, 128.0);
overlay.setTexture(SceneManager.getTextures().fromUri(textureUri));

SceneManager.getScreenOverlays().add(overlay);
SceneManager.render();

The screen overlay is initialized to be located at the origin (0, 0) with a width and height of 128 pixels. By default, the bottom, left corner is the origin for screen overlays. This can be changed and is discussed in the Origin section below. Next, a texture is loaded from a PNG file and assigned to the overlay's Texture (get / set) property. Finally, the overlay is added to the SceneManager.ScreenOverlays (get) collection and all scenes are rendered by calling render.
The texture used with a screen overlay need not be a simple static image loaded from a file. It can also be a Raster conditioned with Insight3D's extensive imaging capabilities or a video. By default, the texture's aspect ratio is not maintained. To maintain the aspect ratio of the texture during sizing of the overlay, set the MaintainAspectRatio (get / set) property.
For best performance, render should be called just once to render all scenes after a batch of Primitives, Globe Overlays, and Screen Overlays have been added. When animating, it is not necessary to explicitly render at all.
When a screen overlay should no longer be rendered, remove it from the overlay manager:
SceneManager.getScreenOverlays().remove(overlay);
In previous examples, the screen overlay's position, width, and height were defined in pixels. If the window resizes, the position and size of the overlay will not change. An alternative to pixel units is fractional units. Using fractional units, an overlay's position or size is defined as a percentage of its parent's size. When its parent's size changes, the overlay adjusts itself accordingly.
When an overlay is added directly to the SceneManager.ScreenOverlays (get) collection (which is an instance of ScreenOverlayManager), its parent is the window itself. The details of adding a screen overlay as a child of another screen overlay are discussed in the Nesting Overlays section.
The percentage is in the range [0.0, 1.0], where 1.0 is 100%. Consider the following example:
ScreenOverlayPoint position = new ScreenOverlayPoint(0.25, 0.25, ScreenOverlayUnit.FRACTION, ScreenOverlayUnit.FRACTION);
ScreenOverlaySize size = new ScreenOverlaySize(0.5, 0.5, ScreenOverlayUnit.FRACTION, ScreenOverlayUnit.FRACTION);
TextureScreenOverlay overlay = new TextureScreenOverlay(position, size);

The overlay is constructed so that its left origin is 50% of the window width toward the right and its bottom origin is 25% of the window height toward the top. In addition, the overlay will consume 50% of the window in both directions.
A screen overlay's position and size can be changed after construction using its Position (get / set) and Size (get / set) properties. Individual components can be set using the X (get / set), Y (get / set), Width (get / set), and Height (get / set) properties.
overlay.setPosition(new ScreenOverlayPoint(0.5, 0.25, ScreenOverlayUnit.FRACTION, ScreenOverlayUnit.FRACTION));
Pixel and fractional units can be mixed. For example, an overlay's position can be defined using pixel units and its size defined using fractional units.
When resizing or transforming an overlay, you may want to set limits using the MinimumSize (get / set) and MaximumSize (get / set) properties. These limits will not be violated, regardless of how the overlay is sized.
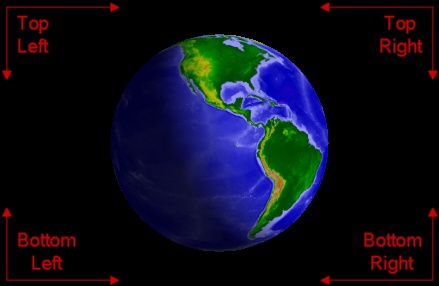
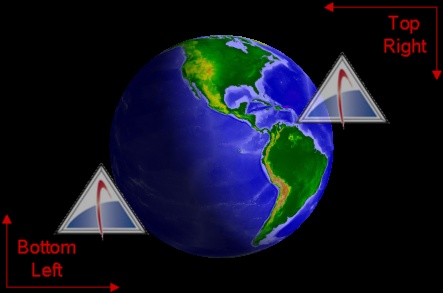
A screen overlay's Origin (get / set) property defines how the overlay is positioned relative to its parent, and the direction of its X and Y axes. The default is ScreenOverlayOrigin.BOTTOM_LEFT. This indicates that the overlay's position is relative to its parent's bottom left corner. Positive X extends to the right and positive Y extends upwards. Several other origins are available, such as the ones shown in the example below:
TextureScreenOverlay bottomLeft = new TextureScreenOverlay(0.0, 0.0, 120.0, 80.0);
bottomLeft.setTexture(SceneManager.getTextures().fromUri(bottomLeftTextureUri));
bottomLeft.setOrigin(ScreenOverlayOrigin.BOTTOM_LEFT);
SceneManager.getScreenOverlays().add(bottomLeft);

TextureScreenOverlay bottomRight = new TextureScreenOverlay(0.0, 0.0, 120.0, 80.0);
bottomRight.setTexture(SceneManager.getTextures().fromUri(bottomRightTextureUri));
bottomRight.setOrigin(ScreenOverlayOrigin.BOTTOM_RIGHT);
SceneManager.getScreenOverlays().add(bottomRight);

TextureScreenOverlay topRight = new TextureScreenOverlay(0.0, 0.0, 120.0, 80.0);
topRight.setTexture(SceneManager.getTextures().fromUri(topRightTextureUri));
topRight.setOrigin(ScreenOverlayOrigin.TOP_RIGHT);
SceneManager.getScreenOverlays().add(topRight);

TextureScreenOverlay topLeft = new TextureScreenOverlay(0.0, 0.0, 120.0, 80.0);
topLeft.setTexture(SceneManager.getTextures().fromUri(topLeftTextureUri));
topLeft.setOrigin(ScreenOverlayOrigin.TOP_LEFT);
SceneManager.getScreenOverlays().add(topLeft);

SceneManager.render();
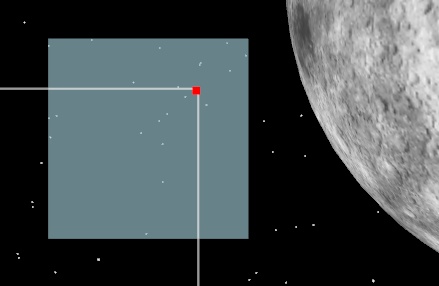
A screen overlay's PinningPosition (get / set) and PinningOrigin (get / set) properties define the point on the overlay that will be "pinned" to the position defined by the Position (get / set) property.
By default, the pinning position is (0, 0), and the pinning origin is set to ScreenOverlayPinningOrigin.AUTOMATIC, which means that the origin and placement of the pinning position will always be the same as the overlay's Origin (get / set). For example, if the overlay's origin is set to ScreenOverlayOrigin.TOP_RIGHT, the point on the overlay that will correspond to its Position (get / set) property will be its top right corner.
Below, the pinning position is specified to be 50 pixels inset from the top right corner of the overlay. The red dot represents the pinning position on the overlay, and the intersection of the white lines shows the value of the overlay's Position property.
ScreenOverlay overlay = new TextureScreenOverlay(200.0, 200.0, 200.0, 200.0);
overlay.setOrigin(ScreenOverlayOrigin.BOTTOM_LEFT);
Color lightBlue = new Color(0xADD8E6);
overlay.setColor(lightBlue);
overlay.setTranslucency(.4f);
overlay.setPinningPosition(new ScreenOverlayPoint(50.0, 50.0));
overlay.setPinningOrigin(ScreenOverlayPinningOrigin.TOP_RIGHT);
SceneManager.getScreenOverlays().add(overlay);
Screen overlays support a full set of affine transformations, including translation, scaling, and rotation.
TranslationX (get / set) and TranslationY (get / set) are used to define the translation transformation applied to the overlay. Translation is used to move the overlay relative to its Position (get / set) property, respecting the X and Y axes defined by the overlay's origin. For example, when the origin is ScreenOverlayOrigin.BOTTOM_LEFT, a translation of (50, 50) moves the overlay 50 pixels to the right and 50 pixels up. When the origin is ScreenOverlayOrigin.TOP_RIGHT, the same translation moves the overlay 50 pixels to the left and 50 pixels down. This is shown in the following example:
TextureScreenOverlay bottomLeft = new TextureScreenOverlay(0.0, 0.0, 101.0, 81.0);
bottomLeft.setTexture(SceneManager.getTextures().fromUri(textureUri));
bottomLeft.setOrigin(ScreenOverlayOrigin.BOTTOM_LEFT);
bottomLeft.setTranslationX(50.0);
bottomLeft.setTranslationY(50.0);
bottomLeft.setTranslucency(0.3f);
SceneManager.getScreenOverlays().add(bottomLeft);

TextureScreenOverlay topRight = new TextureScreenOverlay(0.0, 0.0, 101.0, 81.0);
topRight.setTexture(SceneManager.getTextures().fromUri(textureUri));
topRight.setOrigin(ScreenOverlayOrigin.TOP_RIGHT);
topRight.setTranslationX(50.0);
topRight.setTranslationY(50.0);
topRight.setTranslucency(0.3f);
SceneManager.getScreenOverlays().add(topRight);

SceneManager.render();
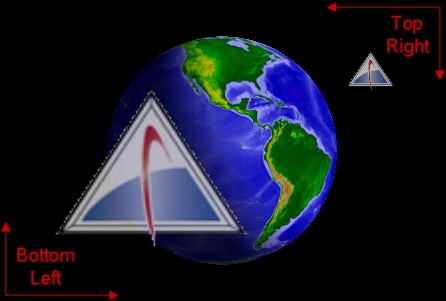
The Scale (get / set) property applies a scale transformation to the overlay. This can modify the size of an overlay relative to its Size (get / set) property. A Scale (get / set) less than 1.0 will shrink the overlay, while a Scale (get / set) greater than 1.0 will enlarge it, as shown below:
bottomLeft.setScale(2.0);
topRight.setScale(0.5);
RotationAngle (get / set) defines the rotation transformation applied to the overlay. The angle is defined in radians and positive angles rotate counter-clockwise. By default, the rotation point is the center of the overlay, and is specified with the RotationPoint (get / set) property. The following example shows an overlay rotated counter-clockwise 60 degrees.
TextureScreenOverlay bottomLeft = new TextureScreenOverlay(0.0, 0.0, 101.0, 81.0);
bottomLeft.setTexture(SceneManager.getTextures().fromUri(textureUri));
bottomLeft.setOrigin(ScreenOverlayOrigin.CENTER);
bottomLeft.setRotationAngle(Trig.degreesToRadians(60.0));
bottomLeft.setTranslucency(0.3f);
SceneManager.getScreenOverlays().add(bottomLeft);
In addition to the transformations above, the FlipX (get / set) and FlipY (get / set) properties can be used to flip an overlay at its center along the X or Y axes, respectively.
When multiple overlays overlap each other, use the bringToFront and sendToBack methods to control the render order. The following example creates three overlays and ensures that the first one created is rendered on top of the other two:
TextureScreenOverlay top = new TextureScreenOverlay(0.0, 0.0, 101.0, 81.0);
top.setTexture(SceneManager.getTextures().fromUri(topTextureUri));
top.setOrigin(ScreenOverlayOrigin.CENTER);
top.setTranslucency(0.3f);
SceneManager.getScreenOverlays().add(top);

TextureScreenOverlay left = new TextureScreenOverlay(0.0, 0.0, 128.0, 128.0);
left.setTexture(SceneManager.getTextures().fromUri(leftTextureUri));
left.setOrigin(ScreenOverlayOrigin.CENTER);
left.setTranslationX(-64.0);
left.setTranslationY(0.0);
SceneManager.getScreenOverlays().add(left);

TextureScreenOverlay right = new TextureScreenOverlay(0.0, 0.0, 128.0, 128.0);
right.setTexture(SceneManager.getTextures().fromUri(rightTextureUri));
right.setOrigin(ScreenOverlayOrigin.CENTER);
right.setTranslationX(64.0);
right.setTranslationY(0.0);
SceneManager.getScreenOverlays().add(right);

top.bringToFront();

The Z-order is defined relative to other overlays with the same parent.
A border can be rendered around a screen overlay by setting the BorderSize (get / set), BorderColor (get / set), and BorderTranslucency (get / set) properties. BorderSize (get / set) is defined in pixels and is 0 by default. When it is greater than 0, a border is rendered around the overlay's bounding rectangle using BorderColor (get / set) and BorderTranslucency (get / set) as shown below:
TextureScreenOverlay overlay = new TextureScreenOverlay(0.0, 0.0, 101.0, 81.0);
overlay.setTexture(SceneManager.getTextures().fromUri(textureUri));
overlay.setOrigin(ScreenOverlayOrigin.CENTER);
overlay.setTranslucency(0.3f);
overlay.setBorderSize(2);
overlay.setBorderColor(Color.RED);
overlay.setBorderTranslucency(0.2f);
SceneManager.getScreenOverlays().add(overlay);

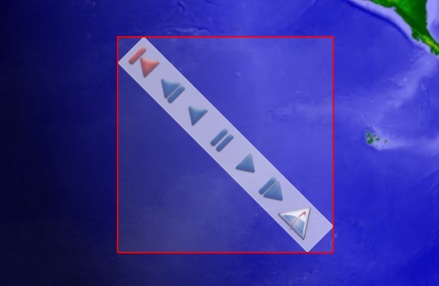
When picking, it can be useful to know a screen overlay's bounds relative to the overall Insight3D control rather than relative to its parent. The ControlPosition (get), ControlSize (get), and ControlBounds (get) properties provide this functionality. In the example below, a border is rendered around the bounding rectangle of the overlay. The OverlayToolbar type referenced below can be found in the picking section of the HowTo example application.
OverlayToolbar overlayToolbar = new OverlayToolbar();
TextureScreenOverlay toolbarPanel = overlayToolbar.Overlay;
toolbarPanel.setScale(1.5);
toolbarPanel.setOrigin(ScreenOverlayOrigin.BOTTOM_CENTER);
toolbarPanel.setRotationAngle(Trig.degreesToRadians(-45.0));
toolbarPanel.setTranslationY(200.0);

ScreenOverlay controlBounds = new ScreenOverlay(overlayToolbar.Overlay.getControlPosition(), overlayToolbar.Overlay.getControlSize());
controlBounds.setBorderSize(2);
controlBounds.setBorderColor(Color.RED);
controlBounds.setTranslucency(0.9f);

SceneManager.getScreenOverlays().add(controlBounds);
A position defined relative to the overall control can be converted to a coordinate relative to an overlay, and vice-versa, using the controlToOverlay and overlayToControl methods. Below, a coordinate relative to an overlay is translated into its screen coordinate, and then back into the overlay's coordinates:
ScreenOverlay overlay = new ScreenOverlay(100.0, 100.0, 200.0, 200.0);
SceneManager.getScreenOverlays().add(overlay);

ScreenOverlayPoint screenPoint = overlay.overlayToControl(100.0, 100.0);
System.out.println(screenPoint.getX() + ", " + screenPoint.getY());
// => 200, 200

ScreenOverlayPoint overlayPoint = overlay.controlToOverlay(screenPoint.getX(), screenPoint.getY());
System.out.println(overlayPoint.getX() + ", " + overlayPoint.getY());
// => 100, 100
Screen overlays can be nested within other screen overlays, forming a hierarchy of screen overlays. The following example adds an overlay to another overlay's Overlays (get) collection. It then adds the first overlay to yet another overlay:
ScreenOverlay screenOverlay = new ScreenOverlay(10.0, 10.0, 200.0, 200.0);
screenOverlay.setOrigin(ScreenOverlayOrigin.TOP_RIGHT);
Color lightSteelBlue = new Color(0xB0C4DE);
screenOverlay.setColor(lightSteelBlue);
screenOverlay.setBorderSize(1);

ScreenOverlay childPanel = new ScreenOverlay(new ScreenOverlayPoint(0.0, 0.0), new ScreenOverlaySize(.5, .5, ScreenOverlayUnit.FRACTION, ScreenOverlayUnit.FRACTION));
childPanel.setOrigin(ScreenOverlayOrigin.CENTER);
Color steelBlue = new Color(0x4682B4);
childPanel.setColor(steelBlue);
childPanel.setBorderSize(1);

ScreenOverlay childPanelChild = new ScreenOverlay(new ScreenOverlayPoint(0.0, 0.0), new ScreenOverlaySize(.5, .5, ScreenOverlayUnit.FRACTION, ScreenOverlayUnit.FRACTION));
childPanelChild.setOrigin(ScreenOverlayOrigin.BOTTOM_RIGHT);
Color green = new Color(0x008000);
childPanelChild.setColor(green);
childPanelChild.setBorderSize(1);

childPanel.getOverlays().add(childPanelChild);
screenOverlay.getOverlays().add(childPanel);
SceneManager.getScreenOverlays().add(screenOverlay);
When a screen overlay is added to an overlay collection, its Parent (get) property returns the overlay panel that contains it, or, if the overlay was added to the screen overlay manager, the manager is returned. The IScreenOverlayContainer interface is implemented by both the overlay manager and overlay panels, and can be cast to the more specific type, as seen below.
ScreenOverlay screenOverlay = new ScreenOverlay(0.0, 0.0, 200.0, 200.0);

ScreenOverlayPoint position = new ScreenOverlayPoint(0.0, 0.0);
ScreenOverlaySize size = new ScreenOverlaySize(.5, .5, ScreenOverlayUnit.FRACTION, ScreenOverlayUnit.FRACTION);
ScreenOverlay childOverlay = new ScreenOverlay(position, size);

screenOverlay.getOverlays().add(childOverlay);
SceneManager.getScreenOverlays().add(screenOverlay);

ScreenOverlay panel = (ScreenOverlay) childOverlay.getParent();
ScreenOverlayManager manager = (ScreenOverlayManager) panel.getParent();
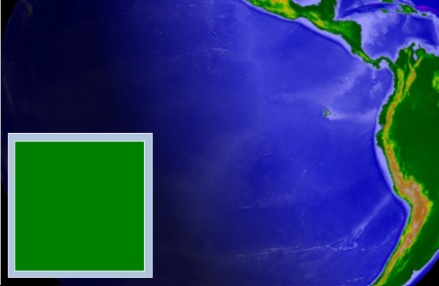
Screen overlays have a Padding (get / set) property which specifies how their child overlays will be offset from the bounds of the parent when being positioned. In the example below, a 10 pixel padding is applied to each edge of the manager and an overlay.
SceneManager.getScreenOverlays().setPadding(new ScreenOverlayPadding(10.0, 10.0, 10.0, 10.0));

ScreenOverlay screenOverlay = new ScreenOverlay(0.0, 0.0, 200.0, 200.0);
screenOverlay.setPadding(new ScreenOverlayPadding(10.0, 10.0, 10.0, 10.0));
Color lightSteelBlue = new Color(0xB0C4DE);
screenOverlay.setColor(lightSteelBlue);
screenOverlay.setBorderSize(1);

ScreenOverlayPoint overlayPanelChildPosition = new ScreenOverlayPoint(0.0, 0.0);
ScreenOverlaySize overlayPanelChildSize = new ScreenOverlaySize(1.0, 1.0, ScreenOverlayUnit.FRACTION, ScreenOverlayUnit.FRACTION);
ScreenOverlay overlayPanelChild = new ScreenOverlay(overlayPanelChildPosition, overlayPanelChildSize);
Color green = new Color(0x008000);
overlayPanelChild.setColor(green);
overlayPanelChild.setOrigin(ScreenOverlayOrigin.TOP_RIGHT);
overlayPanelChild.setBorderSize(1);

screenOverlay.getOverlays().add(overlayPanelChild);
SceneManager.getScreenOverlays().add(screenOverlay);
If a parent overlay contains an overlay that is positioned and sized in such a way that it extends past the bounds of the parent, the protruding portions of the child overlay will be clipped during rendering.
TextureScreenOverlay secondChildOverlay = new TextureScreenOverlay(0.0, 0.0, 128.0, 128.0);
secondChildOverlay.setOrigin(ScreenOverlayOrigin.TOP_RIGHT);
secondChildOverlay.setTranslationX(-36.0);
secondChildOverlay.setTranslationY(-18.0);
secondChildOverlay.setTexture(SceneManager.getTextures().fromUri(textureUri));

To prevent clipping a child overlay, set the overlay's ClipToParent (get / set) property to false.
TextureScreenOverlay secondChildOverlay = new TextureScreenOverlay(0.0, 0.0, 128.0, 128.0);
secondChildOverlay.setOrigin(ScreenOverlayOrigin.TOP_RIGHT);
secondChildOverlay.setTranslationX(-36.0);
secondChildOverlay.setTranslationY(-18.0);
secondChildOverlay.setClipToParent(false);
secondChildOverlay.setTexture(SceneManager.getTextures().fromUri(textureUri));
The pickScreenOverlays method returns information about the screen overlays that are at a specified pixel. The inputs are X and Y coordinates. The origin is the top, left corner of the control. In most cases, the input will be the location of the mouse cursor at the time of click or other event.
Because multiple overlapping screen overlays might exist at a specified pixel, pickScreenOverlays returns a collection of ScreenOverlayPickResults, each representing one picked overlay. The picked overlays are sorted by their Z-order, so the top-most overlay is first in the list. In addition to identifying the picked overlay, each ScreenOverlayPickResult also contains the picked Position (get) within the overlay.
List<ScreenOverlayPickResult> collection = getScene().pickScreenOverlays(x, y);
if (collection.size() != 0) {
    ScreenOverlayPickResult pickResult = collection.get(0);
    ScreenOverlay overlay = pickResult.getOverlay();
    ScreenOverlayPoint overlayLocation = pickResult.getPosition();
    ScreenOverlayPoint screenLocation = pickResult.getControlPosition();
}
It is sometimes useful when building UI elements with screen overlays to disable picking on a certain overlay. If an overlay's PickingEnabled (get / set) property is set to false, pickScreenOverlays will ignore that overlay even if it exists at the specified location.
List<ScreenOverlayPickResult> collection = getScene().pickScreenOverlays(x, y);
if (collection.size() != 0) {
    ScreenOverlayPickResult pickResult = collection.get(0);
    ScreenOverlay overlay = pickResult.getOverlay();
    overlay.setPickingEnabled(false);
}
// Collection will not contain the overlay that was picked above
collection = getScene().pickScreenOverlays(x, y);