Terrain Server
This guide walks you through the process of installing and configuring STK Terrain Server on your system.
The STK Terrain Server installation process will automatically configure Windows and IIS at the time of install. This section of the Installation Guide will demystify all of these automatic operations so that you are able to reconfigure the Terrain Server at a later date, update configuration settings, or simply understand why certain system configurations are required for Terrain Server to operate.
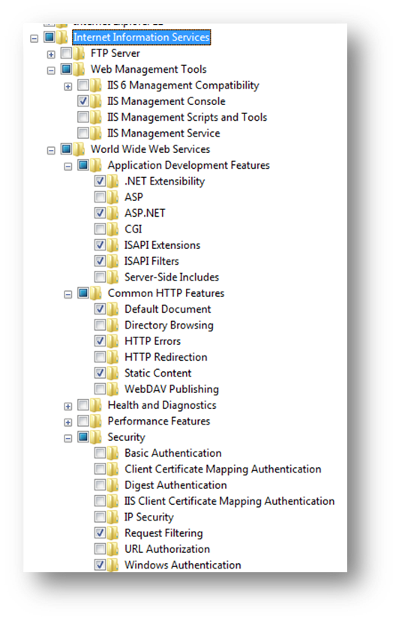
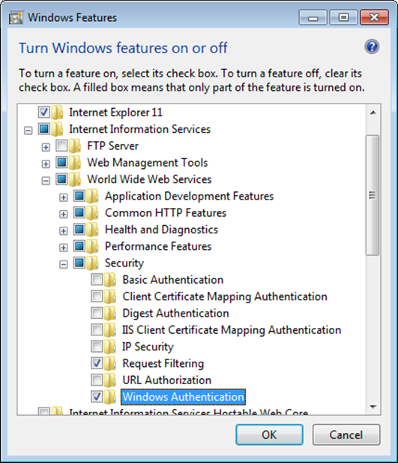
The installer will begin by configuring the required Windows Features, enabling Install Internet Information Services (IIS) v7.0+, Microsoft .NET Framework v4.5+, and ASP.NET if they’re not already installed. Although not required, these Windows Features can also be manually configured by using "Turn Windows Features On/Off" or "Server Manager, Add Roles" to enable these requirements. As an example, the following list demonstrates the minimum set of Windows Features that must be enabled on Windows 7 or Windows Server 2012R2:
|
|
The STK Terrain Server installer defaults to enabling Windows Authentication for read-write access to the Terrain Server Application. All users, including anonymous, unauthenticated users, are allowed to do GET requests. In STK Terrain Server, GET requests cannot make modifications to the server, so this rule provides read-only access to everyone. Only users that are members of the Windows Group specified during installation (StkTerrainServerAdmins, by default) can modify the STK Terrain Server contents. If there is no possibility of accidental or intentional misuse in your environment, you may disable the Windows Authentication in the Setup dialog. To further restrict read-only access to the STK Terrain Server, see the optional configuration section below, Configuring Authentication in IIS.
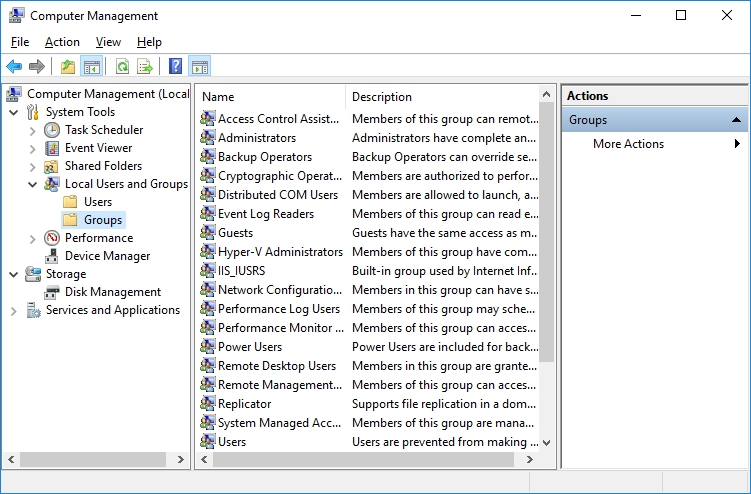
During installation, the STK Terrain Server installer will automatically create a Windows Group configured to match the Group name chosen during installation, defaulting to StkTerrainServerAdmins. Windows groups can be added and managed from the Computer Management Windows application, via the Groups folder under "Local Users and Groups". Windows NT User accounts must be added to this newly created group in order to grant write access to the Terrain Server, which is necessary for creating new Datasources and Terrain Tilesets.
To Add a user to the StkTerrainServerAdmins Windows User Group, launch the Computer Management Windows application. In recent versions of Windows, this is easily done by clicking on the Windows button or pressing the Windows key, and typing "management" to filter the list of available programs to those that contain the word "management". Right-click on "Computer Management" from this list and choose to "Run as Administrator".

In the Computer Management application, select the Groups folder in the left panel.
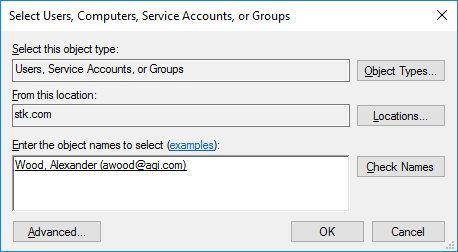
The next step is to specify the Windows Users accounts that will belong to the StkTerrainServerAdmins group and gain access to these elevated Terrain Server permissions. To add Windows Users to this new group, open the StkTerrainServerAdmins group by double clicking on the Group name in the Computer Management Application. Click on the Add... button. This is a standard windows permissions dialog; provide all or a majority of the user name and use Check Names to lookup and verify the username is recognized by the domain. A valid windows user account can belong to the Windows domain as shown in the image below, or can be a local user account. Click "Ok" to add the User to the Group.
Finally, you can verify that this new users group is configured correctly. Open a web browser and navigate to the STK Terrain Server DataSources page. Create a new DataSource by clicking on the Add DataSource button. With this configuration complete, the web browser will automatically prompt for login credentials when attempting to perform an action within the STK Terrain Server application that does not allow anonymous access. In some cases, the login may be automatic (no explicit prompt) when you’re logged into the server as a user that is allowed access, or if your network has a Windows domain and your domain user is allowed access.
If a license for STK Terrain Server is not yet installed, browsing to the Data Sources or Tilesets page in the web interface will redirect to a license information page:
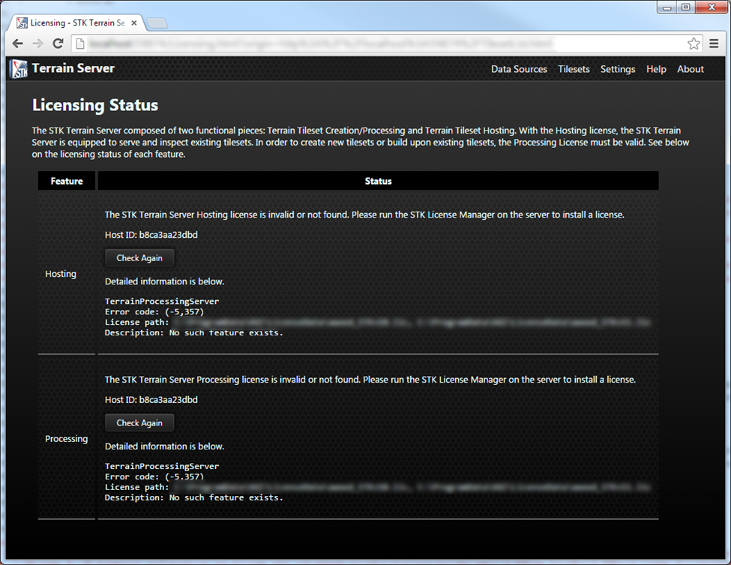
As the page says, the easiest way to install a license is by running the STK License Manager on the server. To receive STK Terrain Server licenses, email AGI Product Support at support@agi.com or call 1-800-924-7244.
If you already have a license file, click the "Manage Licenses" tab and click the  Install a License File button.
Browse to your license and click Open. Then, return to the STK Terrain Service licensing page and click the
"Check Again" button. If the license was installed successfully, you will be automatically directed to the
Data Sources or Tilesets page. If there is a problem with the license, diagnostic information will be
displayed on the page. Please contact AGI support if you have difficulties with licensing.
Install a License File button.
Browse to your license and click Open. Then, return to the STK Terrain Service licensing page and click the
"Check Again" button. If the license was installed successfully, you will be automatically directed to the
Data Sources or Tilesets page. If there is a problem with the license, diagnostic information will be
displayed on the page. Please contact AGI support if you have difficulties with licensing.
The following section provides an overview of additional configurations that can be made to an IIS deployed terrain server installation. In most cases, the default configuration chosen during installation described in the section above is appropriate for the operating environment.
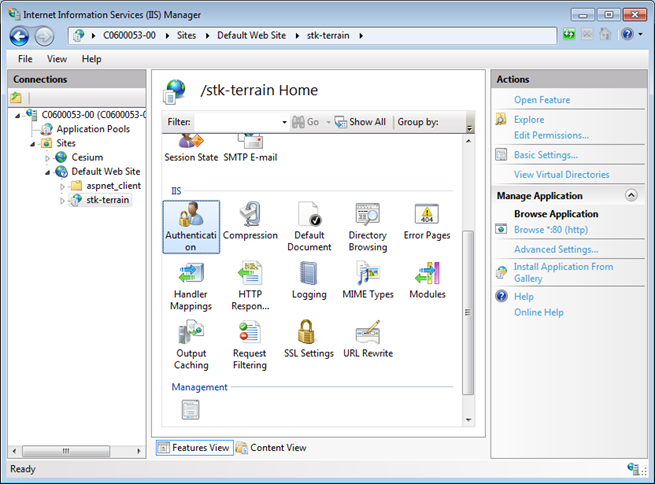
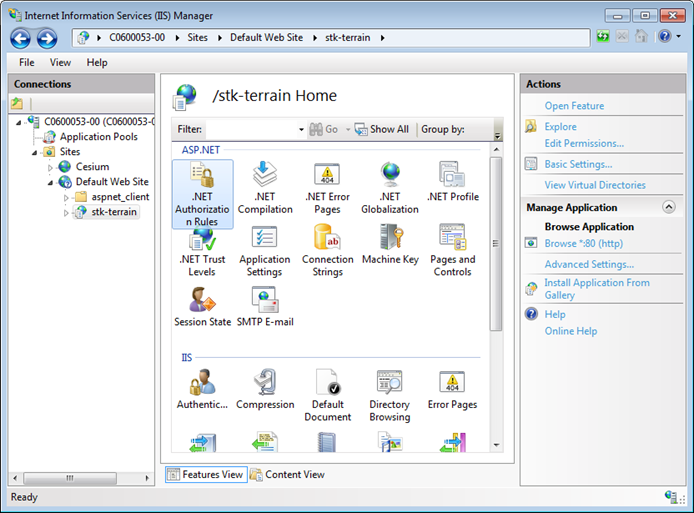
The current version of STK Terrain Server supports authentication using the Windows or Basic authentication mechanism in Internet Information Services (IIS). It allows you to designate Windows users or groups that are allowed to make modifications inside the application. To set it up, open the Internet Information Service (IIS) Manager and navigate to the "stk-terrain" virtual directory in the "Default Web Site". Your virtual directory may have a different name if you changed the default during installation. Then, choose the Authentication feature.
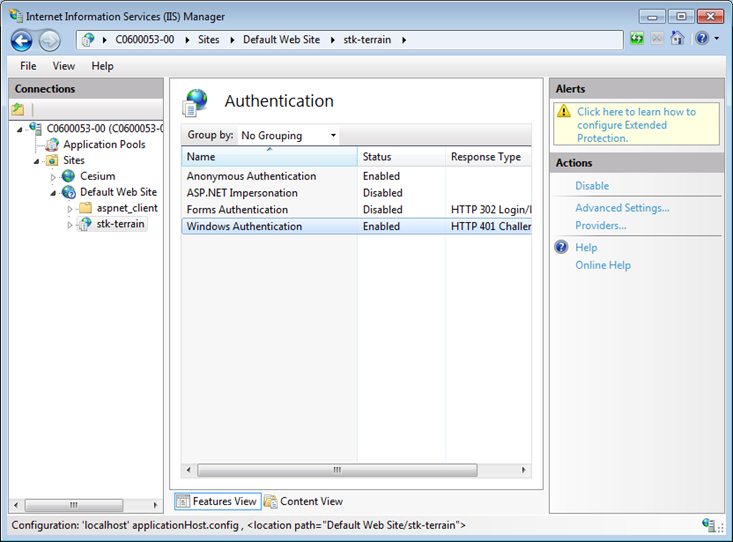
Then, enable "Windows authentication" or "Basic authentication". We recommend that you use Windows authentication whenever possible. Basic authentication will send login credentials in clear text in the HTTP request, which is a security problem unless your server is also configured to require an HTTPS connection.
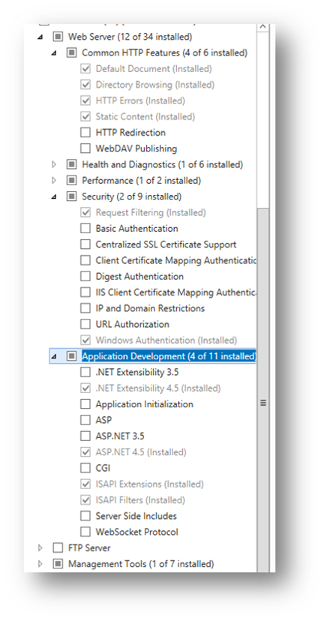
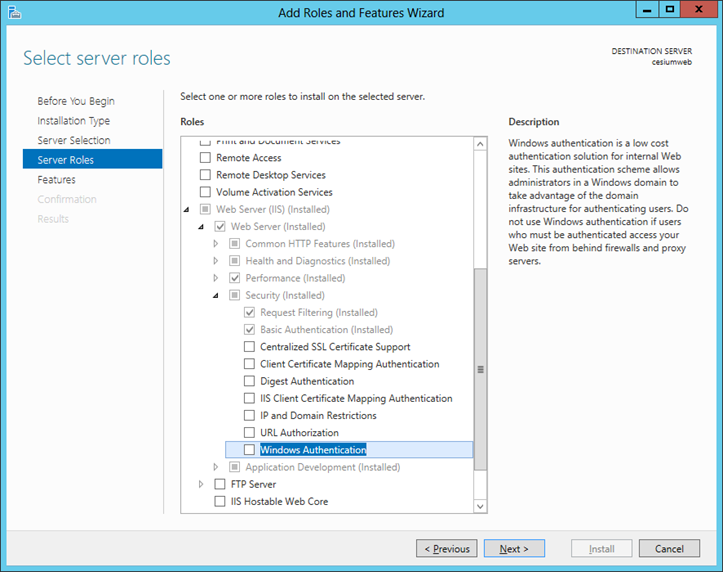
If the authentication mechanism you want does not appear in the list, you will need to install it. On Windows Server 2008 and 2012, authentication mechanisms are installed using Server Manager. Navigate to the IIS pane, scroll down to the Role Services section, and click the "Add Role Services" button or select "Add Roles and Features" from the Tasks drop-down. The features are found under Web Server (IIS), Web Server, Security.
On Windows Vista, 7, 8, and 8.1, authentication mechanisms are installed via "Turn Windows features on or off", under Internet Information Services, World Wide Web Services, Security.
Next, we configure which users and groups are allowed access to the application. In the Features View for the stk-terrain virtual directory, select .NET Authorization Rules.
IIS .NET authorization rules are evaluated in top-down order, and the first rule that matches a user and HTTP verb takes effect. If the first matching rule has a mode of "Allow", the user will be allowed to perform that action. If the first matching rule has a mode of "Deny", the user will not be allowed to perform that action.
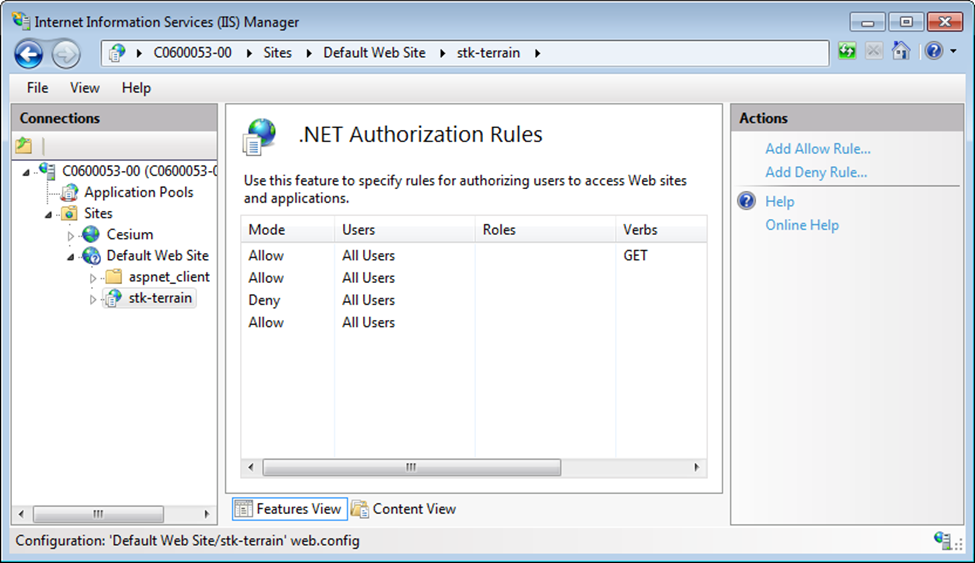
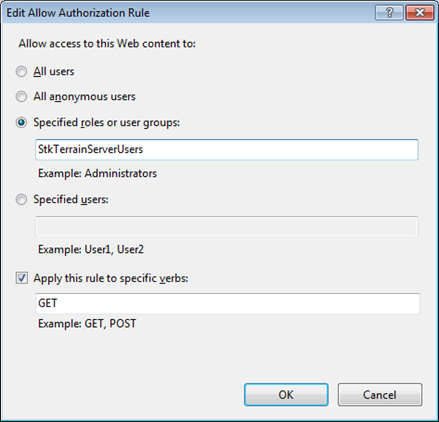
The first rule in the list, set up by the STK Terrain Server installer, specifies that all users, including anonymous, unauthenticated users, are allowed to do GET requests. In STK Terrain Server, GET requests cannot make modifications to the server, so this rule provides read-only access to everyone. To only allow specified users or groups to read data on the server, double-click the first rule in the list and choose a radio button to specify an allowed user or group.
Users and groups refer to Windows users or groups on the web server. They can be qualified with a Windows domain name if necessary.
The next rule in the list grants all users full access (read and write) to the STK Terrain Server application. We recommend that you double-click this rule and select a user or group in order to limit write access. You can designate multiple users or groups by inserting additional, similar rules at the same position in the rule list.
The third rule in the list denies access to all users who weren’t granted access by previous rules. The fourth and subsequent rules in the list, which could be different on your server, are inherited from the parent web site.
With this configuration complete, web browsers will automatically prompt for login credentials when attempting to perform an action within the STK Terrain Server application that does not allow anonymous access. In some cases, the login may be automatic (no explicit prompt) when you’re logged into the server as a user that is allowed access, or if your network has a Windows domain and your domain user is allowed access.
If authentication doesn’t work - in particular, if you’re using Windows authentication and the server will not accept your credentials - here are some things to try.
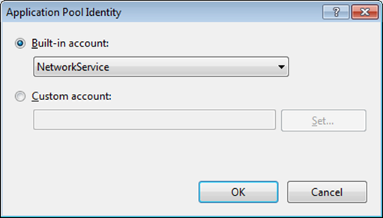
Configure the StkTerrainServerAppPool to use the NetworkService identity instead of the ApplicationPoolIdentity. This often helps because NetworkService is set up by default to work with Kerberos authentication on a Windows domain, whereas ApplicationPoolIdentity is not. In IIS Manager, select Application Pools in the tree on the left, and then click StkTerrainServerAppPool in the list. Click "Advanced Settings…" on the right. Under "Process Model" select "Identity" and then click the "…" button next to it. Under "Built-in account" select "NetworkService".
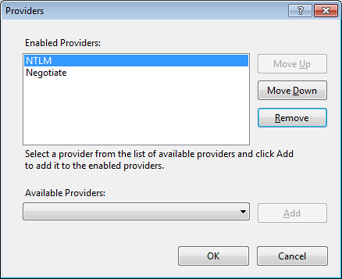
Configure Windows authentication to prefer NTLM over Negotiate. This may help when authenticating Windows domain users, because Negotiate will often choose to use Kerberos authentication in this scenario, which can be tricky to get working. Navigate back to the Authentication feature for the stk-terrain virtual directory in IIS Manager. Select Windows Authentication from the list and then click "Providers…" on the right. Move NTLM above Negotiate.
In the above sections, we showed how the STK Terrain Server can restrict anonymous users to read only access. For some, this level of security may not be adequate enough, as any user can still retrieve information on tilesets and datasources defined on the STK Terrain Server. Authorization of users to only have permissions to request tiles and tileset metadata can be achieved by using the Url Authorization Feature for IIS.
The Url Authorization Feature for IIS must first be enabled on your server. On Windows Server 2008 and 2012, Url Authorization is installed using Server Manager. Navigate to the IIS pane, scroll down to the Role Services section, and click the "Add Role Services" button or select "Add Roles and Features" from the Tasks drop-down. The feature is found under Web Server (IIS), Web Server, Security.
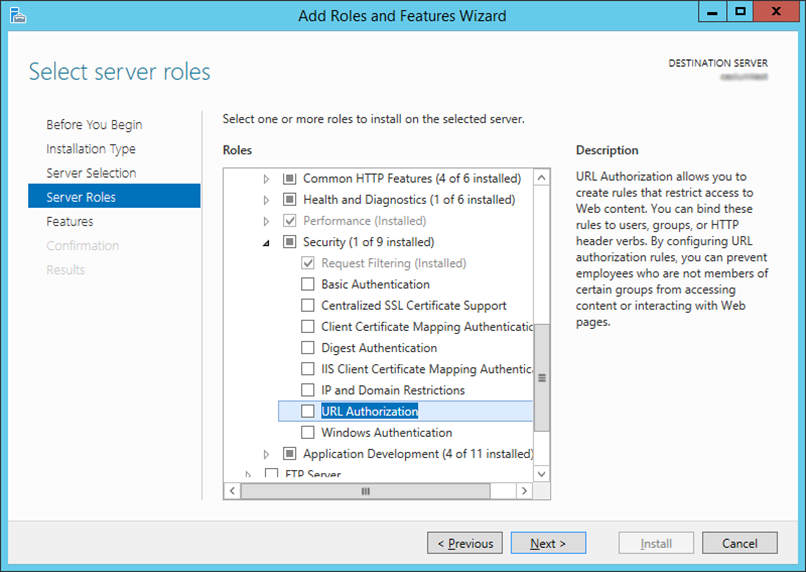
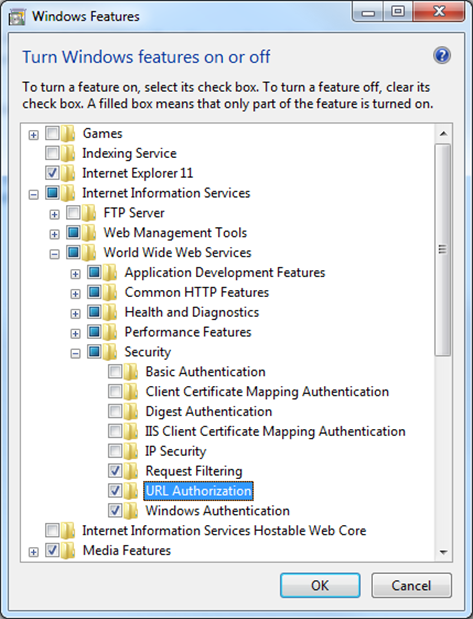
On Windows Vista, 7, 8, and 8.1, authentication mechanisms are installed via "Turn Windows features on or off", under Internet Information Services, World Wide Web Services, Security.
With URL Authorization enabled for IIS, authorization can now be configured for each REST webservice. Open the Web.Config file located at the root of the stk-terrain install directory. Inside the configuration element, a REST webservice virtual location can be identified and assigned authorization control. The following example would restrict the use of localhost/stk-terrain/admin REST API to only users in the StkTerrainServerAdmins user group.
Users and groups refer to Windows users or groups on the web server. They can be qualified with a Windows domain name if necessary.
Following the pattern illustrated in the example above, the "path" attribute can be configured for authorization of the following admin REST API end points:
| location path | Endpoint Description |
|---|---|
| admin/datasources | Returns json that defines the collection of datasources defined on the STK Terrain Server. |
| admin/datasources/{name} | Returns the json that defines the configuration of a named datasource. Named datasources will inherit the authorization defined at the datasources level; defining authorization rules for a named datasource will override the authorization above. |
| admin/settings | Returns json that defines the configuration settings for viewing a tileset. |
| admin/license | Returns json that describes the STK Terrain Server license state. |
| admin/datasources/files | Defines an interface for uploading files to a STK Terrain Server datasource. |
| admin/tilesets | Returns json that defines the collection of tilesets defined on the STK Terrain Server. This web service allows for the discovery of tilesets on the server, but provides admin information about the tileset, including the directory location of the tileset and status on the incorporation of data sources into this tileset, including percent complete and the time elapsed to incorporate the data source. |
The public REST API end points can also be configured for authorization control:
| location path | Endpoint Description |
|---|---|
| v1/tilesets | Returns json that defines the collection of tilesets defined on the STK Terrain Server. This web service allows for the discovery of tilesets on the server, but does not include the additional admin datasource processing information. |
| v1/tilesets/{name}/tiles |
Root path of all Terrain Server tiles. For legacy Cesium applications, the
v1 can be optional for tile and layer.json retrieval endpoints, however this unversioned REST API may be
deprecated in the future. These legacy endpoints are
|
| tilesets/{name}/tiles | Unversioned, legacy endpoint that maps to the same endpoint as v1/tilesets/{name}/tileset |