Access Tool
The STK Access tool has three primary functions:
- Enable you to select the objects and the time period associated with an individual access
- Enable you to manage all defined accesses
- Provide multiple methods to display your access results
You can open the Access tool in the following ways:
- Select it from the Analysis menu
- Right-click an object and select Access...
- Click the Access (
 ) button from the toolbar
Access tool layout
Once you open the Access tool, take a tour of the graphical user interface (GUI). It is broken up into areas, as depicted below.
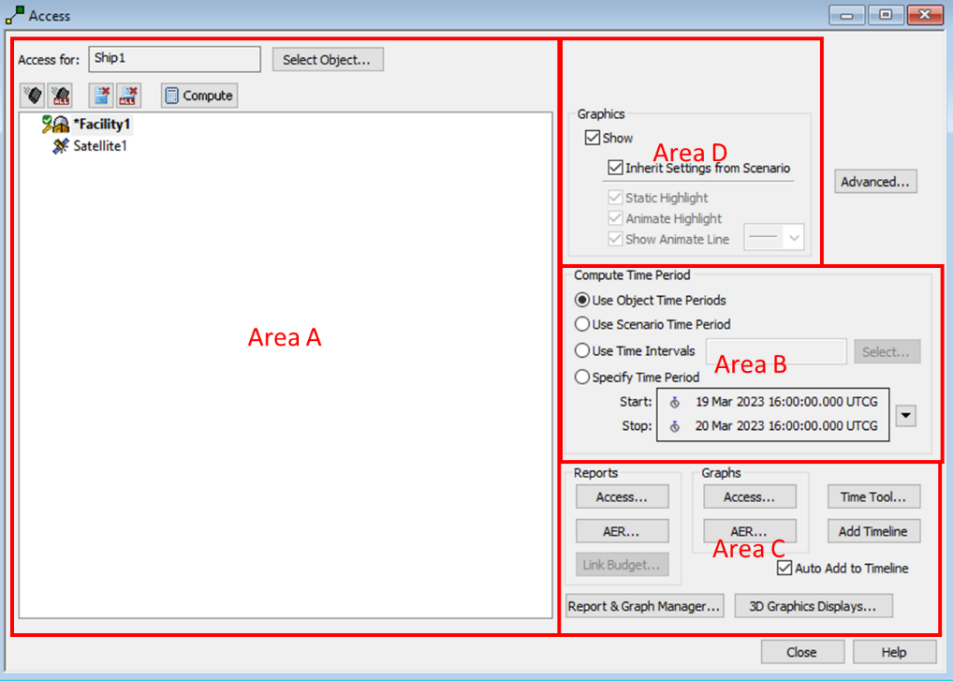
| Area | Description |
|---|---|
| Area A | Enables you to define the primary and associated objects. It also includes tools to manage your accesses, such as the Remove, Clear, and Compute buttons. |
| Area B | This is the location where you define the time period associated with the access. |
| Area C | This is the location where you can generate reports and graphs and show the accesses in the STK Timeline View. |
| Area D | Enables you to manage how your access graphics are displayed in the 2D and 3D Graphics windows. |
Choosing your primary and associated objects
When the Access tool opens, the object currently selected in the Object Browser is selected as the primary object. This is denoted in the Access For field at the top of the tool. If you want to change the primary object, click .
The list of objects under the primary object are the potential associated objects. You can make selections of associated objects using one of the following options:
- One object: Click an object in the list to select it as the associated object.
- Two or more objects: Hold down the Ctrl or Shift buttons to select two or more associated objects. This tells STK to compute accesses for each primary-associate object pairing.
- All objects of a certain type: Click one of the objects of your desired type (facility, satellite, etc.) in the list to select it. Then right-click the white space in Area A and select the option Select All XXX, where XXX is the object type. STK will compute accesses for all pairings from the primary object to each of the objects of that type.
Defining the Compute Time Period
Before computing the access, first establish the compute time period. In the Area B section, you see that the Access tool defaults to using the Object Time Periods. This means that STK computes access over the period when both the primary and associated objects exist.
The following table describes additional options that you can use to define the compute time period.
| Option | Description |
|---|---|
| Use Object Time Period | Computes access using the Start and Stop Time set for the objects. |
| Use Time Intervals | Computes access using a Time Intervals component from Analysis Workbench. |
| Specify Time Period | Computes access using a user-defined time period. |
STK can only calculate access between objects that have position data. Make sure your objects have ephemeris during the compute time period.
Computing access
Now that you defined your objects and compute time period, select the Compute (![]() ) button to calculate access intervals between the primary object and all of the selected associated objects.
) button to calculate access intervals between the primary object and all of the selected associated objects.
When STK finishes the computations, the associated object appears with its name in bold and preceded by an asterisk. In addition, a small key (![]() ) indicates that the object is an associated object, while a green (
) indicates that the object is an associated object, while a green (![]() ) circle with a check mark indicates that STK has computed access for that object.
) circle with a check mark indicates that STK has computed access for that object.
Visualizing access
You can visualize your access in the 2D or 3D Graphics windows. If you open the 2D Graphics window, you see that the vehicle ground tracks are highlighted to indicate periods of access. In both the 2D and 3D Graphics windows, during the animation you see a line appear between the primary and associated objects during times of access. These graphics can be modified using the Graphics settings in Area D.
Graphics settings are only applied when you compute the access. If graphics settings are updated for an access that is already computed, you need to recompute the access to update the access graphics with the new settings.
| Option | Description |
|---|---|
| Show | By default, STK displays access graphics in the 2D and 3D Graphics windows. Use this option to toggle all of the graphics on or off. Animation lines are only visible in the 3D Graphics window when both the primary and associated object are displayed. Even if you select this option, if the object's graphics or display time are turned off in the object properties, STK will not display the animation line. |
| Inherit Settings from Scenario | You can either define the settings or use the scenario's access settings, as defined in the 2D Graphics Global Attributes in the scenario's properties. Select this check box to inherit the scenario's settings. If you do, individual settings are grayed out. |
| Static Highlight | Highlights accesses whether or not the scenario is animating. This appears as a bold line on top of the ground track for the vehicle. |
| Animate Highlight | Displays a box around each object to indicate access during animation in the 2D Graphics window. |
| Show Animate Line | Displays a line between objects to indicate access during animation, using the user-defined line width. |
Viewing access data
After STK computes accesses, you can generate several types of reports and graphs that enable you to view specific types of access data, including the access time intervals, azimuth/elevation/range, and more. You can also view access intervals on the STK Timeline View.
| Option | Description |
|---|---|
| Access... | The standard Access report or graph shows the times of access between the objects. |
| AER... |
An AER report or graph computes azimuth, elevation, and range between the objects during periods of access. These values are based on the local coordinate system of the primary object. The range to a Star object, which is computed from its parallax, is reported as the (constant) distance to the star. Variation of this distance over time is not modeled. For additional details, see Access Coordinate Frames. To help you determine the trend of the data, the Access AER report includes at least three points during the Access period. |
| Link Budget... | This is a special access report for communications link budget analysis for an access between a Transmitter object and a Receiver object. |
| Report & Graph Manager... | Opens the Report & Graph Manager to the Access styles selected so that you can begin working with reports for that access. |
| AWB Time Tool... | Opens the Analysis Workbench Time tool with the Access styles selected so you can begin working with Time components for that access. |
| Add Timeline | Adds the access time intervals to the STK Timeline View. The Auto Add to Timeline check box is selected by default. |
| 3D Graphics Displays... | Opens the 3D Graphics Data Display to enable you to choose the dynamic data for the selected access in the 3D Graphics window. |
Managing accesses
In Area A, there are several tools to help you manage your accesses.
| Option | Description |
|---|---|
| Compute |
Calculates access between the primary and all of the selected associated objects. If the primary or associated object changes in such a way that access is impacted, STK automatically recomputes the access. If you remove either of the objects from the scenario, the associated access data is also removed. |
| Clear ( |
Deletes the computed data and graphics for the primary and currently selected associate object(s). However, the access and its settings still exist, as well as the AWB components. |
| Clear All ( |
Does the same as Clear, but for the primary and ALL associated objects. |
| Remove ( |
Deletes the computed data and graphics, and the association between the primary object and the currently selected associated object(s). Also, the settings are reset to their defaults for the selected associated objects. |
| Remove All ( |
Deletes the computed data and graphics, and association between the primary object and ALL associated object(s). Also the settings are reset to their defaults for ALL associated object(s). |
Finally, the associated objects in Area A form an access tree. You can expand ( ) and collapse (
 ) the items or the entire tree. You can select any of these options by right-clicking in the white space in Area A.
Advanced access options
To the right of Area D, you can click to open the Advanced Options dialog box. These options control event detection, step size control, light time delay, and signal path for the selected access. These values override their corresponding Access Settings.