Streamlining Development with the Java Delegate Code Generator
Overview
Behavior Execution Engine provides a Java delegate code generator that can generate delegate interfaces for all of the blocks in a SysML model, class stubs for the blocks, and a delegate provider that registers the delegate module with Behavior Execution Engine at runtime. These generated files include everything that Behavior Execution Engine needs in order to connect the delegates to the SysML model, enabling you to focus on the methods that need custom implementations. In this section, you will generate delegates for the UAV mission and install them for Behavior Execution Engine to use.
This section covers the following concepts:
- The Behavior Execution Engine delegate code generator
- Behavior Execution Engine delegate auto-implementation
- Behavior Execution Engine delegate providers
- Behavior Execution Engine delegate annotations
- Behavior Execution Engine delegate properties
- The Behavior Execution Engine delegate availability report
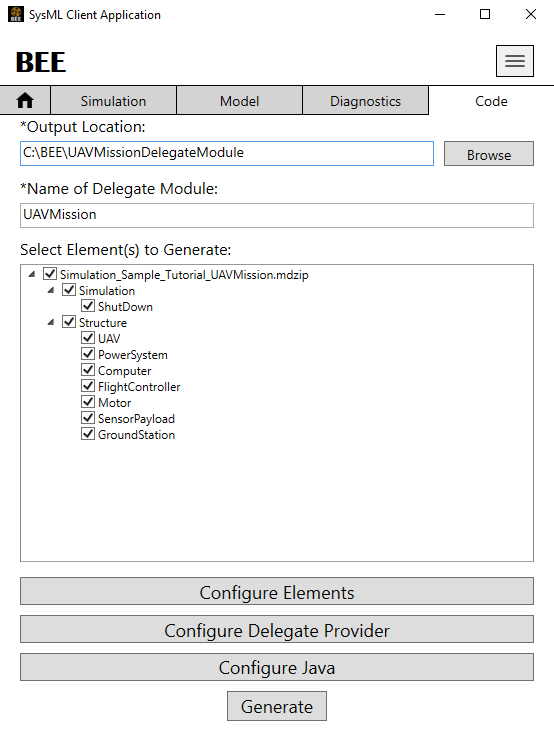
Figure A1: Java delegate code generation
Prerequisites
| Prerequisite | Description |
|---|---|
| Behavior Execution Engine Installation | You must have installed Behavior Execution Engine and have the prerequisites for developing delegates for Behavior Execution Engine. |
| Tutorial Project |
You must start this section with the delegate module project from the previous section. If you did not complete the previous section, you can use the delegate module project from the Behavior Execution Engine installation: \documentation\tutorialFiles\03\DelegateModules\UAVMissionDelegateModule, but you may still need to configure the delegate module for your environment. You also need the UAV Mission simulation project included alongside the delegate module project: \documentation\tutorialFiles\03\DelegateModules\UAVMission.mdzip |
| Recommended Reading |
Before completing this section, you may want to read the following help topics:
|
Instructions
Generate the delegates
You can use the Java delegate code generator to generate interfaces and class stubs for the blocks in your SysML model,
as well as a delegate provider that registers your delegate module with Behavior Execution Engine at runtime.
By including the AutoDelegate annotation on these interfaces and making abstract or concrete classes,
you will only need to implement the methods that need custom functionality.
Behavior Execution Engine will auto-implement the rest at runtime.
- Open the UAVMission.mdzip project specified in the prerequisites for this section using the SysML Client.
- Select Code Generation.
- In the Select Element(s) to Generate box, ensure that the Structure box is selected to include all elements that it contains in the delegate code generation. Deselect all other options.
- Set the Output Location text box to the UAVMissionDelegateModule directory.
-
Select . Enter
com.agi.moxie.tutorial.uavmissionin the Base Package for Java Code text box. Leave the Class Prefix and Class Suffix properties their default values. Select . - Select . Ensure that all selected elements have the Auto Delegate box checked. Set all elements to generate an Abstract Class. Select .
-
Select . Ensure that the Generate Build Files and
Generate Delegate Provider boxes are checked. Ensure all delegates are included in
Select Delegate(s) to Include in the Data Provider window. Select .
Because you already set up your Gradle build files in the previous section, this option will detect those build files and only generate the delegate provider and its SPI file. It will not overwrite the existing build files.
-
Enter
UAVMissionin the Name of Delegate Module text box.Figure B1: The Java delegate code generator
- Click , then click , and then close the Java delegate code generator.
- You should now see the generated interfaces, classes, and delegate provider in the UAVMissionDelegateModule\src\com\agi\moxie\tutorial\uavmission directory and its subdirectories.
Examine the delegate provider and SPI file
Behavior Execution Engine uses the Service Provider Interface (SPI) file to find the delegate provider at runtime.
-
In the
UAVMissionDelegateProviderclass:-
Notice the list of interfaces and classes returned by
provideDescriptor(). If you add more delegates to the project later, you will need to add them to this list. -
Notice the analysis tool controller returned by
provideDescriptor(). The code generator sets this to theBuiltInAnalysisToolController, but you will replace this with theStkControllerwhen connecting to the Ansys Systems Tool Kit® (STK®) application.
-
Notice the list of interfaces and classes returned by
-
In the UAVMissionDelegateModule\resources\META-INF\services\com.agi.moxie.spi.DelegateProvider file.
-
Notice the file only contains the fully qualified name of the delegate provider:
com.agi.moxie.tutorial.uavmission.UAVMissionDelegateProvider.
-
Notice the file only contains the fully qualified name of the delegate provider:
Examine an interface
In the ...\structure\UAV interface:
-
Notice the
@DelegateFor("Structure::UAV")annotation. This informs Behavior Execution Engine which SysML block the Java interface corresponds to.-
Only one class or interface may use a
@DelegateForannotation for any given block.
-
Only one class or interface may use a
-
Notice the
@AutoDelegateImplementationannotation. This instructs Behavior Execution Engine to implement missing SysML properties and operations at runtime.-
For example, the
processFlightPlan()SysML operation is only used as a call event, so its Java implementation does not need to do anything. Behavior Execution Engine will auto-implement theprocessFlightPlan()Java method with an empty body in memory at runtime.
-
For example, the
Examine a class
In the ...\structure\impl\UAVDelegate class:
-
Notice the
@AutoDelegateImplementationannotation. This does the same thing here as it does in the interface, so you can remove it from either the class or the interface if you want, but it does not hurt to leave it in both. -
Notice the
@DefaultDelegateannotation. This informs Behavior Execution Engine which class to use as the default implementation of the SysML block specified by a@DelegateForannotation.-
A
@DefaultDelegateannotation is required when multiple classes derive from the same class or interface that uses a@DelegateForannotation. Only one@DefaultDelegateannotation may be used in that hierarchy. -
If you have multiple SysML instance specifications that need to be implemented by different Java classes,
then you need to use the
MoxieJavaDelegatestereotype to specify which class to use for each instance specification.
-
A
-
Notice the
BasicPropertyandListPropertyJava fields for each of the UAV's SysML properties. These support change tracking of the SysML property values during the simulation. -
Notice the
@InjectByName("timeProvider")annotation in the constructor parameters. This instructs Behavior Execution Engine to inject theTimeProviderdependency from the analysis tool controller into the constructor so that it can be used within the delegate. -
Notice the
@OptionalInjectBySlotannotations in the constructor parameters. These instruct Behavior Execution Engine to inject their values from the SysML instance specification slots into the constructor so that they can be used within the delegate.-
The
@InjectBySlotannotation does the same thing, but does not allownullvalues.
-
The
Reinstall the delegate module
- If you are using an IDE, run the Gradle clean and then install tasks in your IDE to clean, assemble, and reinstall the delegate module.
- If you are not using an IDE,
open a Command Prompt (cmd) and enter
cd C:\BehaviorExecutionEngine\UAVMissionDelegateModule, replacing the path to your delegate module project as necessary. Then entergradle clean installin the Command Prompt. - After the build completes, confirm that there were no errors.
Check the SysML project simulation configuration
After deploying your delegates, remember to check the SysML project. The stereotypes applied to the simulation may affect which delegates are loaded for different simulations. By default, if the MoxieDelegateModulePaths stereotype is NOT applied, the simulation will attempt to load ALL the delegates available in your Delegate Home Directory that you can find in the SysML Client Settings.
- In your SysML modeling tool, open the \documentation\tutorialFiles\03\DelegateModules\UAVMission.mdzip and look for the simulation instance (the one with the MoxieSimulation stereotype applied with the Ansys logo).
- Examine the stereotypes applied to that InstanceSpecification and look at the Tags.
- To load the new module, the relative path to the newly deployed delegate module as well as the STK application delegate must be specified. Add the following entries to the HomeRelativePaths tag if they do not already exist: sample-tutorial-uav-mission and com.agi.moxie.stk
- Remember to save the MDZIP project before reloading it in the SysML Client.
When finished, the InstanceSpecification for your simulation should look like one of these examples:
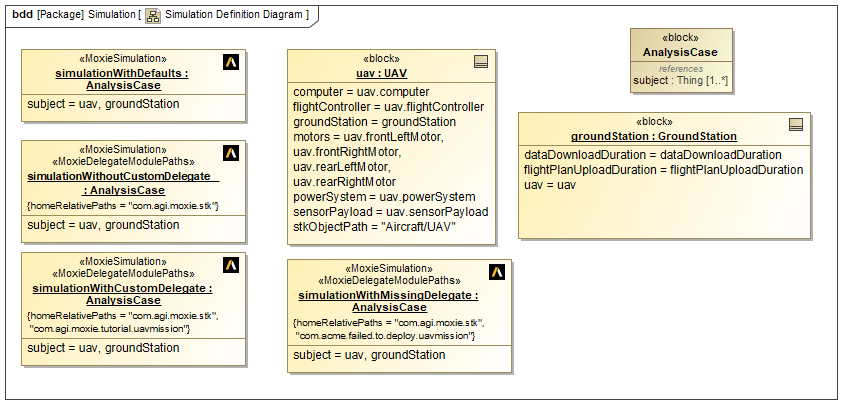
Figure B2: Delegate Module Path Configuration
Running Diagnostics for Delegate Modules
Behavior Execution Engine provides a delegate availability report that lists all the delegates that are currently installed and available to the simulation and the SysML blocks that they correspond to. This list includes the delegates that are part of Behavior Execution Engine itself.
- To test the behavior of various configurations, load the \documentation\tutorialFiles\03\DelegateCodeGeneration\UAVMission.mdzip, which includes three different examples as shown in Figure B2 above.
- In the SysML Client, select Diagnostics > Delegate Availability Report.
-
Look at the different simulations and note whether the
UAVMissionDelegateProvideris included or not. - On the simulationWithCustomDelegate selected, notice the list of delegate classes includes the Java interface and class for each of the SysML blocks in your project.
- Lastly, go to the Simulation tab and select the simulationWithMissingDelegate. Notice how running that simulation produces an error indicating that the delegate modules failed to load because the com.acme.failed.to.deploy.uavmission was missing.
If there is a spelling error, an incorrect path, a missing file, or otherwise an incorrect value in the stereotype, the simulation will fail by default unless you adjust the Settings to allow simulations to proceed with missing delegate modules. Generally, cases where you want to proceed by ignoring delegate module loading errors are rare. However, during delegate code development, you may want to observe the differences between the default Auto-Implementation and the effects of your new modules. To get this, we recommend you use an approach shown in Figure B2 and create different simulations with different configurations rather than ignoring errors that are likely to produce more obscure errors later during execution.
Similarly, this approach of creating different simulations for different purposes can help in cases where there are different sets of instances you want to participate or different versions of delegates that you want to try in quick succession during development. So, while this tutorial will proceed with a single simulation, feel free to create as many as is useful to you and name them appropriately.
Next Section >