Scheduling Transitions with Time Events
Overview
Most complex simulations require the execution of behaviors at specific times, which you can do with either absolute or relative time events. Absolute time events allow you to specify a precise moment in time to trigger a transition, while relative time events allow you to specify a time duration to wait before triggering a transition. In this section, you will use time events to specify the simulation time at which the computer should turn on the power system, and how long to wait before checking whether or not the power system successfully turned on.
This section covers the following concept:
- Absolute and relative time events
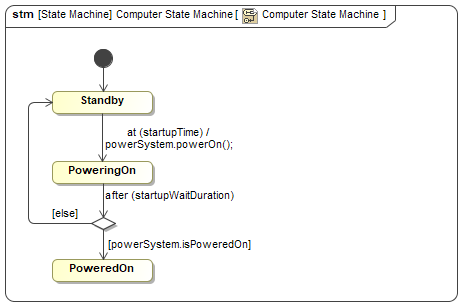
Figure A1: Absolute and relative time events
Prerequisites
| Prerequisite | Description |
|---|---|
| Moxie Installation | You must have installed Moxie. |
| Tutorial Project | You must start this section with the Moxie simulation project from the previous section. If you did not complete the previous section, you can use the following project from the Moxie installation: \documentation\tutorialFiles\02\CallEvents.mdzip |
| Recommended Reading |
Before completing this section, you may want to read the following help topics:
|
Instructions
Add startup time and wait duration properties
For absolute time events, Moxie requires the specific moments in time to derive from Moxie-Base::Structure::TimeInstant.
Similarly, for relative time events, Moxie requires the durations to derive from Moxie-Base::Structure::TimeDuration.
- Open the project from the previous section.
-
In the Containment Tree,
right-click the Structure >
Computerblock and select Specification (or press ). - Select Properties from the left pane of the window and click > Part Property.
-
Set the Name to the string startupTime,
set the Type to
Iso8601TimeInstant, and click . - Click > Part Property again.
-
Set the Name to the string startupWaitDuration,
set the Type to
FixedDuration, and click .
Create instance specifications for the properties
-
In the Containment Tree,
select both Moxie-Base > Structure >
Iso8601TimeInstantandFixedDurationblocks. Then right-click them and select Tools > Create Instance.... -
In the 1. Select parts page,
set the
Iso8601TimeInstant>timevalue to2022-02-22T22:22:22.222222Zand theFixedDuration>secondsvalue to30. Then click . - In the 2. Select a package page, select the Simulation package and click .
- In the 3. Create a diagram page, clear the Create a new diagram checkbox and click .
-
In the Containment Tree,
rename the new
iso8601TimeInstantinstance specification tostartupTimeand the newfixedDurationinstance specification tostartupWaitDuration.
Assign the instance specifications to the computer
- Open the Instance Specification Diagram.
-
Drag the Simulation >
startupTimeinstance specification from the Containment Tree into theuav.computerinstance specification on the diagram and click . -
(Optional)
Click the Link button (
 ) on the context toolbar next to the
startupTimeinstance specification. Then click on theuav.computerinstance specification to add the link. -
Drag the Simulation >
startupWaitDurationinstance specification from the Containment Tree into theuav.computerinstance specification on the diagram and click . -
(Optional)
Click the Link button () on the context toolbar next to the
startupWaitDurationinstance specification. Then click on theuav.computerinstance specification to add the link.
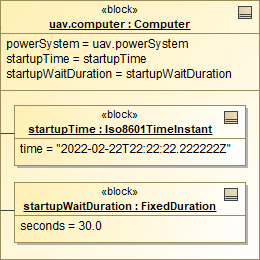
Figure B1: The computer instance specification
Add time events to the computer state machine
The times and durations specified by events always refer to the simulation time, not real time. So when executing a simulation, Moxie jumps the simulation time to each next event, rather than waiting for a specific moment or delay in real time. Jumping the simulation time also allows Moxie to model time continuously instead of in discrete steps, which is very important when integrating external analysis into your simulation.
-
In the Computer State Machine diagram,
double-click the transition from
StandbytoPoweringOn. - In the Trigger category, set the Event Type to TimeEvent.
-
Set When to the string
startupTime, (optionally) add a line break at the start of the Effect Body and Language, and click . -
Double-click the transition from the
PoweringOnstate to the choice pseudostate. - In the Trigger category, set the Event Type to TimeEvent.
-
Set When to the string
startupWaitDuration, set Is Relative totrue, and click .
Figure B2: The computer time events
Examine the simulation state history log
-
Run (
 ) the simulation.
- Select Moxie > Open Log File Directory in File Explorer (or press ).
- Open moxie_simulation.json in a text editor.
-
Notice that the
simulationTimefor exiting the computerStandbystate is2022-02-22T22:22:22.222222Z, as specified by the absolute time event. -
Notice that the
simulationTimefor exiting the computerPoweringOnstate is2022-02-22T22:22:52.222222Z, as expected due to the 30-second delay of the relative time event. - Save your work before continuing.
Next Section >