ODTK Plugin Programming Guide
The Ansys Orbit Determination Tool Kit (ODTK®) application has the capability to call user-defined code at the following plugin points:
- Scenario.Measurements.Files - These are custom readers associated with tracking data files.
- Satellite.ForceModel.Plugin - You can supply additional force modeling for the HPOP propagator.
- Satellite.ForceModel.SolarPressure.Model=ReflectionPlugin - You can define custom states for LightReflection modeling (SolarPressure, Albedo, Thermal radiation, etc.).
- Satellite.ForceModel.Drag.Model=DragModelPlugin - You can define custom states for drag modeling (CD, CL, etc.).
- GPSReceiver.MeasurementProcessing.SatelliteSelection.Method=Plugin- Add a GPS Satellite Selection algorithm specific to the GPS receiver being modeled by the ODTK software.
- {Simulator,Filter}.Events - You can have the software invoke custom scripts for OnStart, OnHalt, OnComplete, OnInternalError, and OnNoMoreMeas events.
- Satellite.FilterEvents - You can have the software call custom scripts when an incoming measurement triggers MeasurementRejectThreshold or MeasurementAcceptTimer events.
All interfaces are implemented using COM, and you can program plugins using a variety of scripting and compiled languages that support COM.
The ODTK application comes with plugin point examples written in C++, C#, VBScript, JScript, and Perl.
Examples shipped with the ODTK install are available at <Install_Dir>\CodeSamples. To test run the plugins, load a solution file into VS.NET and select “Build All”. Then start the ODTK application and load the file TestScenario.sco. Running simulator will call the plugins and you can see their output in the message viewer.
In addition to this guide, refer to the help section “Integrating with ODTK: ODTK Plugins” for details on the plugin interfaces, methods, and properties.
Plugin registration
After writing a plugin in the language of your choice, you must register it:
- Register plugins into the Microsoft Windows registry by using the Windows commands regasm or regsvr32 (see ODTK Plugins: Plugin Components).
- To register plugins with the ODTK application:
- Add Measurement Providers to the Tools >> Options >> Plugin menu and associate them with the file name extension of your tracking data files.
- Register HPOP force model, SRP Light Reflection, and GPS Satellite Selection plugins by placing an XML registration file, similar to the one below, into either of the following folders:
<Install_Dir>\Plugins or
C:\Users\<username>\Documents\STK_ODTK 13\Plugins
<?xml version = "1.0"?>
<AGIRegistry version = "1.0">
<CategoryRegistry>
<Category Name = "LightReflection">
<Plugin DisplayName="SRP.Spherical.Perl" ProgID="AGI.SRP.LightReflection.Spherical.Perl.Example"/>
<Plugin DisplayName="SRP.Spherical.CSharp" ProgID="AGI.SRP.LightReflection.Spherical.CSharp.Example"/>
<Plugin DisplayName="SRP.NPlate.2P.Perl" ProgID="AGI.SRP.LightReflection.NPlate.2Parameter.Perl.Example"/>
</Category>
<Category Name = "HPOP Plugins">
<Plugin DisplayName="TDRS.SRP.Perl" ProgID="AGI.HPOP.ForceModels.TDRS.SRP.Perl.Example"/>
<Plugin DisplayName="TDRS.SRP.CSharp" ProgID="AGI.HPOP.ForceModels.TDRS.SRP.CSharp.Example "/>
<Plugin DisplayName="TDRS.SRP.VB.NET" ProgID="AGI.HPOP.ForceModels.TDRS.SRP.VB.NET.Example "/>
</Category>
<Category Name = "GPSSatSelect">
<Plugin DisplayName="CPP.SimplePDOP" ProgID="AGI.GPS.SatSelect.Simple.PDOP"/>
<Plugin DisplayName="CSharp.Example" ProgID="AGI.GPS.SatSelect.CSharp.Example"/>
<Plugin DisplayName="JScript.Example" ProgID="AGI.GPS.SatSelect.JScript.Example"/>
<Plugin DisplayName="VBScript.Example" ProgID="AGI.GPS.SatSelect.VBScript.Example"/>
</Category>
<Category Name = "DragModel">
<Plugin DisplayName = "Drag.Spherical.Perl" ProgID = "AGI.Drag.Spherical.Perl.Example"/>
<Plugin DisplayName = "Drag.NPlate_Cube.Perl" ProgID = "AGI.Drag.NPlate_Cube.Perl.Example"/>
<Plugin DisplayName = "Drag.Lift.Perl" ProgID = "AGI.Drag.Lift.Perl.Example"/>
</Category>
</CategoryRegistry>
</AGIRegistry>Important environment settings
The ODTK application interacts with plugins using COM interfaces defined in several DLLs delivered with the application. The following steps will point your Visual Studio 2017 project to those DLLs:
For C# and VB.NET, go to Project >> Add Reference… >> COM >> Browse… >> select:
<Install_Dir>\bin\ {AgAttrAutomation.dll, AgUtPlugin.dll, AgAsGPS.dll}
For C++ projects, add the path to the ODTK bin directory to the following places:
- Project >> Properties >> C/C++ >> General >> “Additional Include Directories"
- Project >> Properties >> MIDL >> General >> “Additional Include Directories"
Make sure .NET projects have Configuration Properties >> Register for COM Interop >> True and C++ projects perform COM registration in Build Events >> Post-Build Event >> regsvr32.
C++ Measurement Data Provider
The following steps will take you through the creation of the plugin in Visual Studio 2017.
- File >> New Project >> Visual C++ Projects >> ATL Project >> Name: MyMeasProvider
- Project >> Add Class >> ATL Simple Object
- View >> Class View >> Right-Click CSimpleObsReader >> Add >> Implement Interface
- Implement Interface from: File: AgMach10.dll
- Available type libraries: IAgProvideTrackingDataLib
- Interface: IAgProvideTrackingData
- Insert code snippets listed below into the .h and .cpp files generated by Visual Studio wizard.
- Build >> Build Solution. Build will automatically register MyMeasProvider.dll COM objects.
- In the ODTK application, go to Tools >> Options >> Plugins >> Add: MyMeasProvider.SimpleObsReader and associate it with the extension myObs. Using any .myObs file as input will invoke the reader.
In ATL Project Wizard >> Application Settings >> Server Type: Dynamic-link Library
In ATL Simple Object Wizard >> Names >> Short Name: SimpleObsReader
In Implement Interface Wizard choose:
Insert this code into SimpleObsReader.h CSimpleObsReader class definition:
double m_Min;
std::string m_FileName;
IAgODGenericObsPtrm_pObs;
IAgODObsSetPtrm_pObsSet;
STDMETHOD(Reset)();
STDMETHOD(OpenFile)(BSTR name, VARIANT_BOOL newFile);
STDMETHOD(GetObsSet)(IAgODObsSetCollection * pColl, long * pNum);
STDMETHOD(get_FileName)(BSTR * pVal)
{
*pVal = CComBSTR(m_FileName.c_str()).Detach();
return S_OK;
}
STDMETHOD(get_SupportsSave)(VARIANT_BOOL * pVal)
{
*pVal = VARIANT_FALSE;
return S_OK;
}Insert this code into SimpleObsReader.cpp:
STDMETHODIMP CSimpleObsReader::OpenFile(BSTR name, VARIANT_BOOL newFile)
{
USES_CONVERSION;
// Open data file, initialize counters, etc...
m_Min = 0;
m_FileName = W2A(name);
if( /* file open error */ 0 )
{
return E_FAIL;
}
// Create objects to communicate with ODTK
m_pObsSet.CreateInstance(CLSID_CAgODObsSet);
m_pObs.CreateInstance(CLSID_CAgODGenericObs);
return S_OK;
}
STDMETHODIMP CSimpleObsReader::Reset()
{
// Rewind data file, release memory, etc...
m_Min = 0;
return S_OK;
}
STDMETHODIMP CSimpleObsReader::GetObsSet(
/*[in]*/ IAgODObsSetCollection *pObsSetColl,
/*[out,retval]*/ LONG *pNumObsSet )
{
long jdn;
double mam;
IAgPropQtyPtr pQty;
IAgPropDatePtr pDate;
(*pNumObsSet)=0;
if( m_Min >= 300 ) return S_OK; // Only have 5 hours of "data"
// Each ObsSet contains several measurements at the same time
m_pObsSet->Clear();
m_pObsSet->get_Date(&pDate);
pDate->put_Unit(CComBSTR("UTCG"));
pDate->put_Value(CComBSTR("1 Jan 200608:00:00"));
m_pObsSet->get_JulianDay(&jdn);
m_pObsSet->get_MinAfterMidnight(&mam);
m_pObsSet->put_MinAfterMidnight(mam + m_Min);
m_pObs->put_JulianDay(jdn);
m_pObs->put_MinAfterMidnight(mam + m_Min);
m_pObs->get_Value(&pQty);
// Setting MeasType will set correct Dimension and internal Unit
m_pObs->put_MeasureType(eMTRange);
pQty->put_Unit(CComBSTR("km"));
pQty->put_Value(1000.0 + m_Min);
m_pObsSet->Add(m_pObs);
m_pObs->put_MeasureType(eMTAzimuth);
pQty->put_Unit(CComBSTR("deg"));
pQty->put_Value(30.0 + m_Min);
m_pObsSet->Add(m_pObs);
m_pObs->put_MeasureType(eMTElevation);
pQty->put_Unit(CComBSTR("deg"));
pQty->put_Value(30.0 + m_Min/100.0);
m_pObsSet->Add(m_pObs);
pObsSetColl->Add(m_pObsSet); // Push ObsSet into ODTK
(*pNumObsSet)++;
m_Min += 1.0; // Advance timer ...
return S_OK;
}C++ plugin for GPS SatSelection
The following steps will take you through creation of the GPS SatSelection plugin in VS 2017.
- File >> New Project >> Visual C++ Projects >> ATL Project >> Name: MyGPSSatSelect
- Project >> Add Class >> ATL Simple Object
- View >> Class View >> Right-Click CFancyGPSReceiver >> Add >> Implement Interface
- Add the following code to the stdafx.h file (right after #pragma once).
- Write some code for CFancyGPSReceiver::Init(), Evaluate(), and Free() using <Install Dir>\CodeSamples as a reference or replace return E_NOTIMPL; with return S_OK;.
- Build >> Build Solution. Build will automatically register MyGPSSatSelect.dll COM objects.
- Create MyFancySatSelect.xml in the folder <User>\Documents\STK_ODTK 13\Plugins\ with the following content:
- Start the ODTK application and create a new scenario with a GPS Constellation, a Simulator, and a Satellite with a GPS Receiver subobject. Change GPSReceiver.MeasurementProcessing.SatelliteSelection.Method to Plugin and pick “MyFancyGPSReceiver” from the list. Run Simulator to see your plugin being called.
In ATL Project Wizard >> Application Settings >> Server Type: Dynamic-link Library
In ATL Simple Object Wizard >> Names >> Short Name: FancyGPSReceiver
<Install_Dir>\bin\AgUtPlugin.dll > IAgUtPluginConfig
<Install_Dir>\bin\AgAsGPS.dll > IAgAsGPSSatSelectPluginEngine
#include <atlbase.h>
#include <atlcom.h>
#import "AgAttrAutomation.dll" raw_interfaces_only, no_namespace
<?xml version = "1.0"?>
<AGIRegistry version = "1.0">
<CategoryRegistry>
<Category Name = "GPSSatSelect">
<Plugin DisplayName = "MyFancyGPSReceiver" ProgID = "MyGPSSatSelect.FancyGPSReceiver"/>
</Category>
</CategoryRegistry>
</CategoryRegistry>VBScript, JScript, and Perl plugins
A good method for getting started is to grab one of the examples that came with the ODTK install from <Install_Dir>\CodeSamples\Extend\ODTK and customize it with your own code.
SRP Light Reflection and Drag Model plugins
The Light Reflection plugin for SRP modeling and the Drag Model plugin for drag modeling provide two major advantages over the HPOP force model plugin:
- You can define and estimate model parameters, where the model parameters are modeled as Gauss Markov parameters.
- You can model the light reflection or drag in the body frame and delegate the ODTK application to do the conversion to the inertial (or fixed or RIC or NTC) frame.
The Light Reflection interface methods and properties are defined in the AgAsHpopPlugin project. The IAgAsLightReflectionPlugin interface object defines interfaces that the plugin component must satisfy. You can define control parameters using the AgAttrAutomation project.
The Drag Model interface method and properties are also defined in the AgAsHpopPlugin project. The IAgAsDragModelPlugin interface object defines interfaces that the plugin component must satisfy. You can define control parameters using the AgAttrAutomation project.
An overview of the drag and light reflection model plugin components:
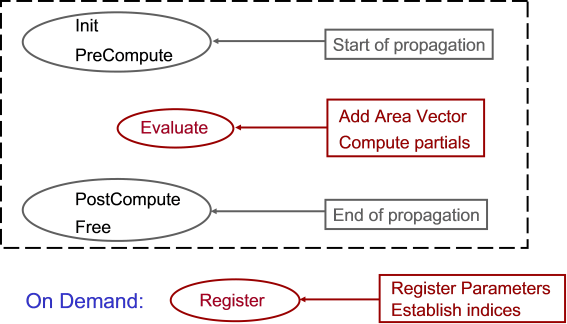
The required output of the plugin component is:
- Area vector in satellite (body | inertial | fixed | RIC | NTC) frame
- Partials of area vector with respect to model parameters
- Partials of area vector with respect to satellite position and velocity
SRP Light Reflection plugin (Perl example)
- Start in directory <Install_Dir>\CodeSamples\Extend\ODTK\SRP.LightReflection\WSC.
- Copy SRP.Reflection.Spherical.Perl.pl to SRP.Reflection.UniqueShape.Perl.pl.
- Copy SRP.Reflection.Spherical.Perl.wsc to SRP.Reflection.UniqueShape.Perl.wsc.
- In the .wsc file, update the GUID with a new value (Tools >> Create GUID in VS 2008).
- In the .wsc file, set the progid to ”Reflection.UniqueShape.Perl” and update the description accordingly.
- At the end of the .wsc file, enter the correct name of the file that will host the code for your plugin:
<script language="PerlScript" src="SRP.Reflection.UniqueShape.Perl.pl"/> - Modify the plugin component code to incorporate the new SRP model.
- Register the new plugin by running regsvr32 SRP.Reflection.UniqueShape.Perl.wsc.
- Create the new XML file or add the following line to the LightReflection category of an existing XML file:
- Launch the ODTK application and set Satellite.ForceModel.SolarPressure.Model to ReflectionPlugin and pick “SRP.Reflection.W84” from the dropdown list of plugins.
<Plugin DisplayName = "SRP.Reflection.W84" ProgID = "Reflection.UniqueShape.Perl"/>
Drag Model plugin (Perl example)
- Use the same technique as in the SRP LightReflection example above.
- Drag model files are in <Install_Dir>\CodeSamples\Extend\ODTK\DragModels\WSC.
- The XML plugin category is DragModel.
- The satellite force model plugin point is Satellite.ForceModel.Drag.Model.
HPOP Force Model plugin
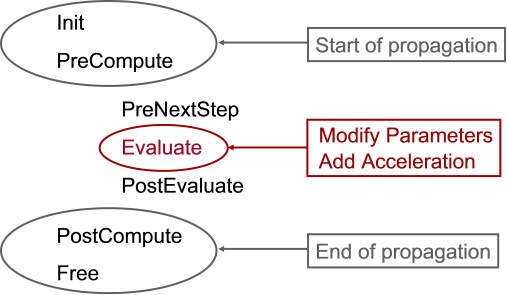
The HPOP Force Model plugin enables you to define a new custom acceleration model or to modify the current acceleration computations for the existing SRP or Drag acceleration models, with the restriction that you are constrained by the current model as to which parameters can be estimated.
The HPOP force model interface method and properties are defined in the AgAsHpopPlugin project. The IAgAsHPOPPlugin interface object defines interfaces that the plugin component must satisfy. You can define control parameters using the AgAttrAutomation project.
An overview of the HPOP force model plugin component is as follows, where the required plugin component output is the computed inertial acceleration vector.
HPOP Force Model plugin (Perl example)
- Use the same technique as in the SRP LightReflection example above.
- The category name is “HPOP Plugins” and the plugin point is Satellite.ForceModel.Plugin.
Custom scripts for event handling
You can implement event handlers in VBScript, Jscript, and Perl. The file name extension is determined by the scripting language used. The file name is determined by the function called to handle the event. Error messages and the object generating the event are passed to the called function.
For example, if Simulator.Events.OnComplete is set to be handled by C:\Test\BeepOnce.js then the Jscript code should look like this:
function BeepOnce(msg,simObj)
{
var odtk = simObj.Parent.Parent.Application;
odtk.WriteMessage("BeepOnce for " + simObj.name + " Msg was:" + msg,"info");
}More examples are in <Install_Dir>\ODTK\AppData\Scripts.