Part 16:
In this lesson you will utilize the Excel Developer Tab. If the Developer Tab does not appear in your Menu Ribbon, then please follow the steps on the Microsoft Help site to enable the feature.
Create an Excel Spreadsheet to Use with STK
Watch the following video, then follow the steps below incorporating the systems and missions you work on (sample inputs provided).- Launch Excel and create a new Spreadsheet (if not already open), save your excel file as a .xlsm file.
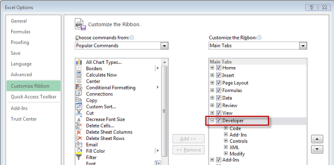
- Select the Developer tab. If you do not see the Developer tab, right-click on the toolbar above the spreadsheet > “Customize the Ribbon …” and check the Developer box
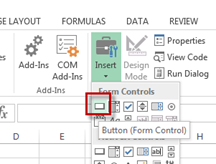
- Click the Insert icon and add a Form Controls-Button.
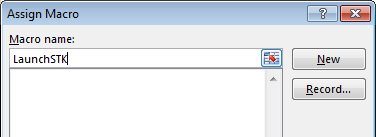
- When assigning a Macro name, use LaunchSTK, then click New. If you missed the new part, you can right-click on the button > Assign Macro, double-check the name and click New.
- Rename the button to "Launch STK"
Create an STK Instance from Excel
You will use the Excel script file to build a simple STK scenario from which you will extract data into Excel. You can use VB script or object model and for automation you can use your preferred method, connect will be demonstrated in this example.
Create a new instance of STK11.
- In the module window of the Visual Basic editor, type the following code before Sub LaunchSTK(). This creates the global variables.
- Type the following code within Sub LaunchSTK() to create a new instance of STK
- Test this Sub. You can run it by either pushing the "Launch STK" button or by selecting the Sub and clicking the green Run button
Dim app
Dim root
Dim scenario
'create new instance of STK

Set app = CreateObject("STK.Application")

' connect to an already running instance of STK
' Set app = GetObject(, "STK.Application")
app.Visible = True
' Grab a handle on the STK application root

Set root = app.Personality2
Create a New STK Scenario from Inside Excel
Now that you have launched STK via the Excel interface, let's see if we can create a new scenario and set the time period via Excel.
- Create a new button called "Create Scenario" that calls a macro names CreateScenario.
- In Excel, copy and paste all the code from the Editor window (to included comments (')) from Task 2 and paste it into Sub CreateScenario().
- Run this new Sub.
' TASK 2

' Create a new scenario.

root.NewScenario("ExcelWebinar")

Set scenario = root.CurrentScenario

‘ Set the analytical time period.

notUsed = scenario.SetTimePeriod("Today", "+24hr")

' Reset the animation time.

notUsed = root.Rewind()
Insert and Configure Objects
With a new scenario created, it's time to populate the scenario with objects. Let's create a number of Target objects and a satellite from Excel.
-
Insert Target objects names, and random latitudes and longitude into Excel. I will be using column F for the target name, column G for the latitude and column H for longitude.
Add column headers for
- Target Name
- Latitude
- Longitude
-
Add the values. The name will be simply Target1 while latitude and longitude will be a random location between -90 – 90 and -180 – 180 respectively

-
Select the three lower cells and pull them down until we have 25 targets.
- Create a new button called “Insert Targets” that calls a marco names InsertTargets.
-
In Excel, copy and paste all the code from the Editor window (to included comments (')) from Task 3.a and paste it into Sub InsertTargets().
- Create a new button called "Insert Satellite" that calls a macro names InsertSatellite
- In Excel, copy and paste all the code from the Editor window (to included comments (‘)) from Task 3.b and paste it into Sub InsertSatellite().
- Run this Sub
' TASK 3.a


' Add a target object to the scenario.


For i = 2 to 26

 Dim target

 Set target = root.CurrentScenario.Children.New(23, Range("F" & i).Value)

 ' Move the Target object to a desired location.

  notUsed = target.Position.AssignGeodetic(Range("G" & i).Value, Range("H" & i).Value, 0.0)

Next
' TASK 3.b

' Add a Satellite object to the scenario.

Dim satellite

Set satellite = root.CurrentScenario.Children.New(18, "LeoSat")

' Propagate the Satellite object's orbit.

root.ExecuteCommand ("SetState */Satellite/LeoSat Classical TwoBody UseScenarioInterval 60 ICRF ""UseAnalysisStartTime"" 7200000.0 0.0 90 0.0 0.0 0.0")
The SetState Classical Connect command and syntax can be found here.
Compute Access Between Objects and Retrieve Data From STK
You now have a scenario with a Target object and a Satellite object. Determine when the Satellite object can access the first Target object.
- Create a new button called “Compute Access” that calls a marco named ComputeAccess.
- In Excel, copy and paste all the code from the Editor window (to included comments (‘)) from Task 4.a and paste it into Sub ComputeAccess().
- Let's now retrieve and view the access data in Excel.
- In Excel, copy and paste all the code from the Editor window (to included comments (‘)) from Task 4.b and paste it into the bottom of Sub ComputeAccess().
- Run this new Sub
- We need to format the access start and stop time correctly. Select the cell containing the start and stop times, right-click on the selection, open the Format Cells option and set the format to dd mmm yyyy hh:mm:ss.000. Alternatively, this can be done through the script with
' Task 4.a

' Compute Access between the satellite and the target

Dim sat

Set sat = root.GetObjectFromPath("Satellite/LeoSat")

Dim tar1

Set tar1 = root.GetObjectFromPath("Target/Target1")

Dim access

Set access = sat.GetAccessToObject(tar1)

'Compute access

access2 = access.ComputeAccess()
' Task 4.b

‘ Pull the data of interest out of the access object
Dim dp
Set dp = access.DataProviders("Access Data")
Dim results
Set results = dp.Exec(scenario.StartTime, scenario.StopTime)
accessNumber = results.DataSets(0).GetValues()
accessStart = results.DataSets(1).GetValues()
accessStop = results.DataSets(2).GetValues()
accessDuration = results.DataSets(3).GetValues()

‘ Write column header
Range("J1") = results.DataSets(0).ElementName
Range("K1") = results.DataSets(1).ElementName
Range("L1") = results.DataSets(2).ElementName
Range("M1") = results.DataSets(3).ElementName

‘ Write the data into Excel.
For i = 0 To UBound(accessNumber)
Range("J" & i + 2) = accessNumber(i)
Range("K" & i + 2) = accessStart(i)
Range("L" & i + 2) = accessStop(i)
Range("M" & i + 2) = accessDuration(i)
Next
ActiveSheet.Columns("K").Select
Selection.NumberFormat = "dd mmm yyyy hh:mm:ss.000"

ActiveSheet.Columns("L").Select

Selection.NumberFormat = "dd mmm yyyy hh:mm:ss.000"
Compute Access Between Objects and Retrieve Data From STK
Create a new button called “Report Satellite LLA” that calls a marco named ReportSatelliteLLA. Retrieve and view the altitude of the satellite during an access interval.
- In Excel, copy and paste all the code from the Editor window (to included comments (')) from Task 5 and paste it into Sub ReportSatelliteLLA().
- Click Enter.
' Task 5

' Take the satellite data and bring it into Excel

Dim lla

Set lla = root.ExecuteCommand("Report_RM */Satellite/LeoSat Style ""Installed Styles/LLA Position""")

' Read the data into Excel.

 Report_RM places a blank line at the end of the report, use Count - 2

For i = 0 To lla.Count - 2

  Dim thisLineSplit

  thisLineSplit = Split(lla(i), ",")


  Range("M" & i + 1) = thisLineSplit(0)

  Range("N" & i + 1) = thisLineSplit(1)

  Range("O" & i + 1) = thisLineSplit(2)

  Range("P" & i + 1) = thisLineSplit(3)

Next
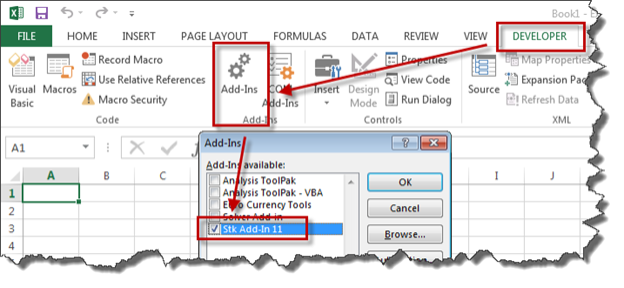
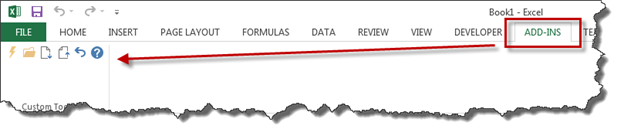
Use the Excel Add In to Pull Data from STK
If you want to simply pull data from STK into Excel or pass certain data types from Excel into STK, the Excel add-in may already do what you want you need. You can get the install from the Software Downloads area on the AGI.com support page.
- Once the add-in is installed, enable it in Excel.
- Restart Excel and you will see the STK options under the Add-ins Ribbon.
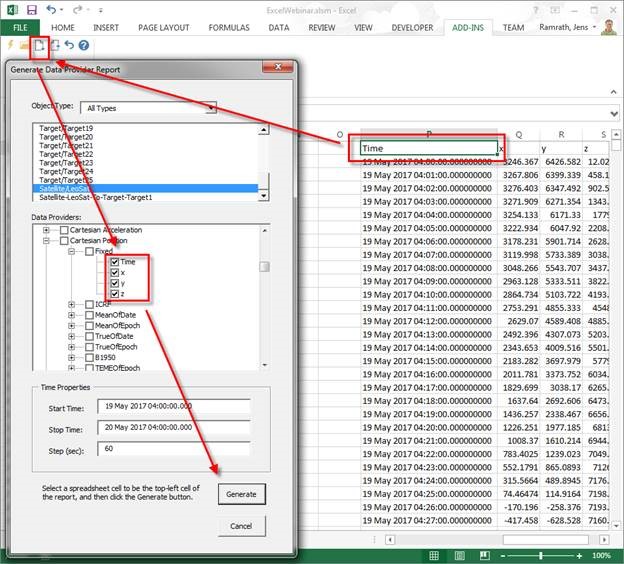
- Click the first button to either start a new instance of STK or connect to an already running one.
- Select the base cell you want the data to be loaded from STK into Excel.
- Click the Import button in the Add-in.
- Select the Data Provider you want to add.
- Click the Generate button.
Don't forget to save your work!
 Visit AGI.com