Astrogator.
The results of the tutorial may vary depending on the user settings and data enabled (online operations, terrain server, dynamic Earth data, etc.). It is acceptable to have different results.
Watch the following video, then follow the steps below incorporating the systems and missions you work on (sample inputs provided).If you did the other Hohmann Transfer exercise, you entered pre-calculated values for the two required ΔVs. In this exercise, you will let Astrogator do the work of calculating the ΔVs, using its targeting capability.
Here, as in the other exercise, the purpose is to transfer a satellite from a low-Earth parking orbit with a radius of 6700 km to an outer circular orbit with a radius of 42238 km.
This exercise and the preceding one are based on Example 3-6-1 in Hale, Francis J., Introduction to Space Flight, Englewood Cliffs, N.J.: Prentice-Hall (1994), pp. 43-44.
The values used here for the radii of the inner and outer orbits are for illustration purposes only. For further practice after completing this exercise, try substituting different values, such as a radius of 42164.197 km (geosynchronous) for the outer orbit.
Setup
- Start STK and create a new scenario; name it Target_Hohmann_Transfer.
- Set the analysis period to the following:
Option Value Analysis Start Time 1 Jul 2016 16:00:00.000 UTCG Analysis End Time 3 Jul 2016 16:00:00.000 UTCG Insert an Astrogator satellite and name it Hohmann_Sat_Targeter;
- On the Orbit page of the satellite's Basic properties, select the Astrogator propagator. You may need to expand the properties window to see all of the controls.
Constructing the MCS
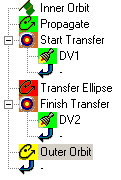
To design a Hohmann transfer from a 6700 km parking orbit to a 42238 km outer orbit, you will use the following MCS segments:
- An Initial State defining a parking orbit with a radius of 6700 km
- A segment to Propagate the parking orbit
- A Target Sequence containing an Impulsive Maneuver to enter the elliptical transfer orbit
- A segment to Propagate the transfer orbit to apogee
- A Target Sequence containing an Impulsive Maneuver to enter the outer circular orbit
- A segment to Propagate the outer orbit
Here it is step by step.
Define the Initial State
- The default MCS that appears when you display the satellite's Orbit page probably already begins with an Initial State segment. If not, Nest at the beginning of the MCS.
- Name the segment 'Inner Orbit'.
- Select Keplerian as the Coordinate Type, change Semi-major Axis to Periapsis Radius with a value of 6700 km. All other elements should be set to zero.
Semimajor Axis = 6700 km;
Eccentricity = 0;
Inclination = 0;
RAAN = 0;
Argument of Perigee= 0;
True Anomaly = 0;
Propagate the Parking Orbit
- If the second segment of the MCS is not already a Propagate segment, insert one in that position.
- Select Earth Point Mass as the Propagate.
- If you wish, select a different color for the segment.
- Set the Duration (Trip value) to 2 hours (7200 sec), more than enough to have the satellite orbit one complete pass.
Maneuver into the Transfer Ellipse
Now use the targeter to calculate the ΔV required to move the spacecraft from the parking orbit into the transfer orbit. The goal of the targeter will be defined in terms of the radius of apoapsis of the transfer ellipse, coinciding with the radius of the desired final orbit.
Define a Target Sequence
- Insert a Target Sequence segment.
- Name the Target Sequence segment 'Start Transfer'.
- Nest a Maneuver in the Target Sequence.
- Name the nested Maneuver segment 'DV1'.
Select Variables
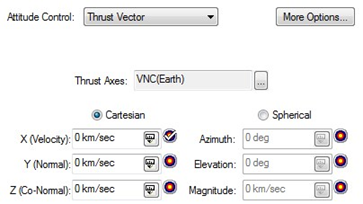
- Highlight the nested Maneuver and make certain that the Maneuver Type is set to Impulsive.
- Select Thrust Vector for Attitude Control.
- Select Cartesian as the vector type.
- Select VNC(Earth) Thrust Axes.
- Select the X (Velocity) component as the sole independent variable by clicking the target to the right of the text field.
- Click Results... and select Radius of Apoapsis (Keplerian Elements folder) as the only dependent variable.
Set up the Targeter
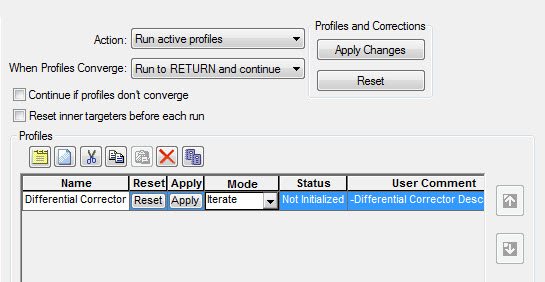
- Select the Target Sequence, highlight the default Profile (Differential Corrector), and open its page by clicking Properties...(
 ).
). - Select the Use options under Control Parameters and Equality Constraints.
- Set the Desired Value for Radius of Apoapsis to 42238 km.
- Set Max. Step (under Control Parameters) to 0.3 km/sec and Tolerance (under Equality Constraints) to 0.1 km.
- Display the Convergence page, increase the Maximum Iterations amount to 50 and enable the Display Status option. Click OK to close the Properties window for the Profile.
- Set the Mode for the Profile to Iterate.
- Make sure the targeter is turned on (select Run active profiles in the Action field).
![]()
Propagate the Transfer Orbit to Apogee
- Insert another Propagate segment after the Target Sequence.
- Name the segment 'Transfer Ellipse' and change its color to a different color than that used for the first Propagate segment.
- Select Earth Point Mass as the Propagator.
- Insert an Apoapsis Stopping Condition and remove Duration.
Maneuver into the Outer Orbit
Here you will use the targeter to calculate the ΔV required to move the spacecraft from the transfer orbit into the circular outer orbit. With the desired radius already achieved, the goal will be to circularize the orbit, i.e., change its eccentricity to zero.
Define a Target Sequence
- Insert another Target Sequence segment.
- Name the Target Sequence segment 'Finish Transfer'.
- Nest a Maneuver in the Target Sequence.
- Name the nested Maneuver segment 'DV2'.
Select Variables
- Highlight the nested Maneuver and make certain that the Maneuver Type is set to Impulsive.
- Select Thrust Vector for Attitude Control.
- Select Cartesian as the vector type.
- Select VNC(Earth) Thrust Axes.
- Select the X (Velocity) component as the sole independent variable.
- Click Results... and select Eccentricity (Keplerian Elements folder) as the only dependent variable.
Set up the Targeter
- Select the "Finish Transfer" Target Sequence, highlight the default Profile (Differential Corrector), and open its Variables page by clicking Properties...().
- Select the Use options under Control Parameters and Equality Constraints.
- Leave the Desired Value for Eccentricity at its default value of zero.
- Set Max. Step (under Control Parameters) to 0.3 km/sec.
- Display the Convergence page and select the Display Status option. Click OK to close the Properties window for the Profile.
- Set the Mode for the Profile to Iterate.
- Make sure the targeter is turned on (select Run active profiles in the Action field).

Propagate the Outer Orbit
- Insert a Propagate segment after the target sequence.
- Name the segment 'Outer Orbit' and change its color to a different color than that used for the other two Propagate segments.
- Select Earth Point Mass as the Propagator.
- Set the Duration to 24 hours (86400 sec), so that the satellite will make a complete orbit pass (and one will be drawn in the 3D Graphics window).
The MCS tree should appear as follows when you are finished:
Running and Analyzing the MCS
Run the MCS and observe the targeting process as displayed in the Status window. When the process is finished, the 3D Graphics window display should be similar to the illustration.
 Visit AGI.com