Web Map Services Plugin
The Web Map Services (WMS/WMTS) plugin provides an interface for the user to connect to a WMS or WMTS server, browse the available layers, and select layers to add to the 3D window.
The functionality of the WMS plugin is exposed through a toolbar:
![]()
If the toolbar is not visible, go to the View menu, then under Toolbars, select Web Map Services.
Add Map Service Layer
The ![]() Web Map Services button launches the Add Map Service Layer dialog.
Web Map Services button launches the Add Map Service Layer dialog.
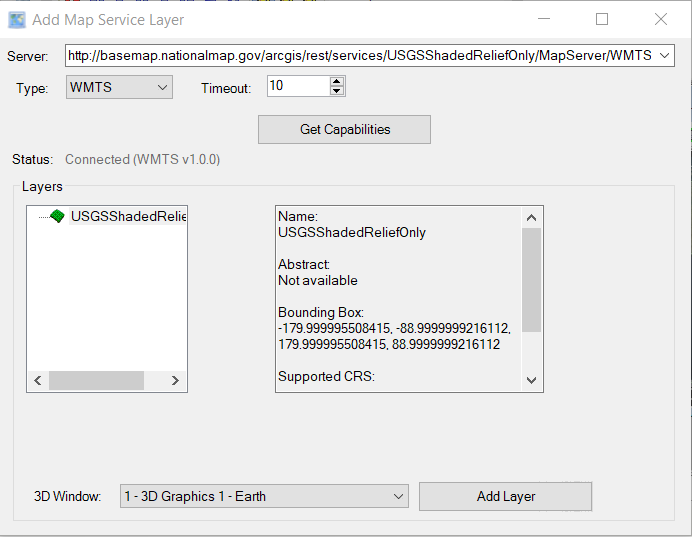
Server. Points to the URL of the WMS or WMTS service that is used to retrieve the server capabilities. For any successful connection, the URL will be added to the drop-down list. To remove a URL from the drop-down list, click the ![]() icon.
icon.
Type. Select the server type, WMS, or WMTS, if known. Otherwise, keep the default value of Auto.
Timeout. Specify the amount of time, in seconds, to wait for a response from the selected server.
Get Capabilities. Click this button to retrieve the selected server's capabilities.
Status. Displays the status of the connection to the server. If connected, it will show the service protocol and version. WMS 1.1, 1.2, 1.3, and WMTS 1.0 are supported.
Layers area. The left box shows the list of layers that are available for display on the globe. The right box shows the available metadata about the selected layer.
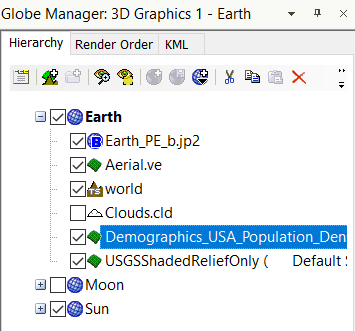
Add Layer. Click this button to add the selected layer to the 3D window selected in the 3D Window field. Each added layer will appear on the Hierarchy tab of the Globe Manager:
Web Map Services Console
The ![]() Web Map Services Console button launches the Console, which logs each tile download. This is used primarily for troubleshooting purposes.
Web Map Services Console button launches the Console, which logs each tile download. This is used primarily for troubleshooting purposes.
 Visit AGI.com