Object timelines are used to represent STK scenario objects on the timeline. They can display time intervals from data providers, access intervals, and 3D model articulations.
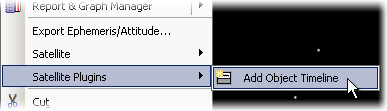
To create an object timeline, right-click any STK object (other than the scenario itself) in the STK object browser window, or in one of the 3D windows (note that "selection" must be enabled in the 3D window for right-clicking an object to work there). A context menu should appear, displaying a list menu options specific to the clicked object. From this menu, pick "Plugins -> Add Object Timeline."
A window will appear, showing a tree of items that are available to be added to the timeline, on the left, and a list of added items on the right.
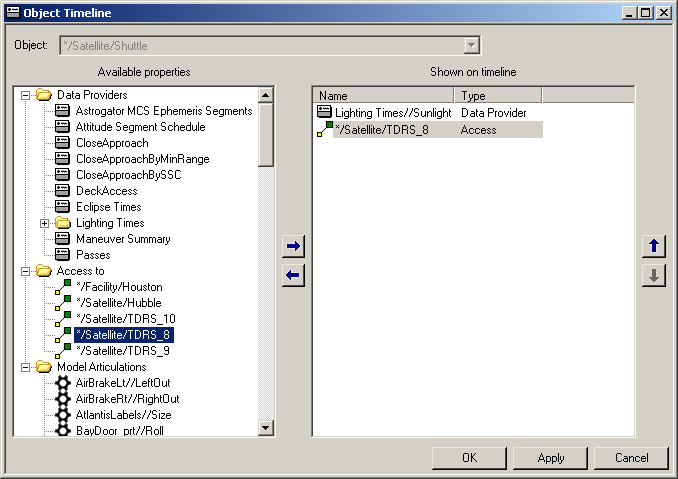
Any of the items on the left can be moved to the right by selecting it and clicking the right-arrow button. Items can be removed by selecting them on the right and clicking the left-arrow icon. None of the changes made here will take effect until the "OK" or "Apply" button is clicked.
When adding multiple items at once, multi-select is not available in a tree view such as the left side of this window, however, a shortcut is to simply double-click on each item of interest, rather than using the right-arrow icon. For model articulations, a parent folder in the tree containing multiple articulations can be selected and moved to the right with one click.
You can bring back this dialog for an existing object timeline by selecting the timeline (click the object name at the top on the left side) and then clicking the yellow "properties" folder above the timeline. Likewise, you can delete an object timeline, or an individual track within the timeline, or an individual articulation keyframe within a track, by selecting the target item and clicking the red "X" icon above the timeline.
Three main types of items are available to add to object timelines: data providers, access intervals, and model articulations.
Data providers
Data providers (![]() ) are used to create reports and graphs in STK. Only a subset of STK's data providers may be shown on the timeline, specifically ones that return time intervals. In addition to any data providers you manually select, the timeline will automatically use the "Available Times" data provider to determine the start and end times of the object timeline itself.
) are used to create reports and graphs in STK. Only a subset of STK's data providers may be shown on the timeline, specifically ones that return time intervals. In addition to any data providers you manually select, the timeline will automatically use the "Available Times" data provider to determine the start and end times of the object timeline itself.
Access intervals
Access intervals (![]() ) work similarly to data providers, displaying available access between two STK objects. Select one and click the right-arrow icon, or just double-click the item in the left window, to move it to the right, for inclusion on the timeline. If the access has already been computed in STK, it will be used on the timeline, otherwise a question will pop up after clicking "OK" for confirmation that the access should be computed when the timeline is created.
) work similarly to data providers, displaying available access between two STK objects. Select one and click the right-arrow icon, or just double-click the item in the left window, to move it to the right, for inclusion on the timeline. If the access has already been computed in STK, it will be used on the timeline, otherwise a question will pop up after clicking "OK" for confirmation that the access should be computed when the timeline is created.
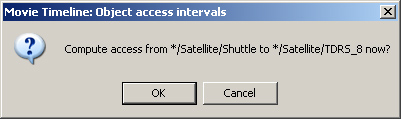
Answering "OK" here will cause STK to compute the access in the scenario, and the resulting time intervals will be shown on the object timeline.
Model articulations
If any model articulations (![]() ) have been added to the timeline, or if the right-hand list has been left completely empty and some model articulations exist in a file on disk, then you may see a variation of the following dialog.
) have been added to the timeline, or if the right-hand list has been left completely empty and some model articulations exist in a file on disk, then you may see a variation of the following dialog.
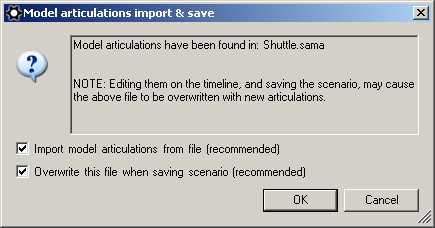
There are potentially two questions to resolve here, and the default answer to both is yes. The first is the question of whether the timeline should import existing model articulations from disk. The exact filename to be used for import will be shown in the text area of the above dialog. Skipping this import could cause the model to lose pre-existing articulations.
The second question will only appear if your model has STK's default setting called "Do not save articulation file". This setting is intended to prevent STK from automatically rewriting a hand-made articulation file on disk. The timeline is asking your permission to turn this setting off, thus allowing STK to overwrite the file the next time the scenario is saved. This is important for the timeline to be able to save model articulations such that they reload automatically even on systems where the timeline is not installed, including compatibility with STK Viewer VDF files. If you have previously created an articulation file by hand, or using some other tool, you should make a backup of the file before allowing this setting to be changed.
Having made a backup of any pre-existing model articulation file, you can now accept the default "yes" answer to both of these questions.
Editing the object timeline
Once the above is complete, an object timeline will appear, similar to the following.
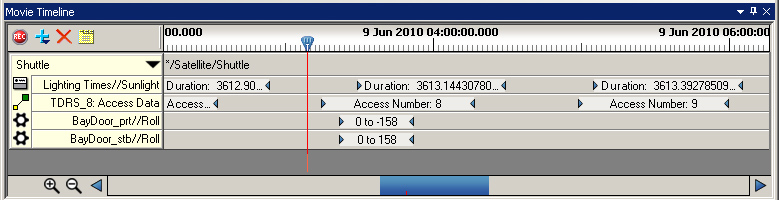
The data providers and access intervals cannot be directly edited on the timeline, as they are built from STK output data. Changing your object settings in STK should cause these tracks to update.
The 3D model articulations, however, can be created, deleted, and edited on the timeline. To create one, position the scrub bar (the vertical red line representing current STK time) on the desired start time for your articulation. Then, hover over the spot on the articulation track where the red line crosses it. The mouse pointer here should change to the "add keyframe" pointer, a small diamond with a plus sign inside. Click this spot to create a model articulation here. The keyframe editor dialog, below, will appear.
To move a keyframe to a new start time, drag it with the left mouse button, from anywhere in the middle of the keyframe. The edges of the keyframe, shown above as small blue triangles, can be dragged individually, to adjust the duration of the articulation. If you have a currently "watched" movie (a track displaying the eyeball icon), then your model articulation start and end times will "snap" to the movie's time steps when dragged with the mouse. To turn off the snap function temporarily, just collapse the watched movie by clicking on the collapse triangle next to the eyeball. Once collapsed, the "watch" status is turned off, and the articulations can be freely dragged on the timeline.
To edit an existing keyframe, double-click it on the timeline. The keyframe editor will appear. This is the same dialog used when adding keyframes.
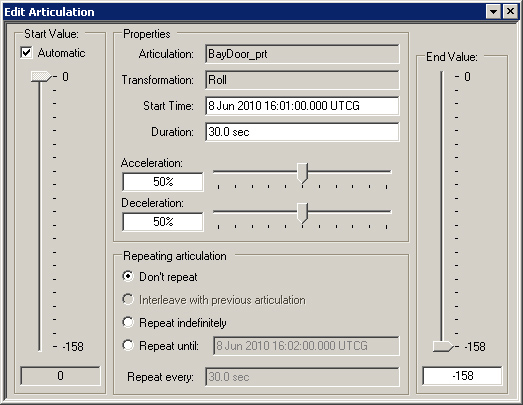
On this dialog, start and duration can be manually edited, as an alternative to dragging the keyframe with the mouse. Below that, the acceleration and deceleration durations are shown as percentages of the total duration. The default for both is 50%, causing the motion to gently transition to and from rest at either end. Setting them both to 0% results in linear motion (constant velocity), typically including discontinuous velocity at both ends. The combined total cannot be larger than 100%.
On the far left and right sides of this dialog, the "Start Value" and "End Value" sliders are shown. These control the position of the model piece being articulated. When multiple articulations are present on the same track on the timeline, the "Automatic" checkbox causes later articulations to import Start Value from the previous End Value on the timeline. The very first start value, from the first articulation on each track, is used as an initial setting for the model prior to encountering any timeline keyframes.
In the bottom center of this dialog are the repeat settings. An articulation or group of articulations can be set to repeat over a range of time. Any subsequent articulations placed downstream from a repeating articulation may become part of the repeat cycle automatically, depending on their start time and the end time of the repeat cycle. Selecting "Repeat Indefinitely" will guarantee that subsequent articulations join the repeat group. Alternately, selecting "Repeat Until" has a default value to allow only a single repeat of the articulation, and careful use may allow later articulations to remain separate from the repeat group.
Articulations that are in a repeat group inherit all of their repeat settings from the first articulation in that group. Turning off repeat mode for the first articulation in a group turns it off for the entire group.
Custom intervals
If an object has it's 2D graphics basic properties set to "Custom Intervals" mode, colors from listed custom intervals will be shown in a thin bar across the top of the object timeline. This is especially useful for Astrogator vehicles, since Astrogator uses colors to differentiate its segments, and those colors are automatically placed by Astrogator in the custom interval list. In other words, when you click the "Go" button in Astrogator, your segment colors will be immediately reflected on your vehicle's object timeline.
 Visit AGI.com