Astrogator.
In this exercise, you have a satellite in a near-circular, equatorial orbit and you'd like to raise the apogee and then the perigee. We will accomplish this with automatic sequences (autosequences) and constraints. You will perform a 100 m/sec burn at every perigee until apogee altitude is greater than 10,000 km. After that, a 100 m/sec burn is performed along the velocity vector at apogee until the perigee altitude is greater than 10,000 km.
The results of the tutorial may vary depending on the user settings and data enabled (online operations, terrain server, dynamic Earth data, etc.). It is acceptable to have different results.
Model the World!
Before you can begin with any analysis, you need to create a scenario and add a satellite. Let's do that now.
- Create a new scenario and call it PulsedOrbitRaise.
- Set the analysis time to the following:
- Add a satellite (
 ) using the Define Properties (
 ) method in the Insert STK Objects (
 ) tool.
 - Change the name to TransferSat.
| Option | Value |
|---|---|
| Analysis Start Time | Default Analysis Time |
| Analysis End Time | +2 Days |
Configure the Initial State
The initial properties of the satellite are known so we use them in the Initial State segment.
- Open TransferSat's () Properties ().
- Set the Propagator to Astrogator.
- Select the Basic - Orbit page.
- Set the following values for the Initial State:
- Click Apply.
| Option | Value |
|---|---|
| Coordinate Type | Keplerian |
| Semimajor Axis | 7000 km |
| Eccentricity | 0.001 |
| RAAN | 0 |
| Inclination | 0 |
| Argument of Periapsis | 0 |
| True Anomaly | 0 |
Create a Simple Autosequence
Autosequences are Mission Control Sequence (MCS) elements that are structurally similar to Sequence segments, but are not MCS segments, properly. Rather, autosequences can be assigned to Propagate and Maneuver (finite) segments, and function as subroutines by executing in response to specified stopping conditions of those segments.
- Click the Automatic Sequence Browser (
 ) button to create a new autosequence.
 - Click the New button to create a new sequence called SmallBurn.
- Double-click SmallBurn to edit it. A new, blank MCS designer appears.
- Click the Insert Segment After button (
 ).
). - Click the Maneuver (
 ) segment type.
 - Set the Attitude Control type to Thrust Vector.
- Set the X Velocity to100 m/sec in the VNC(Earth) Reference Frame.
- Click OK to exit the Automatic Sequence Properties.
- Click OK to exit the Automatic Sequence Browser.
You will notice that the Stop sequence is the only one available by default. It is called any time a Stopping Condition in the Propagator segment is matched. You'd like to create a new sequence and let it automatically run when well defined circumstances occur.
Raise Apogee Using the Created Sequence
In the satellite's Mission Control Sequence (MCS), you should see two items listed, an Initial State and a Proagate segment. We'll now begin modifying that Propagate segment.
- Rename the default propagation segment to RaiseApogee.
- Set the Trip Value for the Duration Stopping Condition to 0.5 days.
- Add Periapsis as a new Stopping Condition type.
- Click the ellipsis button to change the Stop sequence to SmallBurn.
- Set the Max Trip Times value to two (2).
When the Periapsis stopping condition is met, instead of stopping the propagation and passing the control to the next segment, the Periapsis condition automatically starts the SmallBurn sequence. After the maneuver is executed, the control is passed back to the RaiseApogee segment that propagates the orbit to the next stopping condition, which again is Periapsis. The maneuver is executed for the second and last time, since the Max Trip Times field is set to two (2). The control is passed back to the propagate sequence for the remainder of the propagation duration.
Since the Periapsis condition has been met twice , the Propagate segment does not stop the propagation at perigee anymore; instead, it is stopped when the Duration is met. In this case, the Duration we set was a half day.
Run the Mission Control Sequence
- Run (
 ) the MCS.
 - Clear (
 ) the Graphics.
 - Refresh the Maneuver Summary report.
Manuever Summary
Let's verify the results visually through a Maneuver Summary report.
- Select TransferSat () in the Object Browser.
- Open the Report & Graph Manager (
 ).
). - Generate the Maneuver Summary report.
- Leave the Maneuver Summary report open.
The Maneuver Summary is a great place to verify the MCS run when there are multiple burns, especially if they are executed from within autosequences. The segment column is useful to see which segment fired the maneuver and the Total Fuel Used is useful for fuel budget information.
Add a Constraint for the Apogee Radius
Instead of limiting the number of SmallBurn maneuvers to execute, we can allow Astrogator to continue the RaiseApogee segment until a certain threshold is met. We can do this by setting a constraint to check when we reach an apogee greater than 10,000 km.
- Open TransferSat's () properties.
- Select the RaiseApogee propagation segment.
- From the list of Stopping Conditions locate the Periapsis Stopping Condition.
- Set the Max Trip Times field to 10000 (the original default value).
- Delete (
 ) the Duration Stopping Condition.
 - Add a new Stopping Condition called Apoapsis.
- With the Apoapsis stopping condition selected, click the ellipsis button in the Contraints tab.
- Move (
 ) UserDefined constraint.
 - Under Component Details, double-click on the field beside the Criteria option.
- Set the Criteria to Greater Than.
- Beside the CalcObject field, double-click the Embedded Component Link Selection window.
- Beside the Component Name, select the Change... button.
- Expand the Keplerian Elems category from the list of possible CalcObjects.
- Set the CalcObject to Radius of Apoapsis.
- Bring the Select Constraints window to the front, rename the constraint in the ComponentName filed to Apoapsis GT 10000.
- Set the Value to 10000 km.
- Click OK.
We need to stop the sequence just when the apoapsis radius is greater than 10000 km, so we need to add a constraint.
Run the Mission Control Sequence
- Run () the MCS.
- Clear () the Graphics.
- Click OK to close the properties panel.
- Refresh the Maneuver Summary report.
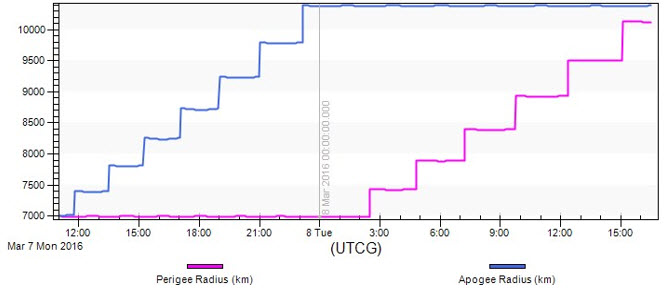
Create a New Graph
You can create a new graph style that will graph the apogee and perigee on one graph.
- Open the Report & Graph Manager ().
- Create a New Graph.
- Name the new graph Apo Peri Graph.
- Move the Classical Elements - ICRF Apogee Radius to the Y Axis.
- Click OK.
- Generate the graph.
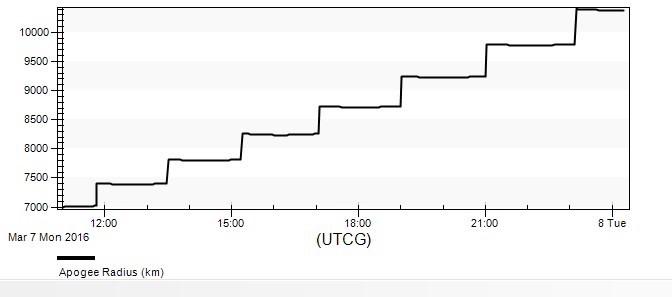
In summary, the RaiseApogee segment propagates until:
- An apogee is reached. If the apogee radius is greater than 10,000 km, control is passed onto the next segment in the MCS. Otherwise nothing happens and the control is sent back the propagator.
- A perigee is reached. In this case, the autosequence is fired and the control is sent back to the propagator.
Raise the Perigee (with Constraint)
Now you can raise the perigee up to a minimum radius of 10,000 km. To accomplish this, you need to create a new propagation segment with similar logic to our RaiseApogee segment..
- Open TransferSat's () properties.
- Add a new Propagate (
 ) segment.
 - Name the new segment, RaisePerigee and set the color to red.
- Add a new Apoapsis stopping condition.
- Set the Sequence to Small Burn for the Apoapsis stopping condition.
- Delete () the Duration stopping condition.
- Add a new Periapsis stopping condition.
- Click the ellipsis button beside the Constraints field of the Periapsis stopping condition.
- Add a UserDefined constraint and set the following options:
To raise the perigee, you need to burn at apogee. You can use the SmallBurn sequence previously defined as the triggered event.
However, you'd like to stop the propagation only when the perigee radius is greater than 10,000km. We can add that as a constraint.
| Option | Value |
|---|---|
| Component Name | Periapsis_GT_10000 |
| Criteria | Greater Than |
| CalcObject | Radius of Periapsis |
| Use Absolute Value | false |
| Value | 10000 km |
Run the Mission Control Sequence
- Run () the MCS.
- Refresh the Maneuver Summary report.
Add Perigee Radius to the Custom Graph
- Open the Report & Graph Manager.
- Open the Properties for the custom Apo Peri Radius Graph.
- Expand the Classical Elements option.
- Expand the ICRF option.
- Move Perigee Radius to the Y axis.
- Generate the Apo Peri Radius Graph.