STK Premium (Space), or STK Enterprise
You can obtain the necessary licenses for this training by contacting AGI Support at support@agi.com or 1-800-924-7244.
The results of the tutorial may vary depending on the user settings and data enabled (online operations, terrain server, dynamic Earth data, etc.). It is acceptable to have different results.
Capabilities covered
This lesson covers the following STK Capabilities:
- STK Pro
- STK SatPro
Problem statement
The goal in this mission is to create a group of satellites that provide 24 hour coverage over a location on the ground. This can be an observation system or a surveillance system.
Solution
Build a scenario where you create a Walker constellation. A Walker constellation consists of a group of satellites (t) that are in circular orbits and have the same period and inclination. The pattern of the constellation consists of evenly spaced satellites (s) in each of the orbital planes (p) specified so that t=s*p. The ascending nodes of the orbital planes are also evenly spaced over a range of right ascension (RAAN). After building this system, you can generate access and study the behavior of the satellites in the system. For example, use the access intervals to define the observing satellites attitude profiles.
Video Guidance
Watch the following video. Then follow the steps below, which incorporate the systems and missions you work on (sample inputs provided).
Create a scenario
The first thing you need to do is create a scenario.
- Click the button.
- Enter the following information to define the scenario start and stop times.
- Click .
| Option | Value |
|---|---|
| Name | STK_SatPro |
| Start / Stop Times | Leave as Default |
Insert a ground site
You can begin by inserting a ground station. This location is the main target for the analysis. Remember, you want to make sure your ground system can be observed by satellites overhead.
- Use the Insert STK Objects tool (
 ) to insert a Place object (
 ) using the Select From City Database (
 ) method.
 - Click the button.
- Enter Colorado Springs in the City Name text field.
- Click . The matching cities are shown in the results list.
- Select the result corresponding from the list.
- Click .
- the City Database window.
Insert a satellite
Before you bring in all the satellites you need, you'll need to load in one satellite that functions as the base or seed satellite for the rest of the Walker constellation.
- Use the Insert STK Objects tool () to insert a Satellite object (
 ) using the Orbit Wizard (
 ) method.
 - Click .
- Select the following:
- Click to save your changes and close the Orbit Wizard.
| Option | Value |
|---|---|
| Type | Circular |
| Name | Walker_Sat |
| Inclination | 90 deg |
| Altitude | 550 km |
| RAAN | 0 deg |
Create a Walker constellation
Now that you have a single satellite in orbit, you can use the Walker tool to quickly generate a Walker constellation using the Two Body, J2, J4, or SGP4 orbit propagators. You can use the characteristics of the satellite you just created to seed the rest of the constellation.
If the seed satellite has sub-objects like sensors, the sub-objects are also created for each of the child satellites.
The type of Walker constellation you choose affects the way the spacing between the ascending nodes is calculated. You must specify the number of satellites per plane and the location of the first satellite in each plane relative to the first satellite in adjacent planes. The way to specify the position of the first satellite depends on the type of Walker constellation you choose.
- Right-click Walker_Sat () in the Object Browser.
- Extend the Satellite shortcut menu.
- Select the Walker... item.
- Enter the following values on the Walker tool dialog:
- Select the Create Satellite Collection in the Container Options - Select Option box.
- Set the Name of the constellation to Observ_Sats.
- Click the button.
- the Walker Tool.
- Delete (
 ) the Walker_Sat seed satellite. You no longer need it.
| Option | Value |
|---|---|
| Seed Satellite: | Walker_Sat |
| Type: | Delta |
| Number of Sats per Plane | 9 |
| Number of Planes | 5 |
| Inter Plane Spacing | 1 |
View in 3D
Let's view the satellites in the 3D Graphics window.
- Bring the 3D Graphics window to the front.
- Mouse around until you see the orbiting satellites.
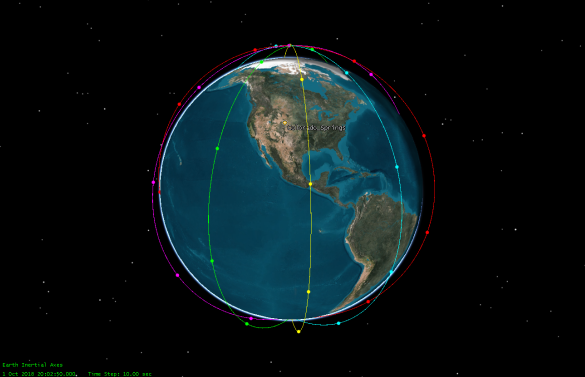
In the 3D Graphics window, you should see multiple orbit lines over the globe.
Compute chain access
Now that you have the players in the scenario, let's determine if the walker constellation can observe the facility on the ground. You can do that by computing Chain Access. If you recall, access is a one-to-one relationship between two objects. Using the Chain object, you can compute access between a set of objects and a single object.
- Use the Insert STK Objects tool () to insert a Chain object (
 ) using the Define Properties (
 ) method.
 - Click .
- Move (
 ) the Constellation object (
 ) to the Assigned Objects list.
 - Move () the Colorado Springs object () to the Assigned Objects list.
- Click to accept the Chain () properties ().
The Chain object is going to calculate based on the order seen in the properties. You want to make sure the Constellation is before the place object.
Generate the complete chain access report
Now that you have the chain object, you can generate a Complete Chain Access report to figure out if you have 24 hour coverage.
- Right-click on the Chain object () in the Object Browser.
- Select the Report & Graph Manager... option.
- Generate the Complete Chain Access report.
- Examine the data. If you see only one interval it means you have complete access over the site for one day.
- Close the report when finished.
Get a better look
Let's examine the total access in this chain.
- Bring the Report & Graph Manager to the front.
- Generate the Individual Object Access report.
- Right-click on the start time value.
- Extend the Start Time menu.
- Select the Set Animation Time. This sets the scenario time to the first moment of access.
- Zoom To Walker_Sat11 ().
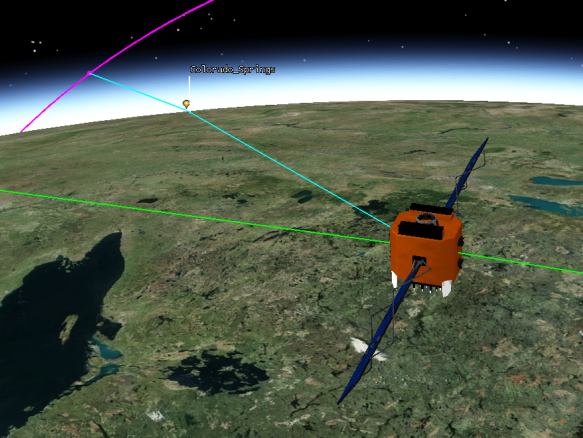
Can you see the access lines between the satellite and the ground site? Mouse around the view to get a better idea of the access.
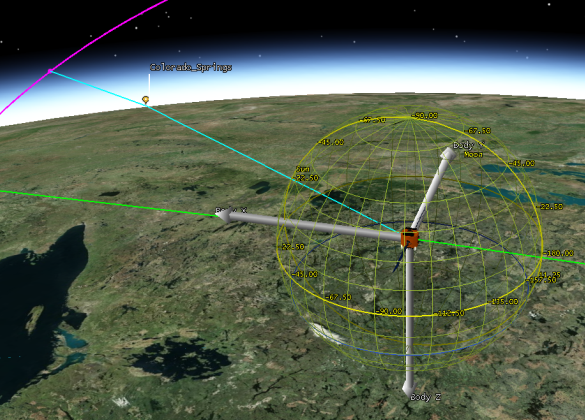
Create an attitude sphere
Let's move on to analyze the objects in the constellation. A way to accomplish this is to add an Attitude Sphere. The Attitude Sphere is a visualization aid that can be made to appear in the 3D Graphics and 3D Attitude Graphics windows. When combined with vector display, the attitude sphere can be a powerful tool to display the object's attitude for tracking changes over time.
- Open Walker_Sat11's () properties ().
- Browse to the 3D Graphics - Attitude Sphere page.
- Select the Show check box.
- Set the Scale Value to 1.000.
- Click .
Add a vector to the satellite
- Select the 3D Graphics - Vector page.
- Select the Axes tab.
- Select the Show check box for the Body Axes.
- Change the color to white (or any color you'd like).
- Click .
Use a targeted attitude
STK allows you to override the basic attitude profile for a satellite, missile, or launch vehicle and have a selected axis (it is Z axis by default) point in the direction of one or more selected targets. This option is subject to applicable access constraints.
- Select the Basic - Attitude page.
- Select the Override Basic attitude for selected targets check box.
- Click the button.
- Move () the Colorado Springs object () to the Assigned Targets field.
- Click on the Select Targets window.
- Click on Walker_Sat11's () properties ().
If you had multiple objects to target you can deconflict the schedule in the Select Targets panel. You can click the Target Times button and disable the Use Access Times option. Then you can set the Deconflict method to Automatic and STK will deconflict the schedule for you.
Animate the Scenario
- Bring the 3D Graphics window to the front.
- Decrease (
 ) the animation timestep.
 - Play (
 ) the animation.
Add intervals to the timeline tool
You can visually see when the satellite undergoes an attitude change in the 3D Graphics window. Another way to view these changes is the Timeline View. You can display it as an event in the Timeline View.
- Select the Timeline view.
- Click the Add Time Components (
 ) button.
 - Select Walker_Sat11 ().
- Select AttitudeInterals in the Components field.
- Click to add the availability interval to the Timeline View.
- Click on the Select Timeline Component window.
Looking at the data in the Timeline View, does the attitude event line up with anything else?
Lifetime tool
If the satellites do not conduct any maneuvers to stay in orbit, then after a period of time the surveillance satellites fall out of orbit and enter the atmosphere. You can view this information using the Lifetime tool which estimates the amount of time a satellite can be expected to remain in orbit before atmospheric drag and other perturbations cause it to decay.
The algorithms behind the Lifetime tool are designed to compute an estimate of duration of time that a satellite will remain in orbit when re-entry is not imminent. This tool is not designed to produce a precise time or location of re-entry. Full fidelity orbit propagation methods such as those available in HPOP and Astrogator are better suited for re-entry prediction. A satellite is assumed to have decayed when its height of perigee drops below 64 km.
You can learn more about the Lifetime Tool here.
- Right-click Walker_Sat11 () in the Object Browser.
- Extend the Satellite menu.
- Select the Lifetime... option.
- Review the settings, but keep the default values.
- Select the button to compute the lifetime of the Walker_Sat11.
- Examine the results in the window that appears. This information predicts how long the satellite remains in orbit without any adjustments. It is also a prediction for how long the satellites can survey the ground site before the satellite falls into the atmosphere.
- Click after viewing the decay time and lifetime.
- Close the Lifetime tool.
Generate a TLE file
With a better understanding of the mission and the assets in the mission, you can extract the satellite's orbital information into a Two-Line Element Set (TLE) file. This is a standard format type for predicting the positioning of a satellite over a length of time. You can use this data format to further the analysis in other tools or to share the results.
- Right-click Walker_Sat11 () in the Object Browser.
- Extend the Satellite menu.
- Select the Generate TLE... option.
- Click the button and take a look at the TLE report.
- Close the Generate TLE window.
With your TLE file you can remodel this orbit in a new scenario or share it to expand your research.
Save your work
- Close any open reports.
- Save (
 ) your work.