Scalable Networks Modeling Interface Connect Commands
Within the Ansys Systems Tool Kit® (STK®) Connect automation interface, you can enter Connect commands to configure the Scalable Network Modeling Interface. After you install the Scalable Networks Modeling Interface, you can run any of the following four Connect commands with the STK Connect Client:
STK Connect client
You can use two or more clients to interface with STK Connect. You can directly enter Connect commands after you run the AGIPXEXP.exe executable. You can find this executable in the STK install in the bin director (default: <Install Dir>\bin). On startup, AGIPCEXP.exe tries to connect to a running instance of STK Desktop, so you must have the STK Desktop running beforehand.
For more information on the STK Connect capability, look at the different Command Listings.
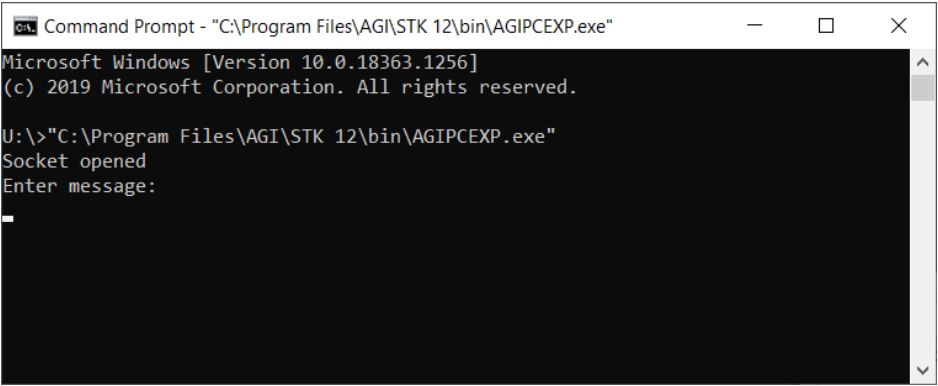
Once started, you can type in commands and execute them when you press the Enter key. Here is an example of a Connect command that creates a new scenario:
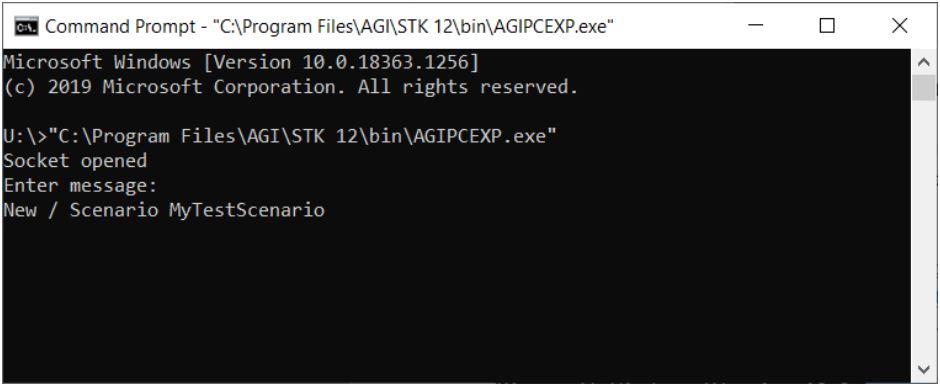
Typically, Connect commands take the form of “Command <StkObjectPath> Option Parameters”. In the screenshot above, the command “New / Scenario MyTestScenario” was executed, which creates a new scenario in the STK application unless a scenario is already running.
Details of the New command
| Input |
Description |
| New |
Connect command name |
| <StkObjectPath> |
/ (denotes the STK application object) |
| Scenario |
option |
| MyTestScenario |
parameter |
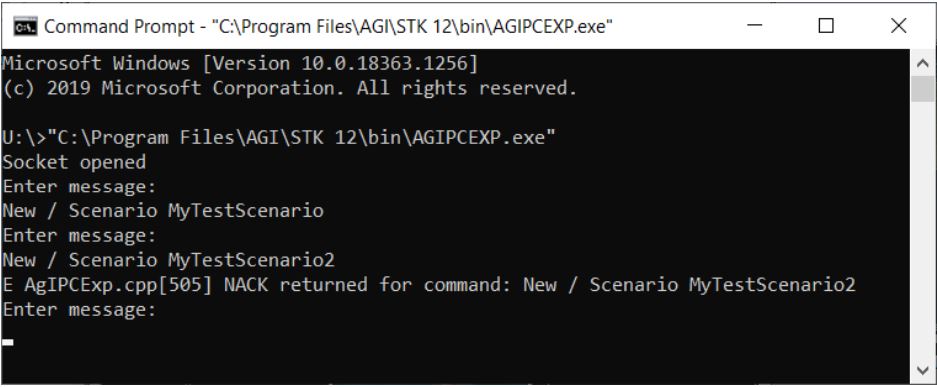
The New command creates a new scenario named MyTestScenario. If you try to execute the command again when a scenario exists in the application, the command fails or NACKs.
If NACK was returned from a command, something failed in the execution of the command. A lot of commands post information to the STK message viewer when NACK is returned.
SNTScenarioExplorer_RM Connect command
You can use the SNTScenarioExplorer_RM Connect command to get information about the Scenario Explorer's configuration. The “_RM” on the end of the command denotes that it returns two or more lines of data. After you execute SNTScenarioExplorer_RM, this command returns and displays information in the AGIPCEXP.exe command line tool.
Syntax: SNTScenarioExplorer_RM <StkObjectPath> <Option> [Parameters]
| Input |
Description |
| <StkObjectPath> |
This is the path to the STK object that represents the node in EXata (*/Facility/Facility1), or if configuring a connection (Wired/Wireless subnet, Application, etc.) the path will be “*/”, which is the shorthand path to the Scenario object itself. Everything under the “Connections” folder in the scenario explorer is associated with the scenario object as well as the scenario configuration settings. |
| <Option> |
You must choose one of the following: GetValue, WirelessSubnets, WirelessSubnetMembers, WiredSubnets, WiredSubnetMembers, Links, LinkSourceDestination, ApplicationNames, ApplicationSourceDestination, InterfaceNames, or HierarchyNodes. |
If you use GetValue for <Option>, you can get the configured value for a particular input or group of inputs. The GetValue option must be directly followed by one of the following categories: Scenario, WirelessSubnet, WiredSubnet, Interface, NodeConfiguration, Link, or Application. Each category has its own set of possible parameters documented below and followed by examples.
The Scenario category does not require additional parameters. You can include the path to the desired input or group of inputs as an optional parameter. If there are spaces in the path, you should wrap the entire path in quotes.
SNTScenarioExplorer_RM */ GetValue Scenario
SNTScenarioExplorer_RM */ GetValue Scenario "Scenario Configuration.General"
SNTScenarioExplorer_RM */ GetValue Scenario "Scenario Configuration.General.General Settings.Experiment Name"
The WirelessSubnet category must be followed by the zero-based index of the wireless subnet into the list of wireless subnets. You can include the path to the desired input or group of inputs as an optional parameter.
SNTScenarioExplorer_RM */ GetValue WirelessSubnet 0
SNTScenarioExplorer_RM */ GetValue WirelessSubnet 0 "Physical Layer.Radio Type"
SNTScenarioExplorer_RM */ GetValue WirelessSubnet 0 "Physical Layer.Radio Type.Use Legacy 802..11b PHY Values"
The input value path is generated from the input names within the GUI and then each is separated by a period. If the input name itself contains a period, it must be escaped by using a double period “..” in the path. For example, in the GUI, you will see “Use Legacy 802.11b PHY Values” as in input name which contains a period. To get the value using the path, the period must be escaped as follows: Use_Legacy_802..11b_PHY_Values.
The WiredSubnet category must be followed by the zero-based index of the desired wired subnet into the list of wireless subnets. You can include the path to the desired input or group of inputs as an optional parameter.
SNTScenarioExplorer_RM */ GetValue WiredSubnet 0
SNTScenarioExplorer_RM */ GetValue WiredSubnet 0 "MAC Protocol"
SNTScenarioExplorer_RM */ GetValue WiredSubnet 0 "MAC Protocol.802..3 Mode"
The Interface category must be followed by the interface name. Also, you must set the StkObjectPath to the STK object associated with the interface. You can include the path to the desired input or group of inputs as an optional parameter.
SNTScenarioExplorer_RM */Facility/Facility1 GetValue Interface interface0
SNTScenarioExplorer_RM */Facility/Facility1 GetValue Interface interface0 "Network Layer.Network Protocol"
The NodeConfiguration option does not require additional parameters. This category requires that the StkObjectPath be set to the STK object associated with the node. You can include the path to the desired input or group of inputs as an optional parameter.
SNTScenarioExplorer_RM */Facility/Facility1 GetValue NodeConfiguration
SNTScenarioExplorer_RM */Facility/Facility1 GetValue NodeConfiguration "Node Configuration.File Statistics.MAC"
The Link category must be followed by the zero-based index of the desired link into the list of links. You can include the path to the desired input or group of inputs as an optional parameter.
SNTScenarioExplorer_RM */ GetValue Link 0
SNTScenarioExplorer_RM */ GetValue Link 0 "Network Protocol"
SNTScenarioExplorer_RM */ GetValue Link 0 "Network Protocol.IPv4 Address"
The Application category must be followed by the zero-based index of the desired application into the list of applications. You can include the path to the desired input or group of inputs as an optional parameter.
SNTScenarioExplorer_RM */ GetValue Application 0
SNTScenarioExplorer_RM */ GetValue Application 0 "Enable Multimedia"
SNTScenarioExplorer_RM */ GetValue Application 0 "Enable Multimedia.Request Packet Size Distribution"
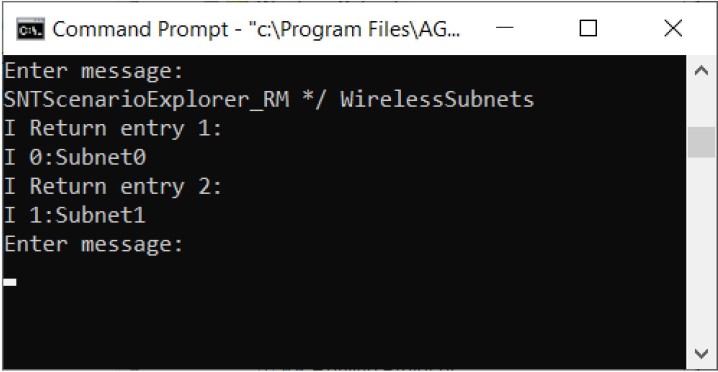
The WirelessSubnets option returns the list of currently configured wireless subnets, where the subnet index and name separated by a colon.
SNTScenarioExplorer_RM */ WirelessSubnets
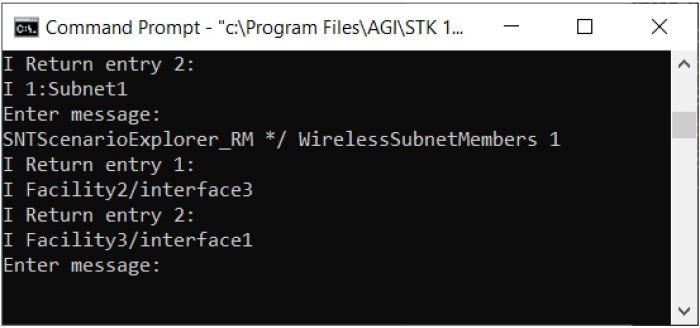
The WirelessSubnetMembers option must be followed by the zero-based index of the desired wireless subnet into the list of wireless subnets. It returns the list of subnet members identified by the STK Object name and interface name separated by a forward slash.
SNTScenarioExplorer_RM */ WirelessSubnetMembers 1
See the documentation for the WirelessSubnets option. This works exactly the same way, but for the wired subnets.
See the documentation for the WirelessSubnetMembers option. This works exactly the same way, but for the wired subnets.
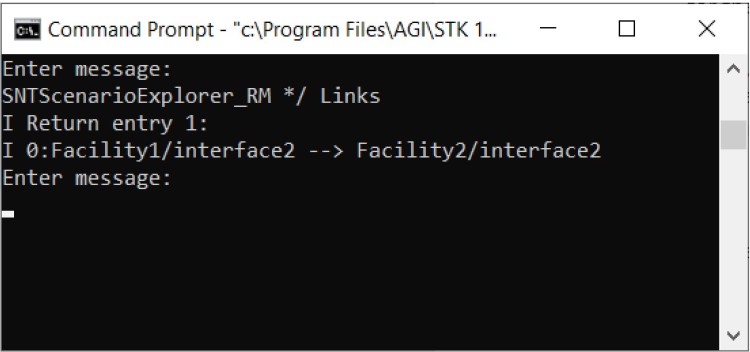
The Links option does not require additional parameters are returns the list of configured links. Each line starts with the link’s index and display name separated by a colon.
SNTScenarioExplorer_RM */ Links
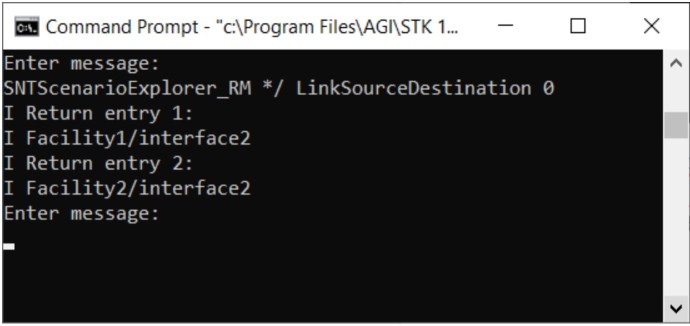
The LinkSourceDestination option requires a parameter that is the zero-based index of the desired link into the list of links. It returns the interface identifiers for the source and destination interfaces of the link. The interface identifier is the STK object name and the interface name separated by a forward slash.
SNTScenarioExplorer_RM */ LinkSourceDestination 0
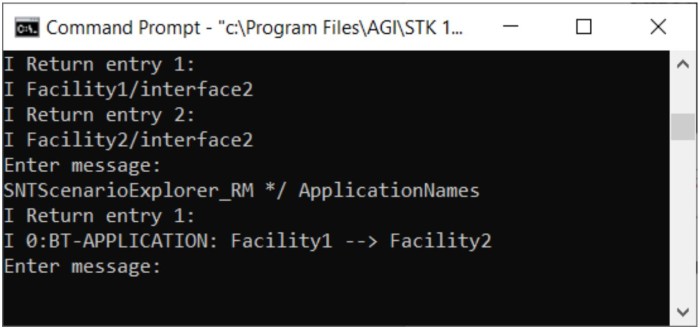
The ApplicationNames option returns the list of application names, but does not require additional parameters. Each line returned starts with the application’s index and display name separated by a colon.
SNTScenarioExplorer_RM */ LinkSourceDestination 0
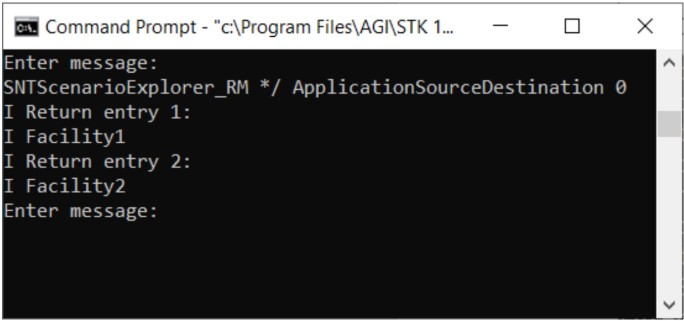
The ApplicationSourceDestination option requires a parameter that is the zero-based index of the desired application into the list of applications. It returns STK object names of the source object and destination object.
SNTScenarioExplorer_RM */ LinkSourceDestination 0
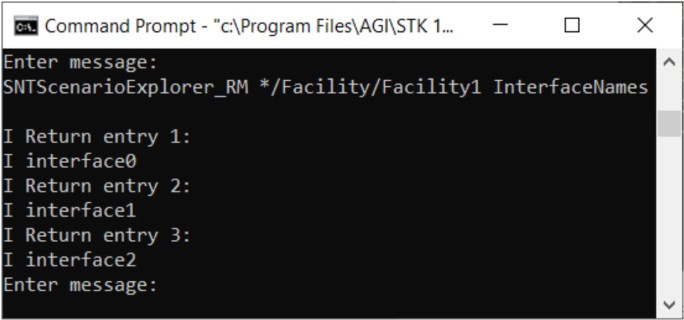
The InterfaceNames option returns a list of interface names associated with a node.
SNTScenarioExplorer_RM */ LinkSourceDestination 0
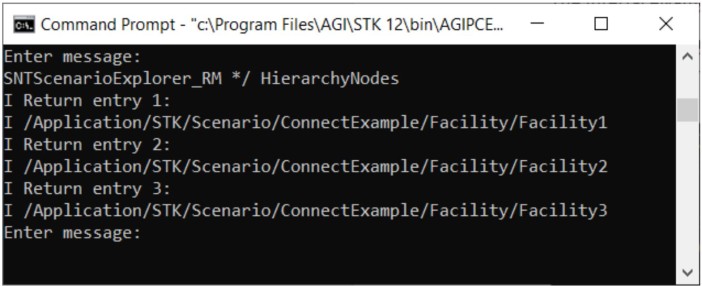
The HierarchyNodes option returns a list of STK object paths which represent the STK objects that are in the hierarchy.
SNTScenarioExplorer_RM */ LinkSourceDestination 0
The ExportExperiment option, exports a new experiment and returns the file system path to where the experiment was exported.
The RunExperiment option, exports, and then runs a new experiment. It returns the file system path to where the experiment was exported.
SNTScenarioExplorer Connect command
You can use the SNTScenarioExplorer Connect command to set values in the Scenario Explorer workflow of the interface.
Syntax: SNTScenarioExplorer <StkObjectPath> option [parameters]
| Input |
Description |
| <StkObjectPath> |
This is the path to the STK object that represents the node in EXata (*/Facility/Facility1), or if configuring a connection (Wired/Wireless subnet, Application, etc.), the path will be “*/”, which is the shorthand path to the Scenario object itself. Everything under the “Connections” folder in the scenario explorer is associated with the scenario object itself as well as the scenario configuration settings. |
| <Option> |
Must be one of the following: SetValue, Add, Remove, or Edit.
|
You can use the SetValue option to set the configured value for a particular input. You must follow the SetValue option with one of the following categories: Scenario, WirelessSubnet, WiredSubnet, Interface, NodeConfiguration, Link, or Application. Each category has its own set of possible parameters and examples.
If the value you want to set contains spaces, enclose the value in quotes.
The Scenario category requires a valid path to an input parameter and a value to set.
SNTScenarioExplorer */ SetValue Scenario "Scenario Configuration.Cyber.Number of SIGINT Scanners" 5
After a WirelessSubnet category, you must include: a zero-based index of the wireless subnet into the list of wireless subnets, a valid path to an input parameter, and a value to set.
SNTScenarioExplorer */ SetValue WirelessSubnet 0 "Physical Layer.Radio Type 802.11a/g Radio"
After a WiredSubnet category, you must include a zero-based index of the wired subnet into the list of wired subnets, a valid path to an input parameter, and a value to set.
SNTScenarioExplorer */ SetVAlue WiredSubnet 0 "MAC Protocol.802..3 Mode" Full-Duplex
After a Interface category, you must include the interface name, a valid path to an input parameter, and a value to set. Also, this category requires that the <StkObjectPath> be set to the STK object associated with the interface.
SNTScenarioExplorer */Facility/Facility1 SetValue Interface interface0 "Network Layer.Network Protocol" IPv6
After a NodeConfiguration category, you must include a valid path to an input parameter and a value to set. This category requires that the <StkObjectPath> be set to the STK object associated with the node.
SNTScenarioExplorer */Facility/Facility1 SetValue NodeConfiguration "Node Configuration.MPLS.Enable MPLS" Yes
After a Link category, you must include a zero-based index of the desired link into the list of links, a valid path to an input parameter, and a value to set.
SNTScenarioExplorer */ SetValue Link 0 "Link Type.MAC Protocol.Symmetric" No
After an Application category, you must include a zero-based index of the desired application into the list of applications. You can include the path to the desired input or group of inputs as an optional parameter.
SNTScenarioExplorer */ SetValue Application 0 "Start Time Distribution" Uniform
The Add option is used to add an item to a list or collection. An example would be adding a Wireless Subnet to the list of wireless subnets. The Add option must be directly followed by one of the following categories: WirelessInterface, WiredInterface, WirelessSubnet, WiredSubnet, Link, Application, BackgroundTraffic, or Fault. Each category has its own set of possible parameters documented below and followed by examples.
The WirelessInterface option must be followed by the path to the STK Antenna Object, which the wireless interface uses. This category requires that the <StkObjectPath> be set to the STK object associated with the node (*/Facility/Facility1). The chosen Antenna Object must be a child of the STK node object. The antenna can also be child of a sensor object, which is a child of the chosen platform. You can include the desired interface name as an optional parameter. If an interface name has spaces, enclose the entire name in quotes. If you do not supply an interface name, the STK application uses a default unique interface name. The command NACKs if you supply an interface name that already exists.
SNTScenarioExplorer */Facility/Facility1 Add WirelessInterface */Antenna/Antenna1
SNTScenarioExplorer */Facility/Facility1 Add WirelessInterface *Sensor/Sensor1/Antenna/Antenna4
SNTScenarioExplorer */Facility/Facility1 Add WirelessInterface *Sensor/Sensor1/Antenna/Antenna4 "My Wireless Interface"
The WiredInterface option does not require additional parameters. This category requires that the StkObjectPath be set to the STK object associated with the node (*/Facility/Facility1). You can include the desired interface name as an optional parameter. If you do not supply an interface name, the STK application uses a default unique interface name. The command NACKs if you supply an interface name that already exists.
SNTScenarioExplorer */Facility/Facility1 Add WiredInterface
SNTScenarioExplorer */Facility/Facility1 Add WiredInterface "My Wired Interface"
The WirelessSubnet option must be followed by a subnet name and a comma-separated list of wireless interface identifiers. An interface identifier is the name of the STK object associated with the interface and the interface name separated by a forward slash (Facility1/interface1). If the list of identifiers contains spaces, enclose the entire list in quotes and separate identifiers with commas. The identifiers must be for wireless interfaces that are not associated with any other subnet or link. If a wired interface is in the list or a wireless interface that is already associated with a subnet or link, the command NACKs.
SNTScenarioExplorer */ Add WirelessSubnet MySubnet "Facility1/interface1, Facility2/interface1"
You can add these optional network protocol settings as well, using the following syntax:
| Network Protocol Setting |
Syntax |
| IPv4 |
SNTScenarioExplorer */ Add WirelessSubnet MySubnet "Facility1/interface1, Facility2/interface1" IPv4 192.168.1.0 255.255.255.0 |
| IPv6 |
SNTScenarioExplorer */ Add WirelessSubnet MySubnet "Facility1/interface1, Facility2/interface1" IPv6 3000:: 48 |
| Dual-IP |
SNTScenarioExplorer */ Add WirelessSubnet MySubnet "Facility1/interface1, Facility2/interface1" Dual-IP 192.168.1.0
255.255.255.0 3000:: 48 |
You can pass an optional final parameter ReassignIPAddresses that will reassign each of the member network interfaces a new unique IP address that matches the subnets. You can pass this parameter for any of the three network protocol types.
SNTScenarioExplorer */ Add WirelessSubnet MySubnet "Facility1/interface1, Facility2/interface1" IPv4 192.168.1.0 255.255.255.0 ReassignIPAddresses
The WiredSubnet option must be followed by a subnet name and a comma-separated list of wired interface identifiers. An interface identifier is the name of the STK object associated with the interface and the interface name separated by a forward slash (Facility1/interface0). If the list of identifiers contains spaces, enclose the entire list in quotes and separate identifiers with commas. The identifiers must be for wired interfaces that are not associated with any other subnet or link. If a wireless interface is in the list or is a wired interface that is already associated with a subnet or link, the command NACKs.
SNTScenarioExplorer */ Add WiredSubnet MySubnet "Facility1/interface0, Facility2/interface0"
You can add these optional network protocol settings as well, using the following syntax:
| Network Protocol Setting |
Syntax |
| IPv4 |
SNTScenarioExplorer */ Add WiredSubnet MySubnet "Facility1/interface0, Facility2/interface0" IPv4 192.168.1.0 255.255.255.0
|
| IPv6 |
SNTScenarioExplorer */ Add WiredSubnet MySubnet "Facility1/interface0, Facility2/interface0" IPv6 3000:: 48 |
| Dual-IP |
SNTScenarioExplorer */ Add WiredSubnet MySubnet "Facility1/interface0, Facility2/interface0" Dual-IP 192.168.1.0 255.255.255.0
3000:: 48 |
You can pass an optional final parameter ReassignIPAddresses that reassigns each of the member network interfaces a new unique IP address that matches the subnets. You can pass this parameter for any of the three network protocol types that reassigns each of the member network interfaces a new unique IP address that matches the subnets.
SNTScenarioExplorer */ Add WiredSubnet MySubnet "Facility1/interface0, Facility2/interface0" IPv4 192.168.1.0 255.255.255.0 ReassignIPAddresses
The Link option must be followed by a source interface identifier and a destination interface identifier. An interface identifier is the name of the STK object associated with the interface and the interface name separated by a forward slash (Facility1/interface0). The source and destination interfaces must be both either wireless or wired. The command NACKs if given a wireless source and wired destination interface, and vice versa. The identifiers must not be associated with any other subnet or link, otherwise the command NACKs.
SNTScenarioExplorer */ Add Link Facility1/interface0 Facility2/interface0
You can add these optional network protocol settings as well, using the following syntax:
| Network Protocol Setting |
Syntax |
| IPv4 |
SNTScenarioExplorer */ Add Link Facility1/interface0 Facility2/interface0 IPv4 192.168.1.0 255.255.255.0 |
| IPv6 |
SNTScenarioExplorer */ Add Link Facility1/interface0 Facility2/interface0 IPv6 3000:: |
| Dual-IP |
SNTScenarioExplorer */ Add Link Facility1/interface0 Facility2/interface0 Dual-IP 192.168.1.0 255.255.255.0 3000::
|
You can pass an optional final parameter ReassignIPAddresses that reassigns the source and destination network interfaces a new unique IP address that matches the subnets. You can pass this parameter for any of the three network protocol types.
SNTScenarioExplorer */ Add Link Facility1/interface0 Facility2/interface0 IPv4 192.168.1.0 255.255.255.0 ReassignIPAddresses
The Application option must be followed by the path for the STK object that represents the source node, the STK object that represent the destination node, and the application type name.
SNTScenarioExplorer */ Add Application */Facility/Facility1 */Facility/Facility2 CBR
You can use the BackgroundTraffic option to add background traffic definitions to a link. It must be followed by the zero-based index of the link into the list of links.
SNTScenarioExplorer */ Add BackgroundTraffic 0
You can use the Fault option to add Fault definitions. Fault definitions can reside in a couple places in the EXata scenario, on a link, node, as well as on a network interface. If adding a Fault to a link, you should pass the scenario path (*/) to the command. The option should be followed by the zero-based index of the link into the list of links.
SNTScenarioExplorer */ Add Fault 0
If adding a Fault to an interface, you should pass the STK object path for the interfaces associated node (*/Facility/Facility1) to the command. The option should be followed by the interface name.
SNTScenarioExplorer */Facility/Facility1 Add Fault interface0
If adding a Fault to a node, you should pass the STK object path for the node (*/Facility/Facility1) to the command without additional parameters.
SNTScenarioExplorer */Facility/Facility1 Add Fault
Use the Remove option to remove an item from a list or collection. An example would be removing a Wireless Subnet from the list of wireless subnets. The Remove option must be directly followed by one of the following categories: WirelessSubnet, WiredSubnet, Interface, Link, Application, BackgroundTraffic, or Fault. Each category has its own set of possible parameters documented below and followed by examples.
The WirelessSubnet option must be directly followed by the zero-based index of the wireless subnet to be removed into the list of wireless subnets.
SNTScenarioExplorer */ Remove WirelessSubnet 0
The WiredSubnet option must be directly followed by the zero-based index of the wired subnet to be removed into the list of wired subnets.
SNTScenarioExplorer */ Remove WiredSubnet 0
The Interface option must be directly followed by the name of the interface to be removed. The path passed to the command should be the path of the STK object that represents the node in EXata which contains the interface.
SNTScenarioExplorer */Facility/Facility1 Remove Interface interface0
The Link option must be directly followed by the zero-based index of the link to be removed into the list of links.
SNTScenarioExplorer */ Remove Link 0
The Application option must be directly followed by the zero-based index of the application to be removed into the list of applications.
SNTScenarioExplorer */ Remove Application 0
You can use the BackgroundTraffic option to remove background traffic definitions from a link. It must be followed by the zero-based index of the link into the list of links as well as the zero-based index of the background traffic definition to be removed from the background traffic definition list.
SNTScenarioExplorer */ Remove BackgroundTraffic 0 0
You can use the Fault option to remove Fault definitions. Fault definitions can reside in a couple places in the EXata scenario, on a link, node, as well as on a network interface. If removing a Fault from a link, you should pass the scenario path (*/) to the command. The option should be followed by the zero-based index of the link into the list of links as well as the zero-based index of the fault definition to be removed from the fault definition list.
SNTScenarioExplorer */ Remove Fault 0 0
If removing a Fault from an interface,you should pass the STK object path for the interfaces associated node (*/Facility/Facility1) to the command. The option should be followed by the interface name and then by the zero-based index of the fault definition to be removed from the fault definition list.
SNTScenarioExplorer */Facility/Facility1 Remove Fault interface0 0
If removing a Fault from a node, you should pass the STK object path for the node (*/Facility/Facility1) to the command. The option should be followed by the zero-based index of the fault definition to be removed from the fault definition list.
SNTScenarioExplorer */Facility/Facility1 Remove Fault 0
Use the Edit option to edit an existing subnet (wired or wireless), link, application, and interface (wired or wireless). The Edit option must be directly followed by one of the following categories: WirelessSubnet, WiredSubnet, Interface, Link, or Application. Each category has its own set of possible parameters documented below, each followed by an example.
The WirelessSubnet option must be directly followed by the zero-based index of the wireless subnet to be edited into the list of wireless subnets and an action. The action can be one of the following: ReassignIPAddresses, AddInterface, or RemoveInterface.
ReassignIPAddresses – This parameter, when passed, reassigns the IP address of each of the member interfaces with a new unqiue IP address that matches the Subnet’s IP address.
SNTScenarioExplorer */ Edit WirelessSunet 0 ReassignIPAddresses
AddInterface – This parameter, when passed along with a network interface identifier, will add the interface to the subnet if it is not already a member.
SNTScenarioExplorer */ Edit WirelessSubnet 0 AddInterface Facility3/interface1
RemoveInterface – This parameter, when passed along with a network interface identifier, will remove the interface from the subnet if it is a member.
SNTScenarioExplorer */ Edit WirelessSubnet 0 RemoveInterface Facility3/interface1
This WiredSubnet option works identically to the WirelessSubnet option, but for wired interfaces.
SNTScenarioExplorer */ Edit WiredSunet 0 ReassignIPAddresses
SNTScenarioExplorer */ Edit WiredSubnet 0 AddInterface Facility3/interface0
SNTScenarioExplorer */ Edit WiredSubnet 0 RemoveInterface Facility3/interface0
The Interface option must be directly followed an action, either Rename or SetAntenna, and an interface name. The interface name should exist on the node for which the STK object path passed to the command is associated with.
Rename – Renames the interface.
SNTScenarioExplorer */Facility/Facility1 Edit Interface Rename interface0 myInterface
SetAntenna – This is only valid for wireless interfaces. It sets the antenna for the wireless interface. The antenna must exist on the same parent platform as the interface.
SNTScenarioExplorer */Facility/Facility1 Edit Interface SetAntenna interface1 */Sensor/Sensor1/Antenna/Antenna4
The Link option must be directly followed by the zero-based index of the link to be edited into the list of links and an action. The action can be one of the following: SetSource, SetDestination, or ReassignIPAddresses.
SetSource – The SetSource action must be followed by an interface identifier (Facility1/interface0) that is the name of the platform and the name of the interface separated by a forward slash.
SNTScenarioExplorer */ Edit Link 0 SetSource Facility1/interface3
SetDestination – The SetDestination action must be followed by an interface identifier (Facility1/interface0) that is the name of the platform and the name of the interface separated by a forward slash.
SNTScenarioExplorer */ Edit Link 0 SetDestination Facility2/interface4
ReassignIPAddresses – This action sets the source and destination IP address to a unique address that matches the address of the link.
SNTScenarioExplorer */ Edit Link 0 ReassignIPAddresses
The Application option must be directly followed by the zero-based index of the application to be edited into the list of applications and an action. The action can be one of the following: SetName, SetSource, or SetDestination.
SetName – The SetName action must be followed by an application type name (CBR, Ftp, etc.).
SNTScenarioExplorer */ Edit Application 0 SetName Ftp
SetSource – The SetSource action must be followed by an STK object path associated with the node that is to be set as the source.
SNTScenarioExplorer */ Edit Application 0 SetSource */Facility/Facility1
SetDestination – The SetDestination action must be followed by an STK object path associated with the node that is to be set as the destination.
SNTScenarioExplorer */ Edit Application 0 SetDestination */Facility/Facility2
SNTConfigImporter_RM Connect Command
You can use the SNTConfigImporter_RM Connect command to get information about the Configuration Importer's configuration. The “_RM” on the end of the command denotes that it returns two or more lines of data. When executing, this command returns and displays information in the AGIPCEXP.exe command line tool.
Syntax: SNTConfigImporter_RM */ <Option> [Parameters]
| Input |
Description |
| <Option> |
You must choose one of the following: ConfigFiles, MappedInterfaces, UnmappedInterfaces,
ExportExperiment, or RunExperiment. |
The ConfigFiles option returns all of the currently loaded configuration files and does not require additional parameters.
SNTConfigImporter_RM */ ConfigFiles
The MappedInterfaces option returns all of the wireless interfaces that you have mapped to an STK antenna object. You must set the parameter as the index of the desired configuration file into the list of configuration files.
SNTConfigImporter_RM */ MappedInterfaces 0
The UnmappedInterfaces option returns all of the wireless interfaces that have not yet been mapped to an STK antenna object. You must set the parameter as the index of the desired configuration file into the list of configuration files.
SNTConfigImporter_RM */ UnmappedInterfaces 0
You can use the ExportExperiment option to export a new experiment and return the experiment's new file path. You must set the parameter as the index of the desired configuration file into the list of configuration files.
SNTConfigImporter_RM */ ExportExperiment 0
The RunExperiment option exports and then runs a new experiment. It returns the file system path to where the experiment was exported. You must set the parameter as the index of the desired configuration file into the list of configuration files.
SNTConfigImporter_RM */ RunExperiment 0
SNTConfigImporter Connect Command
You can use the SNTConfigImporter Connect command to set values in the Configuratoin Importer workflow of the interface.
Syntax: SNTConfigImporter */ option [parameters]
| Input |
Description |
| <Option> |
You must choose one of the following: AddInterfaceMapping, RemoveInterfaceMapping,
RemoveAllInterfaceMappings, AddConfigFile, or RemoveConfigFile.
|
With the AddInterfaceMapping option, you can add a mapping between a wireless interface and an STK antenna object. You must set the first parameter as the index of the desired configuration file into the list of configuration files. The index must be followed first by the node ID, then the interface ID, and lastly the truncated path to the STK antenna object.
SNTConfigImporter */ AddInterfaceMapping 0 1 0 */Facility/Facility1/Sensor/Sensor1/Antenna/Antenna4
With the RemoveInterfaceMapping option, you can remove a mapping between a wireless interface and an STK antenna object. The first parameter to the option must be the index of the desired configuration file into the list of configuration files. The index must be followed first by the node ID and then the interface ID.
SNTConfigImporter */ RemoveInterfaceMapping 0 1 0
With the RemoveAllInterfaceMappings option, you can remove all wireless interface and STK antenna object mappings for the desired configuration file. The only parameter to the option is the index of the desired configuration file into the list of configuration files.
SNTConfigImporter */ RemoveAllInterfaceMappings 0
With the AddConfigFile option, you can add a new configuration file to the list of configuration files. The parameter to this option is the fully qualified file system path to the configuration files. If the path has spaces, it should be enclosed in quotes.
SNTConfigImporter */ AddConfigFile “D:\EXata Scenarios\Large Network Examples\Example1.config”
With the RemoveConfigFile option, you can remove a configuration file from the list of configuration files. The only parameter for this option is the index of the configuration file you want to remove.
SNTConfigImporter */ RemoveConfigFile 0
