STK Premium (Space) or STK Enterprise
You can obtain the necessary licenses for this tutorial by contacting AGI Support at support@agi.com or 1-800-924-7244.
Usage of the Sparse Nonlinear Optimizer (SNOPT) search profile requires an additional license. Please contact AGI support for licensing.
This lesson requires version 13.0 of the STK software or newer to complete in its entirety. If you have an earlier version of the STK software, you can view a legacy version of this lesson.
The results of the tutorial may vary depending on the user settings and data enabled (online operations, terrain server, dynamic Earth data, etc.). It is acceptable to have different results.
Capabilities covered
This lesson covers the following capabilities of the Ansys Systems Tool Kit® (STK®) digital mission engineering software:
- STK Pro
- Astrogator
Problem statement
Engineers and operators require a way to quickly and easily model a satellite's trajectory to optimize planned maneuvers. You need to raise an orbiting satellite's perigee to a radius of 10,000 kilometers using a single burn. You have information on the satellite's initial state and an outline for the burn you plan to make. You want to find both the optimal true anomaly at which to begin the burn and the optimal finite burn duration to minimize the change in velocity, or Delta-V, and thus the amount of fuel required, to accomplish the mission.
Solution
Use the STK/Astrogator® capability, a Target Sequence, and a SNOPT Optimizer search profile to propagate the satellite's orbit until it reaches a certain true anomaly and calculate the duration of the finite burn to minimize the Delta-V. Then, propagate the resulting orbit until the satellite reaches the specified radius of perigee.
What you will learn
Upon completion of this tutorial, you will understand how to do the following:
- Set controls and objectives for an analysis
- Use a SNOPT Optimizer search profile
- Generate a Maneuver Summary report
Creating a new scenario
First, you must create a new STK scenario, and then build from there.
- Launch the STK application (
 ).
). - Click
 Create a Scenario in the Welcome to STK dialog box.
 - Enter the following in the STK: New Scenario Wizard:
- Click when you finish.
- Click Save (
 ) when the scenario loads.
 - Verify the scenario name and location in the Save As window.
- Click .
| Option | Value |
|---|---|
| Name | OptimalTrueAnomaly |
| Start | Default |
| Stop | Default |
The STK application creates a folder with the same name as your scenario for you.
Save () often during this lesson!
Creating an Astrogator satellite
Add a satellite to the scenario and select Astrogator as its propagator to utilize the Astrogator capability for trajectory and maneuver planning.
Adding a new Satellite object
Insert a
- Bring the Insert STK Objects tool (
 ) to the front.
 - Select Satellite (
 ) in the Select an Object To Be Inserted list.
 - Select Insert Default () in the Select a Method list.
- Click .
- Rename Satellite1 () SNOPTSat.
Changing the propagator to Astrogator
There are several types of
- Right-click on SNOPTSat () in the Object Browser.
- Select Properties (
 ) in the shortcut menu.
 - Select the Basic - Orbit page when the Properties Browser opens.
- Open the Propagator drop-down list.
- Select Astrogator.
- Click to confirm your selection and to keep the Properties Browser open.
Defining the satellite's initial state in the Mission Control Sequence
The Mission Control Sequence (MCS) is the core of your space mission scenario. The MCS functions as a graphical programming language, in which mission segments dictate how Astrogator calculates the trajectory of the spacecraft based on the general settings that you specify for the MCS itself. The MCS is defined by selecting and organizing MCS Segments in a manner that produces your desired trajectory. The left side of the MCS is represented schematically by a tree structure, which lists the segments that make up the MCS and depicts their relationships to each other. Above the tree is the MCS toolbar, which contains buttons that perform various MCS and individual segment operations. The right side of the window contains the parameters of the segment that is currently selected in the MCS Tree.
The MCS contains two segments by default: an Initial State segment and a Propagate segment, which produce a low-Earth orbit. Starting with the Initial State segment, you can build your optimized sequence. Use the
- Select Initial State (
 ) in the MCS.
 - Select the Elements tab.
- Open the Coordinate Type drop-down list.
- Select Keplerian.
- Open the Semi-major Axis drop-down list.
- Select Periapsis Radius.
- Set the following options for the orbital elements:
- Keep the remaining values set to their defaults.
- Click to confirm your changes and to keep the Properties Browser open.
The
| Option | Value |
|---|---|
| Periapsis Radius | 6778 km |
| Eccentricity | 0.4 |
| Inclination | 45 deg |
Ensure that you correctly enter the Periapsis Radius value listed in the table, as the default value is a similar number.
Adding a Target Sequence
Add a
- Click Insert Segment After (
 ) on the MCS toolbar.
 - Select Target Sequence (
 ) when the Segment Selection dialog box opens.
 - Click to confirm your selection and to close the Segment Selection dialog box.
- Right-click on Target Sequence () in the MCS.
- Select Rename in the shortcut menu.
- Rename Target Sequence () Target_Maneuver.
Updating the Propagate segment
A Propagate segment models the movement of the spacecraft along its current trajectory until meeting specified stopping conditions. The segment uses the defined propagator and integrator to propagate the orbital state, adding each point to the ephemeris as it goes. Use and update the default Propagate segment in your Target Sequence.
Nesting the Propagate Segment in Target_Maneuver
Nest the Propagate segment in Target_Maneuver.
- Click and drag Propagate (
 ) to nest it inside and under Target_Manuever ().
 - Rename Propagate () ProptoMnvrStart.
Adding a new stopping condition
Add a new Stopping Condition to ProptoMnvrStart.
- Click New... () on the Stopping Conditions toolbar.
- Select True Anomaly (
 ) when the New Stopping Condition dialog box opens.
 - Click to confirm your selection and to close the New Stopping Condition dialog box.
- Select Duration in the Stopping Conditions table.
- Click Delete (
 ) on the Stopping Conditions toolbar.
The propagation will stop when a specified true anomaly is reached.
Enabling a decision variable
The actions that the Target Sequence takes are determined by the profiles that are defined for it. Search profiles define goals and change variables to achieve them. The
Enable the Propagate segment's True Anomaly as a decision variable and define a value for an initial guess. Your initial guess is iteratively adjusted by the search profile in an attempt to converge to a locally optimal solution.
- Enter 170 deg in the Trip field.
- Click the target icon (
 ) next to the Trip field.
 - Notice the target now has a check mark (
 ).
). - Click to confirm your changes and to keep the Properties Browser open.
This ensures ProptoMnvrStart's Trip is made available as a control parameter, which allows the location of the maneuver start to vary.
Modeling a Finite Maneuver
Next, define a Finite Maneuver segment. A Finite Maneuver is effectively a Propagate segment with thrust. It uses a defined propagator to propagate the state, accounting for the acceleration due to thrust. The selected engine model specifies the magnitude of the thrust vector and the selected attitude control specifies the direction of the thrust vector. Like Propagate segments, each calculated point is added to the ephemeris, and propagation continues until reaching a stopping condition.
Inserting a Maneuver segment
Add a
- Ensure ProptoMnvrStart () is selected in the MCS.
- Click Insert Segment After (
 ) on the MCS toolbar.
 - Select Maneuver (
 ) when the Segment Selection dialog box opens.
 - Click to confirm your selection and to close the Segment Selection dialog box.
Changing the segment's color
Change the color of the Maneuver segment to differentiate it from ProptoMnvrStart, since it will be visible in the 3D Graphics window.
- Select Maneuver () in the MCS.
- Click Segment Properties () on the MCS toolbar.
- Open the Color drop-down list.
- Select a color that's different from ProptoMnvrStart ().
- Click to confirm your selection and to close the Edit Segment dialog box.
- Click to confirm your changes and to keep the Properties Browser open.
Configuring the Maneuver segment
Configure the Maneuver segment for a Finite Maneuver, then configure how the satellite's maneuver pointing and attitude are updated.
- Open the Maneuver Type drop-down list.
- Select Finite.
- Select the Attitude tab.
- Open the Attitude Control drop-down list.
- Select Thrust Vector.
- Ensure the Attitude Update is set to Update during burn.
The "thrust vector" describes the direction of acceleration applied to a satellite. This direction is opposite to the exhaust of an engine. With this attitude control setting, the Delta-V vector is specified in some reference frame, using either Cartesian or spherical components. Astrogator then computes the attitude so that the total thrust vector in the body frame, as specified by the thruster set or engine model, aligns with this vector in the reference axes.
With this option, the maneuver pointing is updated throughout the maneuver in order to maintain the required thrust direction in the specified direction at every instant throughout the burn. Therefore, the thrust vector rotates with the specified coordinate system.
Enabling a second decision variable
Your satellite models the maneuver up until a specified stopping condition. Use the default Duration stopping condition, but enable its Trip Value as a decision variable and set an initial guess; this will allow the burn time to vary.
- Select the Propagator tab.
- Note the default Duration stopping condition.
- Enter 90 sec in the Trip Value field.
- Click the target () beside the Trip Value field.
- Click to confirm your changes and to keep the Properties Browser open.
Selecting an objective
A SNOPT Optimizer search profile's objectives and constraints are defined in terms of in terms of calculation object components. Use the Finite Maneuver segment's Delta-V for the search profile's objective.
- Click beneath the MCS Tree.
- Expand (
 ) the Maneuver (
 ) folder in the Available Components list when the User - Selected Results - Maneuver dialog box opens.
 - Select DeltaV ().
- Click Insert Component (
 ) to move DeltaV () to the selected components list.
 - Click to confirm your selection and to close the User-Selected Results - Maneuver dialog box.
- Click to confirm your change and to keep the Properties Browser open.
Defining a second Propagate segment
After the burn is complete, the resulting orbit is defined with a second Propagate segment.
Inserting a new Propagate segment in Target_Manuever
Add another Propagate segment after Maneuver in Target_Manuever and select a new color for the segment.
- Ensure Maneuver () is selected in the MCS.
- Click Insert Segment After () on the MCS toolbar.
- Select Propagate () when the Segment Selection dialog box opens.
- Click to confirm your selection and to close the Segment Selection dialog box.
- Rename Propagate () ProptoPerigee.
- Click Segment Properties () on the MCS toolbar.
- Open the Color drop-down list.
- Select a color that's different from both ProptoMnvrStart () and Maneuver ().
- Click to confirm your selection and to close the Edit Segment dialog box.
- Click to confirm your changes and to keep the Properties Browser open.
Adding a new stopping condition
Use the Periapsis as a stopping condition for ProptoPerigee.
- Select Periapsis as the Stopping Condition.
- Click New... () on the Stopping Conditions toolbar.
- Select Periapsis () when the New Stopping Condition dialog box opens.
- Click to confirm your selection and to close the New Stopping Condition dialog box.
- Select Duration in the Stopping Conditions table.
- Click Delete () on the Stopping Conditions toolbar.
- Click to confirm your changes and to keep the Properties Browser open.
The propagation will stop at a point closes to the origin.
Selecting a constraint
A SNOPT Optimizer search profile's constraints define the set of acceptable (feasible) solutions and are optional. Both objectives and constraints share the same source and method used to define them, but the optimizer applies them to the problem in distinct ways. Use a calculation object for the radius of the orbit, R Mag, to be used as a constraint on the set of feasible solutions.
- Click beneath the MCS Tree.
- Expand () the Spherical Elems () folder in the Available Components list when the User - Selected Results - ProptoPerigee dialog box opens.
- Select R Mag ().
- Click Insert Component () to move R Mag () to the selected components list.
- Click to confirm your selection and to close the User - Selected Results - ProptoPerigee dialog box.
- Click to confirm your changes and to keep the Properties Browser open.
- Save () your scenario.
This will enable you to set the radius of orbit at the end of the Propagate Segment.
Using a SNOPT Optimizer search profile
You can configure a Target sequence to execute in many different ways depending on the solution you are trying to achieve. Set up the Target Sequence to use a
Creating a new SNOPT Optimizer profile
Configure Target_Maneuver to use a SNOPT Optimizer profile, which uses the Sparse Nonlinear Optimization algorithm.
- Select Target_Maneuver () in the MCS.
- Select Differential Corrector in the Profiles table.
- Click Delete Profile () on the Profiles toolbar to delete the default Differential Corrector profile.
- Click when prompted to confirm your deletion.
- Click New... () on the Profiles toolbar.
- Select SNOPT Optimizer () when the New... dialog box opens.
- Click to confirm your selection and to close the New... dialog box.
- Click to confirm your changes and to keep the Properties Browser open.
Using the true anomaly as a decision variable
Each control that you enabled is available to use as a decision variable. Use the true anomaly as a decision variable.
- Ensure SNOPT Optimizer is selected in the Profiles table.
- Click Properties... () on the Profiles toolbar.
- Select the Variables tab when the SNOPT Optimizer dialog box opens.
- Select the Use check box for StoppingConditions.True_Anomaly.TripValue in the Decision Variables (Controls) table.
- Set the Lower and Upper bounds to the following:
| Option | Value |
|---|---|
| Lower Bound | 160 deg |
| Upper Bound | 180 deg |
These are the lowest and highest values the optimizer can use for the element. This limits where in the orbit you want to start the maneuver.
Using the maneuver duration as a decision variable
Now, enable the finite maneuver’s duration as another decision variable.
- Select the Use check box for FiniteMnvr.StoppingConditions.Duration.TripValue in the Decision Variables (Controls) list.
- Set the Lower and Upper bounds to the following:
| Option | Value |
|---|---|
| Lower Bound | 0 sec |
| Upper Bound | 120 sec |
Setting an objective and equality constraint
You would like to reach a radius of perigee of 10,000 kilometers using a minimum amount of fuel. To accomplish this, you are going to vary the starting location (the true anomaly) and duration of the burn with an R Mag constraint of exactly 10,000 kilometers — your desired orbit.
- Select the Use check box for the Maneuver object's DeltaV element in the Objectives and Constraints (Results) table.
- Click on the Goal cell.
- Open the Goal drop-down list.
- Select Minimize.
- Select the Use check box for the ProptoPergiee object's R_Mag element.
- Leave the Goal set to Bound.
- Set the Lower and Upper bounds of R_Mag as follows:
- Click to confirm your changes and to close the SNOPT Optimizer dialog box.
Each objective or constraint that you select is listed in the Objectives and Constraints (Results) table.
This defines the element's role in the problem that the profile is solving. Select Minimize to use it as part of the objective.
If you select two or more Minimize objectives for the same profile, then SNOPT will optimize the sum of the values. The profile multiplies each value by its weight and then divides by its scale factor.
Selecting Bound uses the element as a constraint.
| Option | Value |
|---|---|
| Lower Bound | 10000 km |
| Upper Bound | 10000 km |
Setting the Upper Bound and Lower Bound equal defines the condition as an equality.
Running the entire Mission Control Sequence
To calculate the trajectory of the spacecraft you must run the Mission Control Sequence. Astrogator will proceed through the MCS and run each segment, generating an ephemeris for the spacecraft. As it runs the MCS, Astrogator carries the trajectory and state of the spacecraft determined so far from one segment to the next.
Configuring the Mission Control Sequence
Configure the Mission Control Sequence to allow active profiles to operate.
- Open the Action drop-down list.
- Select Run active profiles.
- Click to confirm your change and to keep the Properties Browser open.
Selecting Run active profiles allows the active profiles to operate when you run the Mission Control Sequence.
Running the MCS
Run the entire Mission Control Sequence.
- Click Run Entire Mission Control Sequence (
 ) on the MCS toolbar.
 - Look at the Target Status window that opens.
- Close (
 ) the Target Status window.
The Target Status window's title bar notes that the SNOPT Optimizer finished successfully with optimality conditions satisfied. The Status of the Finite Maneuver's TripValue Control also indicates that the result is either SNOPT feasible or within tolerance.
When working with SNOPT optimizer profiles, if your initial guesses are inadequate, you may encounter a message in the Target Status window's title bar that the SNOPT optimizer was terminated after numerical difficulties, with the Status of certain Controls noted as being out of bounds. In such cases, the STK application's Message Viewer may display warnings ( ) giving you more detail about the nature of the issue of the numerical difficulties — for example, the satellite's fuel running out during a particular iteration. You can also review the
Clearing iterations from the 3D Graphics window
Erase the iteration graphics after finishing your run to get a good view of the orbit.
- Click Clear Graphics (
 ) on the MCS toolbar.
 - Click to confirm your change and to close the Properties Browser.
- Bring the 3D Graphics window to the front.
- Use your mouse to get a good view of the orbit.
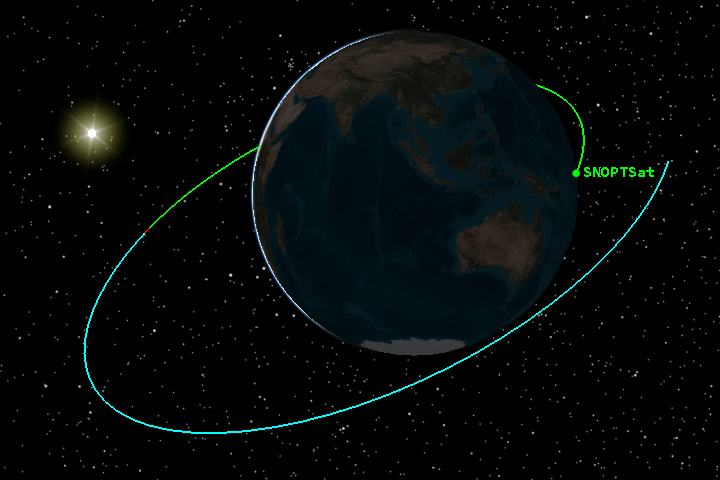
Satellite orbit propagated using SNOPT Optimizer
You can clearly see three periods of propagation, including the optimized burn during the Finite Maneuver segment.
Generating a Maneuver Summary Report
Use the Report & Graph Manager to run a Maneuver Summary Report to ensure your mission was successful.
- Right-click on SNOPTSat () in the Object Browser.
- Select Report & Graph Manager... (
 ) in the shortcut menu.
 - Select the Maneuver Summary (
 ) report in the Installed Styles () folder in the Styles list when the Report & Graph Manager opens.
 - Click .
- Scroll through the Maneuver Summary report to view the amount of fuel used.
- Close the Maneuver Summary report when finished.
- Click to close the Report & Graph Manager.
Saving your work
Clean up your workspace and save your work.
- Close any open reports, properties, tools.
- Save () your work.
Summary
You began by inserting a Satellite object, using the Astrogator capability to specify its initial state. You then constructed a Target Sequence, using SNOPT Optimizer for its search profile and selecting the true anomaly and burn duration as the profile's decision variables. You then set the profile's objective to minimize the maneuver’s Delta-V while using a 10,000-kilometer orbit radius as an equality constraint. After running the mission control sequence and optimized the maneuver, you reviewed details about is execution with a Maneuver Summary report. By using SNOPT, you were able to design your trajectory to minimize the amount of fuel used.
On your own
SNOPT is also used in an Optimal Finite Maneuver segment, which is fundamentally different from both the Impulsive and Finite Maneuvers. In those maneuvers, you set both the thrust attitude and the thrust magnitude. However, for an Optimal Finite Maneuver, while you select the thrust magnitude, the Astrogator capability computes the thrust attitude and, optionally, the maneuver duration in order to optimize a certain objective function and meet a set of constraints. You can learn more in the Spiral to GEO Using an Optimal Finite Maneuver tutorial.