Part 13:
STK Pro, STK Premium (Air), STK Premium (Space), or STK Enterprise
You can obtain the necessary licenses for this tutorial by contacting AGI Support at support@agi.com or 1-800-924-7244.
Required Software Install: The MATLAB programming platform is required to complete this tutorial. Version R2024b was used in this tutorial. Your version may have different tools and procedures.
This lesson requires version 13.0 of the STK software or newer to complete in its entirety. If you have an earlier version of the STK software, you can view a legacy version of this lesson.
Capabilities covered
This lesson covers the following capabilities of the Ansys Systems Tool Kit® (STK®) digital mission engineering software:
- STK Pro
- STK Integration
Problem statement
Developers, engineers and operators need to do the following tasks quickly and easily:
- Automate repetitive tasks from outside of the STK application
- Integrate the STK software with other applications, such as MATLAB, Microsoft Excel, and Python
- Develop custom applications
- Leverage the AGI Object Model collection of COM libraries from other applications
You want to be able to create, drive, and extract data from the STK application using MATLAB. To do so, you need to understand how to access the STK Object Model and Connect Application Programming Interfaces (APIs). You also need a basic understanding of the structure and contents of the STK Programming Help.
Solution
Use the STK software's Integration capability and the MATLAB programming platform to create a new instance of the STK application through the COM interface and expose the object root. Next, build a new scenario, populating it with a Satellite object and a Target object. Create an access between the Satellite object and the Target object, extracting access times from the STK software and moving them into MATLAB. Use the correct data providers, both groups and elements, to determine a Precision Pass value at a specific time in the scenario. Learn the benefits of the STK Programming Help.
What you will learn
Upon completion of this tutorial, you will have a basic understanding the following:
- The STK Programming Help
- The STK Object Model
- Connect commands
- MATLAB code snippets
- MATLAB Connect code snippets
- Data providers
You should shut down both the STK application and MATLAB prior to starting this tutorial. This tutorial isn't designed to teach you how to use MATLAB. It's an introduction to integrating MATLAB with the STK software and to pulling data from the STK software into MATLAB. It's also an introduction to the STK Programming Help and how important it is to be able to intelligently browse these help pages.
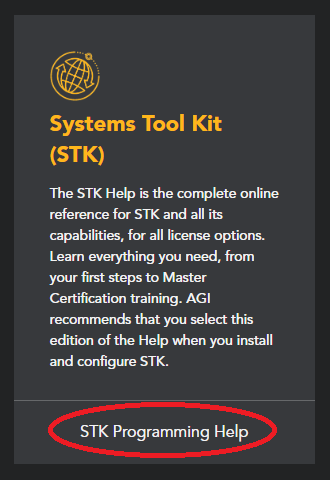
Using the STK Programming Help
The STK Programming Help offers a wide variety of options to automate and customize STK and to integrate its technology into other applications. This tutorial covers only a small portion of the STK Programming Help, but you get a great starting point from which to branch out. You can search and browse the STK Programming Help as you would the STK Desktop Help. See the
- Open your preferred internet browser.
- Go to help.agi.com.
- Click STK Programming Help.
You can also access the STK Programming Help by selecting Programming Interface Help from the Help menu in the Menu Bar. If you don't have internet access, and you've installed a local copy of the STK Help on your device, this will open the local copy of the Help documentation in your default internet browser.
Integrating with other applications
The STK software’s Integration capability enables you to automate repetitive tasks from outside the STK application, integrate the STK software with other applications such as MATLAB and Microsoft Excel, develop custom applications, and leverage the AGI Object Model collection of COM libraries from other applications. Follow these steps to learn more about these possibilities.
- Select the Select the Right Technology Help topic in the table of contents of the STK Programming Help.
- Select the Integrate Technologies Help topic.
- Click the clickable decision tree link on the Integrate With Other Applications page.
- Take some time to view the page and click some of the icons.
There are many clickable decision trees available in STK Programming Help. You can use the trees to quickly locate help pages that you need to be successful when integrating with the STK software.
Automating repetitive tasks
To automate repetitive tasks in the STK application, you can use HTML, Connect, and the STK Object Model to build tools that are accessible from within the STK application. You can find more information on this in the STK Programming Help by following these steps:
- Under the Select the Right Technology help topic, select Automate Tasks.
- Click the clickable decision tree link on the Automate Repetitive Tasks topic page.
- Take some time to view the page and click some of the icons.
Extending AGI products
AGI provides a variety of ways to extend its products. These extensibility mechanisms come under two distinct categories: user interface extensibility and engine extensibility. You can find more information on these in the STK Programming Help by following these steps:
- Under Select the Right Technology, click Extend AGI Products.
- Click the clickable decision tree link on the Extend AGI Products Using Plugins and Custom User Interfaces topic page.
- Take some time to view the page and click some of the icons.
There are other links throughout that aren't covered here. Take some time later on to become familiar with them.
Visualizing with the STK software
STK X enables developers to add advanced 2D and 3D visualization with the STK software's and analytical capabilities to applications with little effort. You can find more information on this in the STK Programming Help by following these steps:
- In the table of contents, go to Library Reference > Controls > STK X.
- Take some time to familiarize yourself with the contents of this page.
Using core libraries
The STK software API consists of two major subsystems: Connect and the STK Object Model.

Core Libraries
- In the STK Programming Help, select the Using Core Libraries Help topic in the table of contents.
- Note the advantages and disadvantages of using the Connect and Object Model libraries.
Choosing between Connect or the STK Object Model should be driven by the requirements of the application and your needs as a developer. However, this need not be an exclusive choice. You can use Connect commands in a COM application side by side with Object Model code.
Learning STK Object Model naming conventions
The STK Object Model contains naming conventions for classes, interfaces, and enumerations.
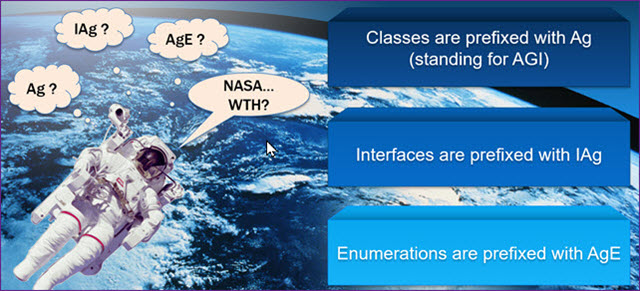
Naming Conventions
- In the STK Programming Help, go to Library Reference > STK Object Model > Naming Conventions.
- Note the various naming conventions described in the Naming Conventions Used in the Various Core Libraries topic.
- Click the certain abbreviations link.
- Note the abbreviations most commonly used in the names of classes, interfaces, and other types in the STK Object Model.
Using model diagrams
As a serious programmer, you can use diagrams to see how the STK traffic flow is connected. That way, you know what's to the right, left, above, and below, all while deep linking to the individual IAg interface topic pages.
- In the STK Programming Help, go to Using Core Libraries > STK Object Model > STK Objects > Diagrams.
- Click STK Object Model Diagram (PDF) in the STK Objects Object Model Diagrams topic.
- Zoom in closer to the page for clarification.
- Take some time to look at the STK 10.0 Object Model Diagram PDF.
- STK Objects: STK Object Model Diagram (PDF) and Space Environment Object Model Diagram (PDF)
- STK X: STK X Diagram (PDF)
- STK VGT (Analysis Workbench): VGT Object Model Diagram (PDF)
- STK Util: STK Util Object Model Diagram (PDF)
- STK Astrogator: STK Astrogator Object Model Diagram (PDF)
- Close the STK Object Model Diagram (PDF) when finished.
- Keep the STK Programming Help open.
Diagrams also exist for the following:
Connecting the STK software and MATLAB
You can integrate the STK software and MATLAB to automate, extend or visualize your analysis. There are
For each supported version of MATLAB, AGI produces a
If you do not have an agi.com account, you will need to create one. The user approval process can take up to three (3) business days. Please contact support@agi.com if you need access sooner.
You can also connect any 64- and 32-bit version of MATLAB to the STK software using the
For this tutorial, you will connect the MATLAB and STK applications via the COM interface.
Launching MATLAB
MATLAB is a programming and numeric computing platform used by millions of engineers and scientists to analyze data, develop algorithms, and create models.
- Launch MATLAB.
- Select the Home tab when MATLAB opens.
- Click Layout in the MATLAB Toolstrip.
- Select Default in the Select Layout menu. This makes it easier to follow the tutorial. If you're familiar with MATLAB and have a setup you prefer, keep it.
Creating a new MATLAB script
MATLAB script files are program files with the .m file extension. In these files, you can write groups of commands that you want to execute together. Scripts are the simplest kind of program file because they have no input or output arguments; they operate only on the available data in their workspace.
- Select the Home tab in the MATLAB Toolstrip.
- Click .
- Select the Editor tab in the MATLAB Toolstrip.
- Select Save As.... in the Save menu.
- Browse to the folder where you will save the .m file (e.g., C:\Users\<username>\Documents\MATLAB).
- Enter STK_Matlab in the File name field.
- Ensure Save as type is set to MATLAB Code files (UTF-8) (*.m).
- Click .
After creating the script file for this tutorial, you can practice with it later. A completed version of the script is included with your STK install at <Install Dir>\Data\Resources\stktraining\scripts\STK_MATLAB_Script.m.
Locating the STK Object Model and MATLAB code snippets
Code snippets demonstrate tasks that are commonly encountered when working with the STK Object Model.
- Return to the STK Programming Help.
- Go to Using Core Libraries > STK Object Model > MATLAB Code Snippets.
Task 1: Creating an STK instance
The AgStkObjectRoot Object is the top-level object in the STK Object Model hierarchy. The AgStkObjectRoot object provides methods and properties to load scenarios, create new ones, and access the Object Model Unit preferences.
Writing comments in your script
Write comments by preceding the line with the % symbol.
- In the MATLAB Editor, enter or copy and paste the following comment onto line 1 of your MATLAB script:
- Select the Enter key to move to the next line.
%Task1
Referencing the IAgStkObjectRoot interface
From the IAgStkObjectRoot interface, you can access all other objects and collections exposed by the Object Model.
- Locate the Initialization section under the subheading "How do I ..." on the MATLAB Code Snippets topic page.
- Click the Start STK and get a reference to IAgStkObjectRoot link.
- Enter or copy and paste the following comment and code onto lines 3 through 5 of your MATLAB script:
- Select the Enter key.
- Place your cursor before
%Task1. - Click on the MATLAB Toolstrip.
- Place your cursor before
%Task1. - Click in the MATLAB Toolstrip.
- Look at the MATLAB Workspace.
You won't use the exact MATLAB snippets available in the STK Programming Help. When using snippets to create scripts, you need to edit the code to build your custom scenario. You can compare the edited code in this tutorial to the snippet code in STK Programming Help.
% Create an instance of STK
uiApplication = actxserver('STK13.Application');
uiApplication.Visible = 1;

Task 1 Example
You created a variable called uiApplication and started an instance of the STK application. You also made the STK application splash screen visible.
Save your MATLAB script after completing each section's task.
Selecting a root of the Application Model
The second part of the
- Click into the MATLAB Command Window.
- Copy and paste or enter the following code in the Command Window:
- MATLAB can work with the STK software using IntelliSense, which will show you possible selections. Use IntelliSense to select an application root of the STK Object Model.
- Return to the STK Programming Help.
- Enter or paste IAgUiApplication in the search field located in the upper-right corner. The case doesn't matter.
- Select the Enter key.
- Select AgUiApplicationLib~IAgUiApplication in the search results. The IAgUiApplication interface represents a root of the Application Model.
root = uiApplication.
Make sure to include the period (.).
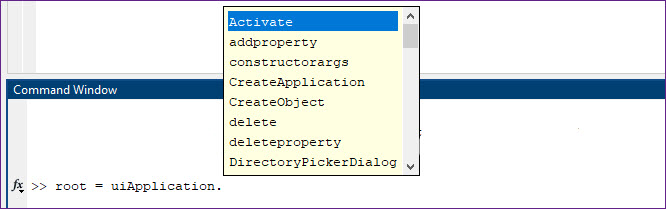
IntelliSense Selections
Exposing the STK object root
Looking at the IAgUiApplication Interface topic page, most of what you see in IntelliSense matches the Public Methods and Properties.
- Scroll down the IAgUiApplication Interface help topic page to the Public Properties section.
- Select Personality2, which returns a new instance of the root object of the STK Object Model.
- Return to the Command Window.
- Select the Tab key while the cursor is just after the period (.) of the
root = uiApplication.command. - Select
Personality2in IntelliSense. - Select the Enter key.
- Enter a semicolon (;) after
Personality2. - Select the Enter key.
- Copy or enter the following whole line of code on line 6 of your MATLAB script:
You could have searched for any of the IntelliSense selections. Searching for Personality2 would have taken you directly to the help page and its description.
The Command Window will display the result, which should be:
root =

	Interface.AGI_STK_Objects_13__IAgStkObjectRoot
Note that with the with the addition of the semicolon in the Command Window, the display of the output of the root = uiApplication.Personality2 command is suppressed.
root = uiApplication.Personality2;
You've exposed the STK object root, so now you can start creating a new scenario.
Task 2: Scripting for a new scenario
You will now use your MATLAB script to interact with the STK application.
Creating a new scenario
Now that you've launched the STK application via the MATLAB interface, you can create a new scenario, set the scenario time period, and reset the animation time.
- Enter or copy and paste the following section break and comment on lines 7 and 8 of the STK_Matlab.m script:
- Select the Enter key.
- Return to MATLAB Code Snippets under Using Core Libraries > STK Object Model in the STK Programming Help.
- Locate the Scenario Management section (under the Scenario heading The direction that the aircraft is pointing.) of the MATLAB Code Snippets topic page.
- Click the Create a new Scenario link.
- In MATLAB, enter or copy and paste the following comment and code onto lines 9 and 10 of your MATLAB script:
- Select the Enter key.
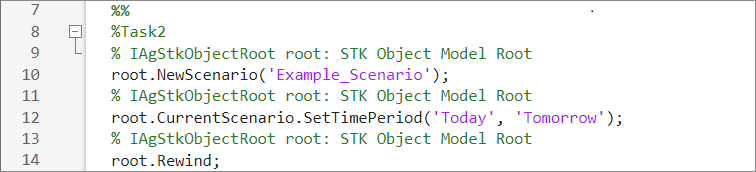
%%
%Task2
This adds a section break and the task identifier at the same time. You will do this for all subsequent tasks.
% IAgStkObjectRoot root: STK Object Model Root
root.NewScenario('Example_Scenario');
Using the IAgStkObjectRoot interface
The IAgStkObjectRoot interface represents the automation interface supported by the root object of the Automation Object Model.
- Return to the STK Programming Help.
- Enter or copy and paste "IAgStkObjectRoot" in the Search field.
- Select the Enter key.
- Select STKObjects~IAgStkObjectRoot in the search results.
- Select NewScenario in the Public Methods list.
Creating a new scenario
The NewScenario method creates a new scenario.
- There is no syntax specifically for MATLAB, so look at the syntax for [Visual Basic .NET].
- Click the ScenarioName link in the Visual Basic .NET syntax entry.
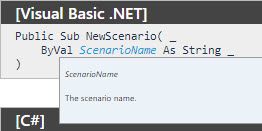
Syntax
The NewScenario method expects a string that is the scenario name. In the line you added to Task 2, you set the scenario name to Example_Scenario.
Setting the analysis start and stop times
You want to return a scenario object and set the analysis period.
- Return to MATLAB Code Snippets.
- Locate the SCENARIO MANAGEMENT section of the MATLAB Code Snippets topic page.
- Click the Change scenario time period link.
- Enter or copy and paste the following comment and code onto lines 11 and 12 of your MATLAB script:
- Select the Enter key.
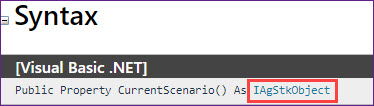
- The CurrentScenario property (IAgStkObjectRoot) returns a scenario object or a null value if you have not loaded a scenario yet.
- The
% IAgStkObjectRoot root: STK Object Model Root
root.CurrentScenario.SetTimePeriod('Today', 'Tomorrow');
You are only using the first two lines of code from the snippet. STK automatically sets the scenario epoch time to match your analysis start time.
Resetting the scenario animation time
You want to reset the animation time to the beginning of the analysis period.
- Return to MATLAB Code Snippets.
- Locate the Scenario Management section of the MATLAB Code Snippets topic page.
- Click the Reset the scenario time link.
- Enter or copy and paste the following comment and code onto lines 13 and 14 of your MATLAB script
- Select the Enter key. You are using the Rewind method (IAgAnimation) to stop and reset the animation.
- Place your cursor in front of
%Task2. - Click in the MATLAB Toolstrip.
- Go to the STK application window.
% IAgStkObjectRoot root: STK Object Model Root
root.Rewind;
Task 2 Example
A new scenario named Example_Scenario (![]() ) is open and the time has been reset in the Current Scenario Time field of the Animation toolbar.
) is open and the time has been reset in the Current Scenario Time field of the Animation toolbar.
Task 3: Inserting a Target object
To create a new object such as a Target object, use the AgESTKObjectType enumeration. Not every object in the STK software has an associated snippet, so you may need to edit the available code snippets to meet your needs.
Creating a new Target object
Target, Place, and Facility objects contain the same properties, but they're seen as different object classes. In this instance, since there isn't a snippet to insert a new Target object into the scenario, you can use the Create a facility (on the current scenario central body) snippet and make some simple changes to the code.
- Return to your MATLAB script.
- Enter or copy and paste the following section break and comment onto lines 15 and 16 of your MATLAB script:
- Select the Enter key.
- Return to MATLAB Code Snippets.
- Locate the Facility section of the MATLAB Code Snippets topic page.
- Click the Create a facility (on the current scenario central body) link.
- Enter or copy and paste the following comment and code onto lines 17 and 18 of your MATLAB script:
- Select the Enter key.
%%
%Task3
% IAgStkObjectRoot root: STK Object Model Root
target = root.CurrentScenario.Children.New('eTarget', 'MyTarget');
The snippet code is: facility = root.CurrentScenario.Children.New('eFacility', 'MyFacility');. You are swapping out the variable eFacility for eTarget and changing the name to 'My Target'.
Retrieving the current scenario
The CurrentScenario property returns a Scenario object or a null value if no scenario has been loaded yet.
- Return to the STK Programming Help.
- Enter "CurrentScenario" in the Search field.
- Select the Enter key.
- Select STKObjects~IAgStkObjectRoot~CurrentScenario in the search results.
- Go to the Visual Basic.NET syntax entry on the CurrentScenario Property (IAgStkObjectRoot) topic page.
- Click the IAgStkObject link.
VB.NET IAgStkObject
Retrieving children of an STK object
The IAgStkObject interface represents a specific instance of an STK object. The Children property (IAgStkObject) returns a collection of direct descendants of the current object.
- Go to the Public Properties section on the IAgStkObject Interface page.
- Select Children.
- Go to Visual Basic.NET syntax in the Children Property (IAgStkObject) topic page.
- Select IAgStkObjectCollection.
Retrieving a collection of STK objects
The IAgStkObjectCollection interface represents a collection of STK objects.
- Go to Public Methods in the IAgStkObjectCollection Interface topic page.
- Select New.
Creating a new STK object
The New method (IAgStkObjectCollection) creates an STK object using a specified class and instance name.
- Go to the Visual Basic.NET syntax on the New Method (IAgStkObjectCollection) topic page.
- Select AgESTKObjectType.
Understanding the AgESTKObjectType enumeration
The AgESTKObjectType Enumeration topic page shows STK objects (members) with their values and descriptions. When using the AgESTKObjectType enumeration to insert a new Target object, you can use the member name eTarget or the value 23. In this case, you are using eTarget and setting the Target object's name to MyTarget. This is another way to use the STK Programming Help.
On your own, you might have to take some time working your way through the pages to find what you're looking for.
Assigning the location
Use a MATLAB code snippet to assign the location of the Target at a specific location.
- Return to MATLAB Code Snippets.
- Locate FACILITY in the MATLAB Code Snippets page.
- Click the Set the geodetic position of the facility link.
- Enter or copy and paste the following comments and code onto lines 19 through 21 of your MATLAB script:
- Select the Enter key.
- The Position property (IAgTarget) gets the position of the target.
- The IAgPosition interface provides access to the position of the object.
- The AssignGeodetic method (IAgLLAPosition) assigns the position using geodetic representation.
- In the script, place your cursor in front of
%Task3. - Click in the MATLAB Toolstrip.
% IAgTarget Interface provides access to the properties and methods used in defining a target object.
% Latitude, Longitude, Altitude
target.Position.AssignGeodetic(50, 100, 0)

Task 3
Checking the location in the STK application
Confirm the location of your new Target object by viewing its properties in the STK application.
- Bring the STK application window to the front to view MyTarget (
 ) in the 2D and 3D Graphics windows.
 - Right-click on MyTarget () in the Object Browser.
- Select Properties (
 ).
). - Note the Latitude, Longitude, and Altitude on the Basic - Position page.
- Click to close MyTarget's Properties ().
If you have an Internet connection and are using Terrain Server, the Altitude will have a value higher than 0 km. That's because you placed the Target object on the surface of the terrain. If you are not using the Terrain Server, the Target object will be on the surface of the WGS84 ellipsoid.
Task 4: Inserting a Satellite object
Use Connect commands to propagate a Satellite object in your scenario.
- Return to your MATLAB script.
- Enter or copy and paste the following section break and comment onto lines 22 and 23 of your MATLAB script:
- Select the Enter key.
- Return to MATLAB Code Snippets.
- Locate the SATELLITE section on the MATLAB Code Snippets page.
- Click the Create a satellite (on the current scenario central body) link.
- Return to your MATLAB script.
- Enter or copy and paste the following comment and code onto lines 24 and 25 of your MATLAB script:
- Select the Enter key.
%%
%Task4
% IAgStkObjectRoot root: STK Object Model Root
satellite = root.CurrentScenario.Children.New('eSatellite', 'MySatellite');
Learning about Connect
The Connect module provides you with an easy way to connect with the STK software and work in a client-server environment. You can use the library shipped with Connect to build applications that communicate with the STK application. This library contains functions, constants, and other messaging capabilities that you can use to connect third-party applications to the STK software.
- Return to the STK Programming Help.
- Go to Using Core Libraries > Connect.
This page is a great place to learn about Connect. Take some time to become familiar with the content linked from this page.
Propagating your satellite via Connect
Just like you did while using the STK Object Model and MATLAB Code Snippets, you can use the MATLAB Connect Code Snippets help topic to become familiar with Connect.
- Go to Using Core Libraries > Connect > Connect Code Snippets.
- Locate the Satellite section of the MATLAB Connect Code Snippets topic page.
- Click the Set initial state of satellite and propagate link.
- Return to your MATLAB script.
- Enter or copy and paste the following code onto lines 26 and 27 of your MATLAB script:
- Select the Enter key.
- The ExecuteCommand method (IAgStkObjectRoot) executes a custom Connect action.
- The Units_Set command sets units of measure. You're using Units_Set because Connect's distance unit defaults to meters and you require kilometers.
root.ExecuteCommand('Units_Set * Connect Distance "Kilometers"'); %Default Connect Units are meters
root.ExecuteCommand('SetState */Satellite/MySatellite Classical TwoBody "UseAnalysisStartTime" "UseAnalysisStopTime" 60 ICRF "UseAnalysisStartTime" 6678.14 0 28 180 0 180');
There are several propagators in the STK software (e.g., Two-Body, J2 Perturbation, J4 Perturbation, SGP4, etc.). This command is using the Two-Body propagator.
This is an instance where the Connect Command has changed, but the snippet uses an old command. In the snippets, the code is root.ExecuteCommand('SetUnits / km'). SetUnits is an obsolete command. If you have a set of commands and upgrade to a new version of STK and the command no longer works, go to Deprecated Commands. You will find both deprecated commands and obsolete commands. Locate the bad command and you will find the command that has replaced it.
Learning about the SetState Connect command
Look at the Alphabetical Listing of Connect Commands to get information on the SetState command.
- Return to the STK Programming Help.
- Go to Library Reference > Connect Command Library.
- Note the links in the Connect Command Listings topic page.
- Click the Alphabetical Listing of Connect Command link.
- Click "S" at the top of the Alphabetical Listing page.
- Locate and select the SetState Classical command.
- Scroll through the SetState Classical page and note the following:
- The syntax will help you understand the input values of your SetState command.
- The description table explains each input and its associated unit.
- In the Examples section, there are several examples that you can copy and edit for your particular scenario.
The Alphabetical listing includes all Connect commands, regardless of their groupings.
Using MATLAB to set the Satellite state
Update the SetState syntax to definite the to define the satellite's orbital parameters.
- Return to your MATLAB script.
- Using SetState syntax, update the following values in the SetState Connect command that you entered on line 27 of your MATLAB script.
- Place your cursor in front of
%Task4. - Click in the MATLAB Toolstrip.
- Bring the STK application to the front to view MySatellite in the 2D and 3D Graphics windows.
- Open MySatellite's (
 ) Properties ().
 - Note and match the property settings and values to your SetState Connect command.
- Click when finished.
| Option | Value |
|---|---|
| SemiMajorAxis | 7200 |
| Eccentricity | 0 |
| Inclination | 90 |
| ArgOfPerigee | 0 |
| RAAN | 0 |
| MeanAnom | 0 |
The SetState command in MATLAB should match the following:
root.ExecuteCommand('SetState */Satellite/MySatellite Classical TwoBody "UseAnalysisStartTime" "UseAnalysisStopTime" 60 ICRF "UseAnalysisStartTime" 7200 0 90 0 0 0');

Task 4
Task 5: Creating access intervals between MySatellite and MyTarget
Use the STK Object Model to create access intervals from the Satellite object the to Target object.
Entering the access commands into MATLAB
Use your MATLAB script to enter access computation commands.
- Return to your MATLAB script.
- Enter or copy and paste the following section break and comment onto lines 28 and 29 of your MATLAB script:
- Select the Enter key.
- Return to the STK Programming Help.
- Go to Using Core Libraries > STK Object Model > MATLAB Code Snippets.
- Locate the ACCESS section on the MATLAB Code Snippets topic page.
- Select Compute an access between two STK Objects (using IAgStkObject interface).
- Return to your MATLAB script.
- Enter or copy and paste the following comments and code onto lines 30 through 33 of your MATLAB script:
- The GetAccessToObject method (IAgStkObject) returns an IAgStkAccess object. In this instance, you're creating an access from the Satellite object to the Target object.
- The ComputeAccess method (IAgStkAccess) recomputes the access between two objects.
- Select the Enter key.
%%
%Task5
% Get access by STK Object
access = satellite.GetAccessToObject(target);
% Compute access
access.ComputeAccess();
Computing and checking the access intervals
Run the latest MATLAB code section and check the access calculation results in the STK application.
- In the script, place your cursor in front of
%Task5. - Click in the MATLAB Toolstrip.
- Bring the STK application window to the front.

Task 5
You can see the highlighted satellite ground tracks indicating periods of access in the 2D Graphics window.
Task 6: Retrieving the access data
You created access intervals between the Satellite object and the Target object. An easy way to extract and see those times is to create an interval collection of access start and stop times.
Scripting access interval retrieval in MATLAB
Write a MATLAB script task to get the access interval times from the STK software.
- Return to your MATLAB script.
- Enter or copy and paste the following section break and comment onto lines 34 and 35 of your MATLAB script:
- Select the Enter key.
- Return to MATLAB Code Snippets.
- Locate the ACCESS section of the MATLAB Code Snippets page.
- Click the Compute and extract access interval times link.
- Return to your MATLAB script.
- Enter or copy and paste the following comments and code onto lines 36 through 40 of your MATLAB script:
- The ComputedAccessIntervalTimes property (IAgStkAccess) returns a list of the computed access interval times.
- The IntervalCollections property (IAgCrdnIntervalsVectorResult) is a collection of interval collections.
- The ToArray method (IAgIntervalCollection) returns a two-dimensional array of intervals beginning at a given position and having a specified number of rows.
- The SpecifyAccessIntervals method (IAgStkAccess) specifies a list of intervals to use for the access calculation.
- Select the Enter key.
%%
%Task6
% IAgStkAccess access: Access calculation
% Get and display the Computed Access Intervals
intervalCollection = access.ComputedAccessIntervalTimes;
% Set the intervals to use to the Computed Access Intervals
computedIntervals = intervalCollection.ToArray(0, -1);
Retrieving the access interval times
Run Task 6 of your MATLAB script to retrieve the access inteval times.
- In the script, place your cursor in front of
%Task6. - Click in the MATLAB Toolstrip.
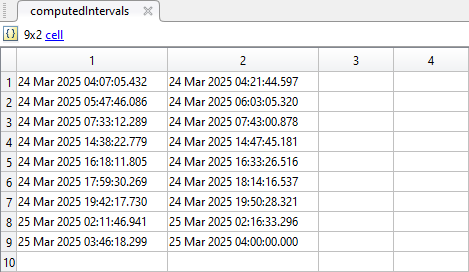
- In the MATLAB Workspace, double-click computedIntervals.
- When the computedIntervals cell opens, expand columns 1 and 2 so you can read the access data. Column 1 shows the start times of the accesses and column 2 shows the stop times. Your data will have different values.
- When finished, close the cell.

Task 6
Task 7: Investigating data providers
The STK software generates reports and graphs using selected data providers for the specific report or graph style. You can view data providers, both groups and individual elements, when using the Report & Graph Manager inside of the STK application. The STK Programming Help contains details of data provider groups, individual elements, and report and graph styles.
- Enter or copy and paste the following section break and comment onto lines 41 and 42 of your MATLAB script:
- Select the Enter key.
- Return to the STK Programming Help.
- Go to Library Reference > Data Providers Reference.
%%
%Task7
You can spend a lot of time looking at an object's data providers, both groups and elements on the Data Providers by Object topic page.
Extracting data providers
Your scenario is 24 hours long. The Satellite object data provider group named "Passes" contains extensive data about the satellite's orbit for each pass. The data provider group "Precision Passes" contains, for specific times, the following:
- Precision pass number: This number has two parts: the integer pass number for the given time and the fraction of the orbit from the ascending node for that time.
- Precision path number: This is the satellite's orbit path number, which will remain at the value of 1 until the ground track repeats, at which time the number will increase to 2, and so on.
Use MATLAB to extract these data.
- Go to Using Core Libraries > STK Object Model > MATLAB Code Snippets in the STK Programming Help.
- Locate the DATA PROVIDERS section on the MATLAB Code Snippets topic page.
- Click the Getting Data for a Single Point in Time link.
- Return to your MATLAB script.
- Enter or copy and paste the following comments and code onto lines 43 through 48 of your MATLAB script:
- Select the Enter key.
% IAgStkObjectRoot root: STK Object Model root
% IAgSatellite satellite: Satellite object
% Change DateFormat dimension to epoch seconds to make the data easier to handle in MATLAB
root.UnitPreferences.Item('DateFormat').SetCurrentUnit('EpSec');
satPassDP = satellite.DataProviders.Item('Precision Passes').ExecSingle(2600);
pass = cell2mat(satPassDP.DataSets.GetDataSetByName('Precision Pass Number').GetValues);

Task 7
Setting the date format and elements
Break down your code to understand what time data will be returned.
- Look at the code from line 46:
root.UnitPreferences.Item('DateFormat').SetCurrentUnit('EpSec');. - The UnitPreferences property (IAgStkObjectRoot) provides access to the Global Unit table.
- The Item property (IAgUnitPrefsDimCollection) returns IAgUnitPrefsDim, for which you give a dimension name or an index. The data provider is DateFormat.
- The SetCurrentUnit method (IAgUnitPrefsDimCollection) sets unit preferences. You are using epoch seconds, or EpSec.
- Return to the STK Programming Help.
- Go to Using Core Libraries > STK Object Model > STK Util > Dimensions and Units.
- Scroll down to DateFormat in the STK Object Model Unit Preferences page.
- Look at Available Units.
The Epoch Seconds element is EpSec.
Your scenario's default date format is Gregorian UTC (UTCG). As stated in the SetCurrentUnit code snippet, changing the DateFormat dimension to epoch seconds makes the data easier to handle in MATLAB. Since your scenario is 24 hours long, the STK software expresses the scenario end time as 86400 EpSec. Thus, a scenario UTCG time of 30 Jun 2023 08:11:49.699 will now appear as 15109.699 EpSec. This is easier to read and use in MATLAB.
Selecting satellite data providers
Review your code to understand what data will be returned.
- Return to your MATLAB script.
- Look at the code from line 47:
satPassDP = satellite.DataProviders.Item('Precision Passes').ExecSingle(2600);. - The DataProviders property returns the object representing a list of available data providers for the object. In this case, it is a Satellite object.
- The ExecSingle method computes the data given a specific time. SingleTime uses the DateFormat Dimension, which you set to EpSec.
- Return to the STK Programming Help.
- Go to Library Reference > Data Providers Reference.
- Select the Satellite in the Data Providers by Object topic page.
- Select Precision Passes in the Available Data Providers table.
Retrieving the Precision Pass data
Examine the code to understand how the data Precision Pass data will be formatted.
- Return to your MATLAB script.
- Look at the code from line 48:
pass = cell2mat(satPassDP.DataSets.GetDataSetByName('Precision Pass Number').GetValues);. - The
- The DataSets property (IAgDrResult) returns a collection of datasets.
- The GetDataSetByName method (IAgDrDataSetCollection) returns the element for a given name, which in this case is the Precision Passes data provider element Precision Pass Number.
- The GetValues method (IAgDrDataSet) retrieves an array of values of the elements in the dataset.
- Place your cursor in front of
%Task7. - Click in the MATLAB Toolstrip.
- Look at the pass value (e.g., 1.4276) in the MATLAB Workspace.
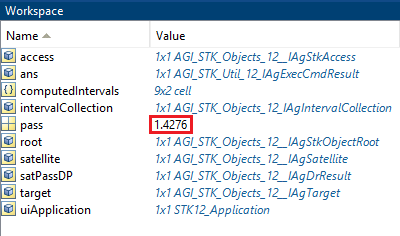
Precision Pass Value
The Precision Pass Number of the satellite at the analysis start time (0 epoch seconds) is 1.0000. For the above example, a Precision Passes value of 1.4276 indicates that the Satellite object has orbited the central body almost one-half of an orbit based on the given scenario time of 2600 epoch seconds. With a 24-hour analysis period, any value from 0 through 86400 epoch seconds will work. You can change this value and rerun task 7 to determine precision pass numbers throughout the 24-hour analysis period.
Summary
You began by viewing a small portion of the STK Programming Help pages. Next, using MATLAB code snippets, you performed the following:
- Created a connection between MATLAB and the STK application
- Exposed the STK object root
- Created a new scenario
- Inserted and positioned a Target object
- Inserted and propagated a Satellite object
- Calculated accesses between the Satellite object and the Target object
- Extracted access data from the STK software into MATLAB
- Used data providers to changes time units from UTCG to EpSec
- Extracted a satellite precision pass value from the STK into MATLAB
On your own
Throughout the tutorial, hyperlinks were provided that pointed to in-depth information concerning the STK Object Model and Connect. Now is a good time to go back through this tutorial and view that information. Obviously, there is a lot to learn. However, this tutorial should have provided some familiarization on how to use STK Programming Help.
The STK Programming Help provides tutorials designed to help you become more familiar with the STK Object Model and Connect.
AGI maintains a GitHub repository of code samples to help you get started with the STK Object Model.