STK Pro, STK Premium (Air), STK Premium (Space), or STK Enterprise
You can obtain the necessary licenses for this tutorial by contacting AGI Support at support@agi.com or 1-800-924-7244.
Required product install:installation of the Navigation Files Plugin, which is included with
The results of the tutorial may vary depending on the user settings and data enabled (online operations, terrain server, dynamic Earth data, etc.). It is acceptable to have different results.
Capabilities covered
This lesson covers the following capability of the Ansys Systems Tool Kit® (STK®) digital mission engineering software:
- STK Pro
Problem statement
Engineers and operators want to use external Two-Line Element sets (TLE) in their analysis. They require an easy way to locate, download and propagate the TLEs in their scenarios. For those who focus on GPS satellites, they require an easy way to locate, download, and propagate GPS almanac files and associated satellite outage files (SOFs) in their scenarios.
Solution
Use the Ansys Government Initiatives website to download both current and archived TLEs and propagate them as Satellite objects in a scenario. Then, use the United States Coast Guard Navigation Center website to locate and download GPS almanac files and satellite outage files and propagate the GPS satellite constellation in your scenario.
What you will learn
Upon completion of this tutorial, you will:
- Download and use TLEs in your analysis
- Download and use GPS almanac files in your analysis
- Download and use satellite outage files in your analysis
Video guidance
Watch the following video. Then follow the steps below, which incorporate the systems and missions you work on (sample inputs provided).
Creating a new scenario
First, you must create a new scenario, and then build from there.
- Launch the STK application (
 ).
). - Click
 Create a Scenario when the Welcome to STK dialog box opens.
 - Enter the following in the STK: New Scenario Wizard:
- Click when you finish.
- Click Save (
 ) when the scenario loads.
 - Verify the scenario name and location in the Save As dialog box.
- Click .
| Option | Value |
|---|---|
| Name | TLE_Almanac_Files |
| Start | Default |
| Stop | Default |
The STK application creates a folder with the same name as your scenario for you.
Save (![]() ) often during this scenario!
) often during this scenario!
Using the current satellite databases
U.S. Space Command (USSPACECOM) continually tracks man-made space objects (that is, spacecraft and orbital debris) as part of its mission. These objects constitute the space object catalog. While most of the catalog is made available to the public, some information is restricted. AGI provides the publicly released information for use with the STK application in the form of satellite database files and two-line mean element files (TLEs). A
Users can download TLE files that can be
Opening and signing into the Ansys Government Initiatives website
You can access and download the current satellite databases from the Ansys Government Initiatives website. Log in to your AGI account using the internet browser of your choice.
If you do not have an agi.com account, you will need to create one. The user approval process can take up to three (3) business days. Please contact support@agi.com if you need access sooner.
- Open your preferred browser.
- Browse to
- Click at the top of the page.
- Select Sign In from the drop-down menu.
- Enter your email and password that you use for your AGI account.
- Click .
Locating the satellite database
You can download the satellite database, example scenarios, 3D models, and more from the AGI Support Center.
- At the top of the page, select Support in the navigation menu.
- Select Support Center in the Support menu.
- Scroll down to the Quick Resources section when the Support Center page opens.
- Under Getting Started, select Supporting STK Data.
- Select Satellite Database (
 ) when the Supporting Data page opens.
Understanding the age of the databases
AGI updates the satellite databases three time a day; this ensures that you have access to the most current and accurate TLE data for your space operations and analyses. With each update, a text (*.txt) file is included with the date information. You can view the most current file date in your browser.
- Click the Click Here link when the Satellite Database for PC page opens to find out the date of the last database update.
- Look at the text on the page when the Date.txt file opens in your browser.
- Return to the Satellite Database for PC page.
This will show you the day, month, date, and time of the latest update.
Downloading the current satellite databases
Looking at the Satellite Database for PC page, you can see that there are multiple databases that you can download and use. You can read what each database provides. For simplicity, you'll use the Download All Current Satellite Databases selection, which will download a compressed folder containing all of the current satellite databases.
- Click .
- Leave your browser open.
Your download should start automatically after a few seconds. If your download does not start, click to return back to the page where you requested the file to download and try again.
Extracting the stkAllDatabases40 folder
Now that you've downloaded all the satellite database, extract its contents.
- Open Windows File Explorer.
- Go to the location where your downloads reside.
- Right-click on the stkAllDatabases40 compressed (zipped) folder.
- Select Extract All... in the shortcut menu.
- Click in the Extract Compressed (Zipped) Folders dialog box.
Copying the satellite databases to your scenario folder
The stkAllDatabases40
- Right-click on the now-extracted stkAllDatabases40 folder.
- Select Copy in the shortcut menu.
- Select Documents in the navigation pane.
- Navigate to your scenario folder (for example, C:\Users\<username>\Documents\STK_ODTK 13\TLE_Almanac_Files.
- Right-click in the content pane, where you interact with files and folders.
- Select Paste in the shortcut menu.
If you chose a non-default folder in which to store your scenarios during the STK application install, you will need to place the stkAllDatabases40 File folder in your custom location.
Learn more about satellite database files at https://help.agi.com/STKComponents/html/SatelliteDatabases.htm.
Opening the STK application preferences
The STK
- Bring the STK application () to the front.
- Select the Edit menu.
- Select Preferences....
- Clear the Set as Default check box in the bottom-left corner of the Preferences dialog box.
When you clear the Set as Default check box, the preferences that you set will be applied only to the scenarios that are opened during your current STK session, whether they are previously saved scenarios or newly created scenarios. If you leave the Set as Default check box selected, the preferences that you set are applied to all scenarios that are opened during the current STK session and also in subsequent sessions.
Setting SGP4 Propagator defaults
The
- Select the Propagator Defaults page when the Preferences dialog box opens.
- In the SGP4 Propagator panel, open the Update Mode drop-down list.
- Select FromFiles.
- Click the Source File ellipsis (
 ).
). - In the Select File dialog box, browse to the location of the stkAllDatabases40 File folder (for example, C:\Users\<username>\Documents\STK_ODTK 13\TLE_Almanac_Files).
- Open the stkAllDatabases40 File folder.
- Select the stkAllTLE.tce file.
- Click .
- Click to confirm your selections and to close the Preferences dialog box.

SGP4 Propagator settings
This will allow you to use your downloaded local TLE file when inserting a Satellite object using the From Standard Object Database method in the Insert STK Objects tool. It will also set the default file to use when inserting a Satellite object using the From TLE File method.
Inserting a Satellite object from the Standard Object Database
Use the local database to insert the International Space Station (ISS).
- Bring the Insert STK Objects tool (
 ) to the front.
 - Select Satellite (
 ) in the Select An Object To Be Inserted list.
 - Select From Standard Object Database (
 ) in the Select A Method list.
 - Click .
Selecting a satellite from the local database
You want to use the TLE from the local database.
- If you are using an Internet connection, clear the Online check box underneath Data Sources when the Search Standard Object Data dialog box opens.
- Enter 25544 in the Name or ID field.
- Click .
- Select ZARYA in the Results list.
- Click .
- After ZARYA_25544 () propagates, click .
Confirming the TLE date
- Right-click on ZARYA_25544 () in the Object Browser.
- Select Properties (
 ) in the shortcut menu.
 - Select the Basic - Orbit page when the Properties Browser opens.
- In the TLE Source panel, click .
- Confirm the TLE Epoch date is close to your current scenario time.
- When finished, click to close the TLE Preview dialog box.
- Click to close the Properties Browser.
- Clear the check box for ZARYA_25544 () in the Object Browser.
Using current satellite almanac files to propagate GPS satellites
The GPS almanac is a set of data that every GPS satellite transmits, and it includes information about the state (health) of the entire GPS satellite constellation, and coarse data on every satellite's orbit. Using the GPS Almanac is useful when creating scenarios that measure things like dilution of precision (DOP), and navigation accuracy.
You can insert Satellite objects using element sets from GPS almanac files. The STK
Connecting to the United States Coast Guard Navigation Center website
The U.S. Coast Guard makes GPS almanacs in the System Effectiveness Model (SEM) format available on a routine basis — currently once per day. SEM almanac files are ASCII messages containing the almanac information and usually have a .al3 file extension. Note that the Coast Guard almanac data includes only ephemeris and clock data, and does not include covariance or the high-accuracy GPS to UTC time correlation.
- Return to your web browser.
- Navigate to the U.S. Coast Guard's Navigation Center's GPS NANUS, Almanacs, OPS Advisories, & SOF page at
- Scroll down to the Almanacs (YUMA & SEM) section.
- Click the Current SEM Almanac - .al3 link to download the most recent almanac file, current_sem.al3.
- Leave your browser open.
Copying the almanac file to your scenario folder
Copy the downloaded almanac file to your scenario folder.
- Go to the location of your downloaded SEM almanac in Windows File Explorer.
- Right-click on current_sem.al3.
- Select Copy in the shortcut menu.
- Select Documents in the navigation pane.
- Navigate to your scenario folder (for example, C:\Users\<username>\Documents\STK_ODTK 13\TLE_Almanac_Files).
- Right-click in the content pane.
- Select Paste in the shortcut menu.
If you chose a non-default folder in which to store your scenarios during the STK application install, you will need to place the current_sem.al3 file in your custom location.
Opening the STK application preferences
You'll need to update the application preferences to use the almanac file.
- Bring the STK application to the front.
- Select the Edit menu in the Menu Bar.
- Select Preferences....
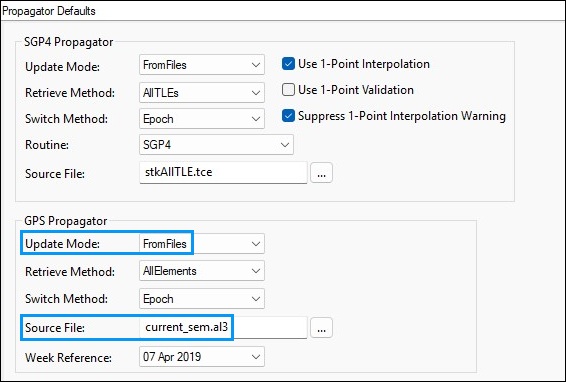
Setting the GPS Propagator defaults
Set the default GPS propagator to point to the local SEM file you just downloaded.
- Select the Propagator Defaults page when the Preferences dialog box opens.
- Open the Update Mode drop-down list in the GPS Propagator panel.
- Select FromFiles.
- Click the Source File ellipsis ().
- In the Select File dialog box, browse to the location of the SEM file (for example, C:\Users\<username>\Documents\STK_ODTK 13).
- Select the current_sem.al3 file.
- Click .
- Click to confirm your selections and to close the Preferences dialog box.
gps propagator settings
You will use the local database when inserting a Satellite object using the Load GPS Constellation method in the Insert STK Objects tool.
Inserting the GPS Constellation
Use the local database to insert the GPS Constellation.
- Bring the Insert STK Objects tool () to the front.
- Insert a Satellite () object using the Load GPS Constellation (
 ) method.
Confirming the GPS date
View the data for one of the GPS satellites to verify that the date of almanac is correct.
- Open gps-02_svn61's () Properties ().
- Select the Basic - Orbit page when the Properties Browser opens.
- Look at the Date of Almanac (GPSG).
- Click to close the Properties Browser without making any changes.
It should be very close to the date and time of your analysis period.
Using current satellite outage files
Satellite outage files (SOFs) provide information about GPS satellite outages. Taking these outages into account is crucial for obtaining an accurate navigation error prediction. Without considering outages, your navigation errors may be smaller than actually observed.
Downloading the current satellite outage file
The U.S. Space Force produces a new SOF each time a new outage is completed, experienced or predicted. You can download the current SOF from U.S. Coast Guard Navigation Center. The SOF provides GPS outage information for historical, current and predicted outages.
- Return to the GPS NANUS, Almanacs, OPS Advisories, & SOF page at
- Scroll down to the Satellite Outage File (SOF) section.
- Click the Current SOF - .sof link to download the most recent SOF file, current_sof.sof.
- Leave your browser open.
Copying the outage file to your scenario folder
Copy the SOF to your scenario folder.
- Navigate to the location of the downloaded current_sof.sof file in Windows File Explorer.
- Copy current_sof.sof.
- Select Documents in the navigation pane.
- Navigate to your scenario folder (for example, C:\Users\<username>\Documents\STK_ODTK 13\TLE_Almanac_Files).
- Paste current_sof.sof in your scenario folder.
If you chose a non-default folder in which to store your scenarios during the STK application install, you will need to place the current_sof.sof file in your custom location.
Loading the SOF into the GPS Satellite Outage tool
Use the GPS Satellite Outage tool to use the GPS satellite outage information from the SOF in your analysis.
- Return to the STK application.
- Right-click on GPSConstellation (
 ) in the Object Browser.
 - Select Constellation Plugins in the shortcut menu.
- Select Add GPS Satellite Outages in the Constellation Plugins submenu.
- Increase the size of the Add GPS Satellite Outages window when it opens.
- Click the ellipsis () in the Select GPS Satellite Outage Data panel.
- In the Open dialog box, browse to the location of the SOF file (for example, C:\Users\<username>\Documents\STK_ODTK 13\TLE_Almanac_Files).
- Select current_sof.sof.
- Click .
This will allow you to see the full extent of the tool.
A message noting "Satellite Outage Data Loaded" will appear on the bottom of the Select GPS Satellite Outage Data panel.
You can also access the GPS Satellite Outage tool by clicking Add GPS Satellite Outages ( ) on the Navigation Files Support toolbar (
 ). You can enable the toolbar by selecting Toolbars in the View menu, then selecting Navigation Files Support in the Toolbars submenu.
Applying the outages to the GPS Constellation
With your SOF file loaded, apply the outage to the GPS constellation.
- Ensure GPSConstellation is selecting in the Apply to Which GPS Constellation? list.
- Click .
- Read the message that satellite outage data has been updated in the Update Complete dialog box.
- Click to close the message.
- Review the outage information in the Outage Results Applied panel.
- Click to close the GPS Satellite Outage tool.
The outages for your scenario are determined by your scenario’s time frame. Once applied, the text box at the bottom of the tool will list any outages for your scenario.
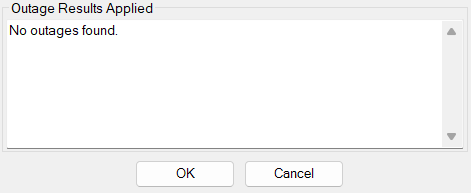
No GPS Outages
If an outage is found, the tool will list the interval of the outage. The identification of the object is based on the PRN assigned to it, which is matched to the space vehicle identifier (SVID) value in the SOF.
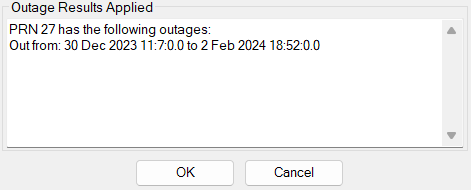
GPS Outage found
If an outage is reported, the STK application will remove the satellite from your analysis by creating a temporal constraint. You can open the satellite's properties and go to the Constraints - Active page. An Intervals constraint will already exist in the Active Constraints list. In the Interval Constraint's Constraint Properties list, the outage interval from the SOF will automatically be loaded.
Cleaning up your scenario
Clean up your scenario for the next section.
- Delete (
 ) both GPSConstellation () and all the GPS satellites () from the Object Browser.
 - Select the check box for ZARYA_25544 ().
Using archived TLE databases
Satellite database files contain both identification information and orbital characteristics. While the identification information does not change often over time, the orbital characteristics do. Thus, if you are searching for space objects with certain orbital characteristics, you should first obtain an appropriately dated satellite database file.
Changing the analysis start time
Change the analysis start time to a point in the past.
- Open TLE_Almanac_Files () Properties ().
- Select the Basic - Time page when the Properties Browser opens.
- In the Analysis Period panel, enter 1 Dec 2024 16:00:00.000 UTCG in the Start field.
- Enter + 24 hrs in the Stop field.
- Click to confirm your changes and to close the Properties Browser.
- In the Animation toolbar, click Reset (
 ) to reset the scenario to the new start time.
Previewing the TLE source
Preview the TLE Source data to review the changes.
- Right-click on ZARYA_25544 () in the Object Browser.
- Select Properties () in the shortcut menu.
- Select the Basic - Orbit page when the Properties Browser opens.
- In the TLE Source panel click .
- Note the TLE Epoch date.
- When finished, click to close the TLE Preview dialog box.
- Click to close the Properties Browser.
You can see that the TLE epoch is now far in advance of the scenario time, and the age is a considerably negative number of days. This is because the recent TLE file has been propagated backward in time, but it does not account for station-keeping and other maneuvers that were executed between those times. You need a TLE file with a more appropriate epoch for your updated scenario time.
Deleting the International Space Station
To see the forthcoming changes, remove your previously propagated Satellite object.
- Select ZARYA_25544 () in the Object Browser.
- Click Delete () in the Object Browser toolbar.
- Click to confirm in the Delete Object dialog box.
Downloading an archived TLE database
While there may be many TLEs available for a space object, the most appropriate set of TLEs to use for propagation are those that have an epoch near the Time Period of propagation. Download the appropriate database files for your new analysis period.
- Return to the Satellite Database for PC page on agi.com.
- Scroll down to the bottom page.
- Click the Click Here link to search the archives.
- On the Satellite Database Archive page, click on stkSatDb to open the Satellite Database drop-down list.
- Select stkALLTLE in the Satellite Database drop-down list.
- Enter 12/01/2024 in the Archive Date field.
- Click .
Extracting the stkAllTLE20241201 archive
Extract the archived satellite database folder.
- Open Windows File Explorer.
- Go to the location where your downloads reside.
- Right-click on the stkAllTLE20241201.tar.gz compressed (zipped) folder.
- Select Extract All... in the shortcut menu.
- Click in the Extract Archive dialog box.
Copying the archived satellite databases to your scenario folder
Copy the stkAllTLE20241201 databases to your scenario folder.
- Right-click on the stkAllTLE20241201 folder.
- Select Copy in the shortcut menu.
- Select Documents in the navigation pane.
- Navigate to your scenario folder (for example, C:\Users\<username>\Documents\STK_ODTK 13\TLE_Almanac_Files).
- Right-click in the content pane.
- Select Paste in the shortcut menu.
If you chose a non-default folder in which to store your scenarios during the STK application install, you will need to place the stkAllTLE20241201 folder in your custom location.
Opening the STK application preferences
Reopen the STK application preferences.
- Bring the STK application to the front.
- Select the Edit menu item.
- Select Preferences... in the shortcut menu.
Setting the SGP4 Propagator defaults
Adjust the default SGP4 propagator to point to the local TLE file you just downloaded.
- Select the Propagator Defaults page when the Preferences dialog box opens.
- In the SGP4 Propagator panel, click the Source File ellipsis ().
- In the Select File dialog box, browse to the location of the stkAllTLE20241201 folder (for example, C:\Users\<username>\Documents\STK_ODTK 13\TLE_Almanac_Files).
- Click .
- Select the stkAllTLE.tce file.
- Click .
- Click to confirm your selections and to close the Preferences dialog box.
You will use the local database when inserting a Satellite object using the From Standard Object Database method in the Insert STK Objects tool.
Inserting a Satellite object from the Standard Object Database
When you select a source file in the default propagator preferences, it updates the default file to use when inserting a satellite using the Insert from Standard Object Database tool.
- Bring the Insert STK Objects tool () to the front.
- Insert a Satellite () object using the Select From Standard Object Database () method.
- Enter 25544 in the Name or ID field.
- Click .
- Select ZARYA in the Results list.
- Click .
- After ZARYA_25544 () propagates, click .
Confirming the TLE date
View the TLE information used to propagate the ISS to verify that the TLE date is correct.
- Open ZARYA_25544's () Properties ().
- Select the Basic - Orbit page when the Properties Browser opens.
- In the TLE Source panel click .
- When finished, click to close the TLE Preview dialog box.
- Click to close the Properties Browser.
- Delete () ZARYA_25544 () from the Object Browser.
Notice that the TLE Epoch is very close to your analysis period.
Using archived almanac files
In addition to the current GPS almanac file, the U.S. Coast Guard's Navigation Center also has archived GPS almanacs from 2000 onwards available for download.
Browsing to the historical almanac files
The U.S. Coast Guard's Navigation Center hosts archived files in a separate portion of its website from the most current data.
- Bring your web browser to the front.
- Navigate to
- On the Archives page, open the Archives Type drop-down list.
- Select GPS.
- Open the GPS Type drop-down list.
- Select Almanac - SEM.
- Enter 2024 in the Please enter year field.
- Click .
Selecting the correct GPS almanac SEM file
Each SEM almanac contains orbital elements for the then-active GPS Constellation for a specified almanac date. The almanac date and elements are used by the GPS propagator to produce ephemerides. It is important when using almanacs to use the correct set of almanacs for your time intervals of interest.
Your current scenario analysis start time is 1 Dec 2024. If you look at the files, you need to know which day corresponds to your scenario date. December 1, 2024 was day 336. This is easy to find. For instance, you can find it in the "Days by year" section of the Epoch Converter website at
- Scroll down in your browser.
- Click on the link for 336.al3.
This will open the almanac file as a non-html text file in your browser.
Saving the almanac file to your scenario folder
You can save the almanac file directly to your scenario folder from your browser.
- Right-click in the page contents when 336.al3 opens.
- Select Save as... in the shortcut menu.
- Open the Save as type drop-down list.
- Select All files (*.*).
- Enter 1Dec2024.al3 in the File name field.
- Select Documents in the navigation pane.
- Navigate to your scenario folder (for example, C:\Users\<username>\Documents\STK_ODTK 13\TLE_Almanac_Files).
- Click .
Be sure you overwrite the default 336.al3.txt file name in its entirety. You don't want to save it as a text (*.txt) file.
The U.S. Coast Guard also allows programmatic access and download SEM files without the need to spider the various listings. Files will be returned as non-html text, if they exist. The URL for the programmatic access to SEM files is https://www.navcen.uscg.gov/sites/default/files/gps/almanac/YYYY/Sem/NNN.al3, where YYYY is the year requested and NNN is the number of the archive file from 001 to 999.
Opening the STK application preferences
You'll need to update the application preferences to use the almanac file.
- Bring the STK application to the front.
- Select the Edit menu in the Menu Bar.
- Select Preferences....
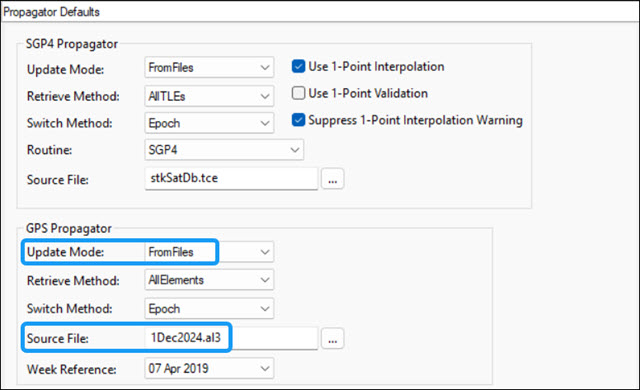
Setting the GPS Propagator defaults
Set the default GPS propagator to point to the SEM file you just downloaded.
- Select the Propagator Defaults page when the Preferences dialog box opens.
- Open the Update Mode drop-down list in the GPS Propagator panel.
- Select FromFiles.
- Click the Source File ellipsis ().
- In the Select File dialog box, browse to the location of the 1Dec2024 AL3 file (for example, C:\Users\<username>\Documents\STK_ODTK 13).
- Select the 1Dec2024 AL3 File.
- Click .
- Click to confirm your selections and to close the Preferences dialog box.
gps propagator settings
Inserting the GPS Constellation
Use the local database to insert the GPS Constellation.
- Bring the Insert STK Objects tool () to the front.
- Insert a Satellite () object using the Load GPS Constellation () method.
Confirming the GPS date
View the data for one of the GPS satellites to verify that the date of almanac is correct.
- Open gps-02_svn61's () Properties ().
- Select the Basic - Orbit page when the Properties Browser opens.
- Look at the Date of Almanac (GPSG) which is 3 Dec 2024 16:51:12.000.
- Click to close the Properties Browser without making any changes.
Using historic outage file data
In addition to the current outages, the same SOF file available from the U.S. Coast Guard's Navigation Center provides GPS outage information for historical outages. The historical outages in the current SOF file go back to 1998.
Loading the SOF into the GPS Satellite Outage tool
Use the GPS Satellite Outage tool load the in GPS satellite outage information for your analysis.
- Right-click on GPSConstellation () in the Object Browser.
- Select Constellation Plugins in the shortcut menu.
- Select Add GPS Satellite Outages in the Constellation Plugins submenu.
- Increase the size of the Add GPS Satellite Outages window when it opens.
- Click the ellipsis () in the Select GPS Satellite Outage Data panel.
- In the Open dialog box, browse to the location of the SOF file (for example, C:\Users\<username>\Documents\STK_ODTK 13\TLE_Almanac_Files).
- Select current_sof.sof.
- Click .
This will allow you to see the full extent of the tool.
Applying the outages to the GPS Constellation
With your SOF file loaded, apply the outage to the GPS Constellation.
- Ensure GPSConstellation is selecting in the Apply to Which GPS Constellation? list.
- Click .
- Read the message that satellite outage data has been updated in the Update Complete dialog box.
- Click to close the message.
- Review the outage information in the Outage Results Applied panel.
- Click to close the GPS Satellite Outage tool.
In this case, for 1 December 2024 16:00:00.00 UTCG, no outages were found.
Using CelesTrak for orbital data
CelesTrak provides free access to orbital data, publications, software, and tools for the space community.
Downloading GPS almanac files from CelesTrak
You can find GPS SEM almanac data on
- Bring your web browser to the front.
- Browse to celestrak.org.
- Scroll down and select GPS Data.
- Look at the information provided on the GPS Data page.
- Under GPS Almanacs, select SEM Almanacs.
Selecting the year and almanac file
Selecting the correct GPS SEM almanac is different but using the selected file is exactly the same as earlier steps in this tutorial.
- In the GPS SEM Almanacs list, select 2024.
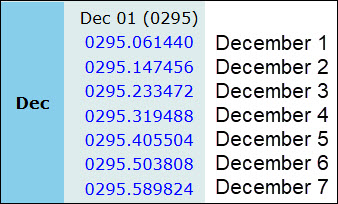
- Scroll down to Dec.
- Look at the selections under Dec 01 (0295).
- Click on 0295.061440, which is the almanac link for December 1, 2024.
GPS SEM data
You can now save this page as an al3 file, and use it in the STK application, just like you did using the data from the United States Coast Guard Navigation Center website. If you return to CelesTrak, look through the website. It contains a lot of information and it's fun to use.
Resetting the propagator default preferences
It is helpful to know how to find and reset your application preferences to the default databases that are set with your STK software install. Before closing out, reset your application preferences to use your default online and local databases.
Resetting the SGP4 Propagator defaults
Reset the SGP4 Propagator to use the application defaults.
- Select the Edit menu in the Menu Bar.
- Select Preferences....
- Select the Set as Default check box in the bottom-left corner of the Preferences dialog box.
- Select the Propagator Defaults page when the Preferences dialog box opens.
- Open the Update Mode drop-down list in the SGP4 Propagator panel.
- Select OnlineAGI.
- Click the Source File ellipsis ().
- In the Select File dialog box, browse to the location of the default Source File (for example, C:\ProgramData\AGI\STK_ODTK 13\Databases\Satellite).
- Select stkAllTLE.tce.
- Click .
The ProgramData folder is often hidden by default, so you may need to update your Windows folder options to display it.
Resetting the GPS Propagator defaults
Reset the GPS Propagator to use the application defaults.
- Open the Update Mode drop-down list in the GPS Propagator panel.
- Select OnlineAGI.
- Click the Source File ellipsis ().
- In the Select File dialog box, browse to the location of the default Source File (for example, C:\ProgramData\AGI\STK_ODTK 13\GPSAlmanacs).
- Select GPSAlmanac.al3.
- Click .
- Click to confirm your changes and to close the Preference dialog box.
Saving your work
Clean up your workspace and save your work.
- Close any open reports, properties and tools.
- Save () your work.
Summary
You used the Ansys Government Initiatives website to download current and archived TLEs and propagated them as Satellite objects in a scenario. You used the United States Coast Guard Navigation Center website to locate and download current and archived GPS almanac files and propagated the GPS satellite constellation in the scenario, as well as a satellite outage file. Then, you were introduced to the CelesTrak website. Finally, you reset your default application preferences to use the default application databases that come with the STK software installation.