STK Pro, STK Premium (Air), STK Premium (Space), or STK Enterprise
You can obtain the necessary licenses for this tutorial by contacting AGI Support at support@agi.com or 1-800-924-7244.
The results of the tutorial may vary depending on the user settings and data enabled (online operations, terrain server, dynamic Earth data, etc.). It is acceptable to have different results.
Capabilities Covered
This lesson covers the following STK Capabilities:
- STK Pro
Problem Statement
You require quick, simple methods with which to share, collaborate, and reuse STK scenarios, object files, and models to help foster an organization's digital mission environment.
Solution
You will use STK and the on-premises STK Data Federate (SDF) or the online SDF, create a project folder that contains data needed by your project team and assign them the required privileges to access the data.
What You Will Learn
Upon completion of this tutorial, you will be able to do the following:
- Sign in to your SDF Home Folder
- Connect to the on-premises or online SDF from STK
- Use the SDF from STK
- Create a folder for your project team
- Set up your STK files for team sharing or team collaboration
- Use the SDF to organize and navigate information
Video Guidance
Watch the following video. Then follow the steps below, which incorporate the systems and missions you work on (sample inputs provided).
STK Data Federate
The STK Data Federate is a file sharing platform that integrates with STK to assist teams using STK to collaborate as efficiently as possible in a digital mission environment. The SDF is an STK Enterprise Data Service (SEDS) that is an important component for sharing, collaborating and reusing information in a digital mission environment. This tutorial is designed for STK users of an organization's private, on-premises SDF, but you can also use the steps within to use the online version of the SDF.
Connect to the SDF server or online SDF from STK
You can connect to a local SDF server or the online SDF the same way.
- Launch STK (
 ).
). - Open the Edit menu item when STK opens.
- Select Preferences... in the shortcut menu.
- Select the Data Services page in the Preferences dialog box.
- Select the STK Enterprise Data Services type in the Services list.
- Click
- Double-click AGI SEDS in the STK Enterprise Data Services (SEDS) dialog box.
- Enter the URL for your on-premises server in the Server URL* field in the STK Enterprise Data Services (SEDS) Details dialog box. If you are using the online SDF, leave the default Server URL*.
- Ensure the Active check box is selected for STK Data Federate (SDF) Server in the Data Services list.
- Click .
- Log in using your Email address and administrator password locally or using the online SDF Email and personal password.

Edit Preferences
If you do not know the name of the server, contact your System Administrator.
User Dashboard
After logging in to the SDF, you land on your dashboard. This is your SDF home page and is accessible by clicking the HOME link on any page in the SDF. You can also access this page by selecting the User drop down and selecting the User Dashboard link. For information on customizing your dashboard, see the SDF User's Guide.
Creating a folder for your project
Set up an SDF folder for your project.
- In the SDF menu bar, select My Files.
- When the My Files page opens, click in the My Files menu.
- Select Folder.
- Type SDF Practice in the Name: field in the New Folder dialog box.
- Type Practice folder for SDF tutorial in the Description: field.
- Click .
- Select your name on the SDF menu.
- Select Logout in the shortcut menu.
- Close your browser.
- Return to STK.
- Click to close the STK Enterprise Data Services (SEDS) Details dialog box.
- Click to close the STK Enterprise Data Services (SEDS) dialog box.
- Click to close the Preferences dialog box.
For future reference, descriptions of the fields follow:
| Field | Description |
|---|---|
| Name | Name of the folder. Sometimes it helps to follow a naming convention. For example, <project name><project team><sys admin for folder> |
| Title | This field defaults to the value entered in the Name field, except all lowercase, no punctuation, and dashes instead of spaces. |
| Description |
Your description of the folder. For example, team project. |
Creating a scenario
Create a practice scenario.
- Click (
 ) in the Welcome to STK dialog.
 - Enter the following in the STK: New Scenario Wizard:
- Click when you finish.
| Option | Value |
|---|---|
| Name: | SDF_Practice |
| Location: | Default |
| Start: | Default |
| Stop: | Default |
Saving your Scenario to the SDF
When you save your scenario to the SDF, it automatically saves to your home folder.
- Select the File menu item when your scenario opens.
- Select Save To STK Data Federate... in the shortcut menu.
- Select Login if the Save As dialog box opens. If the Log In: AGI SEDS dialog box opens, move to step 5.
- Click when the SDF Server Login dialog box opens.
- Enter your Account name (Email) and Password in the Log In: AGI SEDS dialog box.
- Click .
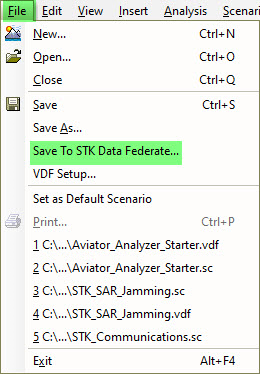
save to stk data federate
SDF Home Folder
By default, your SDF home folder already exists in the SDF at User Homes/<your email folder>. There are many reasons why it is a good idea to store your STK scenarios and files in your SDF home folder. For example:
- You can work on your files from any computer that can connect to the SDF.
- You are not ready to share your files with your co-workers.
- You are working on a proprietary catalog.
Setting the SDF Practice folder as the default folder
- Select the SDF Practice folder in the Save As dialog box.
- Click Set Default Location To Selected Folder in the Location frame tool bar.
- Click to close the message.
- Look at the bottom of the Save As dialog box.
- Ensure the File name is the same as your Scenario () object’s name.
- Ensure the file type is VDF (*.vdf), which stands for visual data file.
- Click .

Set default location to selected folder button
Finding the URL for the starter scenario
- Look at the File Details/History dialog box. You can view information and add information to the Overview: field.
- Type Practice scenario for using the SDF in the Overview: field.
- Click . In the File Successfully Saved to the SDF dialog box, you can jump to the SDF or you can copy the URL for later use.
- Select here in the Click here to copy the URL to the clipboard sentence.
- Open Notepad or a text editor that doesn’t add hidden characters.
- Paste the URL into your text editor.
- Keep your text editor open.
- Return to STK.
- Click to close the File Successfully Saved to the SDF dialog box.
Each time you click Save in the scenario, it will be updated in the SDF. Try it to see how it works. For more information on SDF file versioning, see the SDF User's Guide.
Insert a Satellite object
Add a Satellite (![]() ) object to the scenario. In an actual project, this object might be required by other team members at other locations.
) object to the scenario. In an actual project, this object might be required by other team members at other locations.
- Select Satellite (
 ) in the Insert STK Objects tool.
 - Select Orbit Wizard (
 ) as the method.
 - Click
Orbit Wizard
Create your Satellite (![]() ) object.
) object.
- When the Orbit Wizard opens, type SDF_Satellite in the Satellite Name: fileld.
- Click to close the Orbit Wizard and propagate the Satellite () object.
Saving your Satellite object to the SDF
You can save objects to the SDF not just scenarios.
- Select SDF_Satellite () in the Object Browser.
- Open the File menu.
- Select Save SDF_Satellite To STK Data Federate... in the shortcut menu.
- Click .
- Click in the File Details/History dialog box.
- Click to close the File Successfully Saved to the SDF dialog box.
- Close (
 ) STK.
 - If the Scenario Close dialog box opens, click .
Earlier in the scenario, you designated the SDF Practice folder as the default location. When the Save As dialog window opens, the SDF Practice folder should be selected.
Loading your scenario from the SDF
You can access your scenarios or objects from the SDF.
- Launch STK ().
- Click (
 ) in the Welcome to STK dialog box.
 - Change the Location: to STK Data Federate at the bottom of the Open dialog window.
- Click Guest in the top right corner to sign into your account.
- Click when the SDF Server Login dialog box opens.
- Enter your Account name and Password on the Log In: AGI SEDS dialog box.
- Click .
- Once logged in, choose either Option 1 or Option 2 to open your scenario.
Option 1: Browse to your file
You can open your scenario by browsing to the scenario file.
- Select the Browse tab.
- Expand (
 ) the folder containing the scenario (e.g., SDF Practice).
 - Select SDF_Practice.vdf (v1.0) ().
- Click .
Option 2: Paste a URL
If you want to open a scenario from the SDF, you can open it by copying and pasting the scenario’s URL.
- Select the Browse tab.
- Copy the URL from your text editor where you saved it earlier.
- Right-click in the File name: field.
- Select Paste.
- Click .
Inserting STK objects from the SDF
You can insert objects into STK from the SDF.
- Insert a Satellite () object using the From STK Data Federate (
 ) method.
 - At the top of the Open dialog box, select the Browse tab.
- If needed, expand the folder containing the Satellite object (e.g., SDF Practice).
-
Select SDF_Satellite.sa (v 1.0) ().
- Click .
-
Close () STK.
- If the Scenario Close dialog box opens, click .
Opening the SDF with your saved URL
The SDF presents a lot of information about your saved scenario file.
- Copy the URL from your text editor.
- Open a browser.
- Paste the URL into the address bar.
- Click Enter.
- Sign in to the account, if required.
Navigating the SDF
In the upper left corner, the menu bar provides links to the SDF home page (Home), My Files, and Sites.
- Select the Home menu. This takes you to your dashboard.
- Select the My Files menu. When the My Files page opens, on the left, you’ll see the folder you created called SDF Practice and any other folders you may have created.
- Select SDF Practice (
 ). You will see your saved scenario VDF (SDF_Practice.vdf) and the saved Satellite object (SDF_Satellite.sa) files.
Details
Take some time to discover information the different links provide.
- On the left of the page, under My Files , select the My Files () folder.
- To the right, place your cursor on the line that contains the SDF Practice folder.
- To the right, select View Details in the shortcut menu. This takes you to the Folder Details page.

View details
Managing permissions
You’ve created a scenario VDF and a Satellite (![]() ) object and they are only visible to you unless you share them with your team. You can accomplish this in the Folder Actions list to the right.
) object and they are only visible to you unless you share them with your team. You can accomplish this in the Folder Actions list to the right.
- Expand (
 ) Folder Actions, if required. You can use this section to add people, assign permissions, and perform other actions.
 - Select Manage Permissions. to open the Manage Permissions page.
- When the Manage Permissions page opens, on the upper right side of the page, click . You can use the search field to search for a member. Since this is practice, use your last name.
- Type your last name in the search field.
- Click .
- Click to the right of your name. For a real project, you could continue using the search feature to select more members and add them to your folder.
Assigning roles
Once you have added members to your folder, you can determine how the folder will be used by assigning roles to each member
- In the Locally Set Permissions list, to the right of your name, click in the Role frame. This expands the selection.
- Select Contributor.
- Click .
| Role | Permissions |
|---|---|
| Contributor | Has full rights to the content that they own; they cannot edit or delete content created by others. |
| Collaborator | Has full rights to the content that they own; they have rights to edit but not delete content created by others. |
| Coordinator |
Has full rights to all content - what they have created themselves and what others have created. |
| Editor | Has rights to edit file properties and check files in and out; they cannot create their own content. |
| Consumer | Has view-only rights; they cannot create their own content. |
You can assign different permissions to different users and groups in the same project.
Changing permissions
You can go back to the Manage Permissions page to change a person's role or delete them from the project.
- In the Folder Details page, select Manage Permissions in the Folder Actions list.
- When the Manage Permissions page opens, in the Locally Set Permissions list, place your cursor over your name.
- To the right under Actions, select Delete.
- Click .
Sharing Files
- Select My Files in the SDF menu.
- Place your cursor on the line that contains the SDF Practice folder.
- To the right, select View Details.
- When the Folder Details page opens, on the right of the page, expand () Share if required.
You can Email or share the URL located in Copy this link to share the current page with a member on your team. When they click on the URL, they will need to log into the SDF and it will take them to the Folder Details page and to the folder you are sharing.
Downloading a zipped folder from the SDF
Download the scenario folder as a zipped folder from the SDF.
- Select the My Files menu item.
- When the My Files page opens, place your cursor on the line that contains the SDF Practice folder.
- Select Download as Zip in the shortcut menu.
- Navigate to the zipped folder in your computer's Downloads directory.
- Unzip the folder if desired. You can use the scenario and other files locally.
Searching the SDF using the search field
Search the SDF using the Search field.
- Select the Home menu item.
- Type .vdf in the search field.
- Press the Enter key. A list of files that contain that term are returned.
- On the left hand side of the page, you can select various filters used to refine your search. Select VDF file in the File Type list.
- If you find a file you need, you can select it. To the right you’ll see an Actions shortcut menu.
- Click Actions to see your choices for the file.
Advanced Search
- Return to the search field.
- Click the magnifying glass icon.
- Select Advanced Search... in the shortcut menu. Use the Advanced Search when you need to fine-tune your search results or are searching for something specific.
- Click Content.
- Content – Searches for all types of content
- Folders – Searches specifically for folders and containers
- Use the following fields to define the specifics of your search. You can include wildcard characters (e.g., *) in the search:
| Role | Permissions |
|---|---|
| Keywords | Enter any keywords that are in the content. |
| Name | Enter any words that are in the name of the content. |
| Title |
Enter anything (fragments, words, etc.) that are in the title of the content. |
| Description | Enter anything (fragments, words, etc.) that is in the description of the content. |
| Mimetype | Select the drop-down to select the file type of the content. |
| Modified Date | Enter the date range within which the content was modified. Enter dates in DD/MM/YYYY format, or click the calendar buttons to select the dates to include in the date range. |
| Modifier | Enter the name (or a fragment of the name) of the person that last modified the content. |
Summary
The SDF is a scalable, open, and secure content management system (CMS) built to meet the growing needs of the aerospace and defense communities. The SDF is a centralized data solution for STK Enterprise users, providing a common location to save, load, and share scenarios with others.
Deleting the SDF Practice folder
Although not required, you may want to delete the SDF Practice folder and its contents that were used in this tutorial.
- Select the My Files menu item.
- Place your cursor on the line containing the SDF Practice folder.
- Select … More in the shortcut menu.
- Select Delete Folder.
- Click .
On your own
While you’re still in the SDF, now’s a great time to further explore and become familiar with all the sections.
For more ways on how you can use the SDF, see the SDF User's Guide.