Grease Pencil 3D Editing Tool
Launching the Grease Pencil
To launch the grease pencil, click ![]() from the 3D Graphics toolbar.
from the 3D Graphics toolbar.
Using the Grease Pencil Tool
This tool enables you to switch between different input modes or launch the Appearance or Layers configuration interface.
When first activated, the tool opens in the ScreenSpace drawing mode. In this mode, you can click and drag to draw sketches directly on the screen.
Each Grease Pencil function is shown below, along with its keyboard shortcut in parentheses.
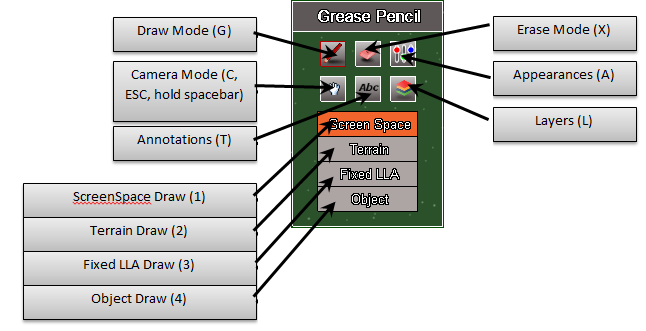
A special input mode enables you to quickly and easily switch to controlling the camera while operating in other input modes. To enter this special input mode, hold down the space bar. To exit the mode, release the space bar.
Input Modes
Input modes define the available interactions (click, right-click, drag and release, etc) with the scene, and the operations that are performed for the interactions. For example, a Mouse-Drag draws a line in the Draw Input Mode, whereas a Mouse-Drag in Erase Mode deletes any sketches that fall under the cursor. The active input mode is indicated by a red border around the button; inactive modes are indicated by a white border.
| Mode | Description |
|---|---|
| Draw Input Mode | In this mode, double-click and drag to draw a line. The actions are determined by the selected DrawMode. |
| Erase Input Mode | Click a sketch or annotation to delete the annotation. Click and drag to delete any sketches or annotations that fall under the cursor during the drag. |
| Annotation Input Mode | Click to set the text cursor. Enter the annotation text and press Enter. Note that the cursor in the scene is defined by the selected DrawMode. |
Draw Mode
The Draw Mode defines how lines are drawn and how text is positioned in the scene. Both Fixed LLA and Object draw modes define additional operations to support the drawing mode. These draw modes are further described below.
While drawing a sketch or defining an annotation, these operations can be undone using Ctrl-Z. You cannot undo an erase operation.
| Mode | Description |
|---|---|
| ScreenSpace | This is the most basic draw mode. In Draw Input mode, click and drag to construct a 2D line that remains fixed in 2D space on the screen, exactly where the sketch was drawn. Changing the camera view does not affect the screen position of ScreenSpace sketches. As the window resizes, this sketch should maintain its relative location and aspect. |
| Terrain | In this mode, LLA is picked from the 3D scene as you drag the mouse button. Each point on these lines is placed in 3D space on the surface of the central body.
In Annotation input mode, click on the screen to place the text cursor on the surface of the central body. If no surface is at the place of the click, the cursor is not placed. |
| Fixed LLA | For Draw Input mode, SHIFT+click on the surface of the globe to set the latitude and longitude. From here, right-click and drag to move the latitude/longitude reference point in a plane perpendicular to the camera view; this allows the point to be raised in 3D space, thus affecting the altitude of the reference point.
In Annotation Input mode, click on the screen to set the text cursor at a screen space position relative to the LLA reference point. |
| Object | When in Draw Input mode, the Grease Pencil draws on the screen. This sketch is tethered to the STK object that was selected and follows the object through the scenario.
Upon entering this draw mode, you must first click on an STK object in the 3D scene to select the object. Status that indicates the currently selected object is located at the bottom center of the screen. The Annotation Input mode for Object drawing behaves in the same way as in Fixed LLA draw mode; the text cursor is placed at a pixel offset from the center of the 3D object. |
Layers
Annotations and sketches can be grouped into layers, enabling you to:
- Toggle visibility on a group of annotations or sketches.
- Delete an entire group of annotations or sketches in one click.
- Sort layers to control the draw order of sketches that are rendered in screenspace.
To view and modify the layers, click on the Layers button in the Grease Pencil frame, or use the “L” hotkey.
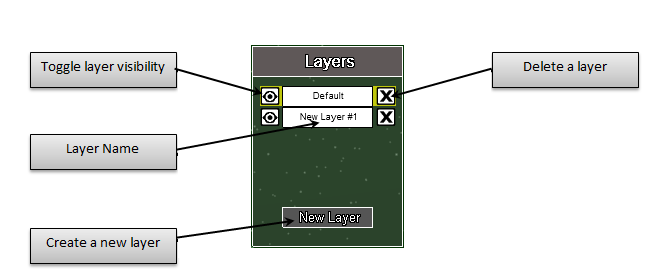
There must be at least one layer and no more than five layers.
Click the New Layer button to create a new layer.The layer is automatically assigned a new name. To change this name, double-click it, enter a new name, and press Enter.
Layers can be hidden or shown by clicking  next to the layer name. Layers that are hidden will render the visibility icon at half transparency, whereas visible layers will have their visibility icon drawn at full transparency.
Layers can be resorted by clicking and dragging the Layer name. Releasing the mouse button will perform the actual operation of resorting.
Appearance
The Appearance interface controls the appearance of the sketches and annotations. You can easily configure color, translucency (alpha), line width, and font. The configuration settings control the appearance of all subsequent sketches and annotations. Note that it is not currently possible to configure the appearance of a sketch or annotation that was already drawn.
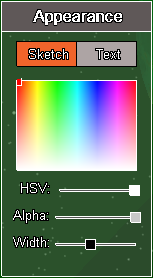
The color picker uses the Hue Saturation Value (HSV) color model. Click or click and drag on the color spectrum to choose a color. The color selection cursor displays the currently selected color. You can control the brightness (HSV) of the HSV spectrum by using a slider. Setting the HSV slider to 0.0 (all the way to the left) will set the entire spectrum to black.
Select the translucency (A), and width (W) using sliders. Note that the line width slider will adjust the width between the min and max line width allowed by the video card.
Save and Load
Grease Pencil annotations are saved as part of the scenario.