Saving a Schedule File
At any time while working within a schedule file, the file may be saved for later use.
Two Save Methods
There are two methods for saving schedule files: Save and Save As.
The Save method is used when saving a file that has had a save location and a file name defined through a previous save. It causes the previously saved file to become updated with the information of the schedule in its current state.
The Save As method allows you to first designate a file name and save location prior to saving the active schedule. This method is used whenever a new schedule is saved for the first time or whenever you wish to save the active schedule to a different location or save it using a different file name.
How to Save a Schedule File
The different save methods may be enacted several ways:
- The
 button on the Tool Bar will use the Save method to save the active schedule whenever the schedule has a previously defined file name and save location. If, however, the active schedule's file name and location has not yet been specified, the button will cause the Save As method to commence, and the Save As form will open to allow you to specify the location and file name of the schedule file.
 - By selecting File -> Save from the Astro Scheduler Engine Menu Bar, the Save method will save the active schedule if the schedule has a previously defined file name and save location. Again, if the active schedule's file name and location has not yet been specified, the menu selection will cause the Save As method to commence, and the Save As form will open to allow you to specify the location and file name of the schedule file.
- Selecting File -> Save As from the Menu Bar will always cause the Save As method to commence. The Save As form will open to allow you to specify the location and file name of the schedule file.
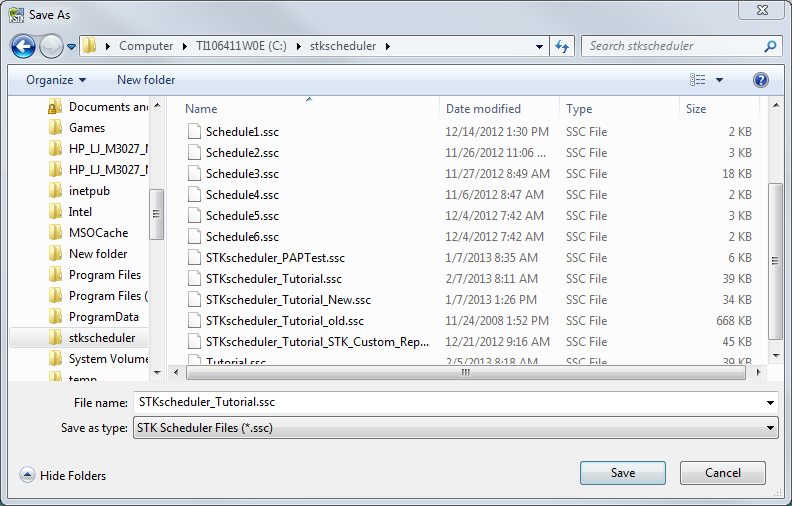
Save As Form
The Save As form allows you to specify a name and location to save the active Schedule File.
Save As Form
Save in Combobox
The save in combobox allows you to select the folder in which a Schedule file will be saved. By clicking the  button, you can quickly choose from the various storage areas available to the host system. Once a storage area choice is made, the main list view will be made populated with any folders or files contained within that storage area.
Go To Last Folder Visited Button
By clicking the ![]() button, you can quickly return to the last folder that populated the main list view. Note that this button only becomes active once the folder that populates the main list view is changed.
button, you can quickly return to the last folder that populated the main list view. Note that this button only becomes active once the folder that populates the main list view is changed.
Up One Level Button
By clicking the ![]() button, you can view the contents of a parent folder.
button, you can view the contents of a parent folder.
Create New Folder Button
By clicking the ![]() button, you can create a new folder within the current folder.
button, you can create a new folder within the current folder.
View Menu Button
By clicking the ![]() button, you can select the format of the main list view area. The choices for viewing are:
button, you can select the format of the main list view area. The choices for viewing are:
- Large Icons - displays folders and files depicted by large size icons.
- Small Icons - displays folders and files depicted by small size icons.
- List (shown) - displays folders and files depicted by small icons and shown in a list format.
- Details - displays folders and files depicted by small icons, shown in a list format, with detailed data about each file and folder. The detailed data appears as additional columns added to the list. The title of each column appears in a header at the top of the list view. The header may be manipulated in several ways to organize the way in which the folder contents are displayed:
- Each column may be used to sort the list in ascending or descending alphabetical order by clicking on the header once or twice.
- The order in which the columns appear may be changed by dragging a column header to a new position.
- The width of any column may be changed by dragging the bar that separates the column header from the next column header to the right and changing its position.
- The detailed information displayed may be modified by right clicking anywhere in the header and selecting the properties to display.
- Thumbnails - displays folders and files as thumbnail previews. For files that are not graphical in nature, only their icons will be displayed.
Navigation Buttons
The navigation button, located on the left side of the form, can be used to quickly navigate to a new storage area. Clicking a button causes the storage area to appear in the look in textbox.
Main List View
The main list view displays the contents of the currently selected folder. The types of files displayed are subject to filtering using the Files Of Type combobox. The manned in which the files and folders are displayed are subject to the selected view chosen using the View Menu Button. There are several functions that are available from the main list view no matter what the display format is.
These are:
- Clicking on an icon or on the file or folder name causes that file or folder to become selected. If the selected object is a file, the file name will appear in the File Name Combobox.
- Clicking on a file or folder name of a selected object allows the name to be modified.
- Double clicking on an icon or the file folder name causes the file or folder to open. If the selected object is a folder, the Look in textbox will change to the selected file and the list view will be populated with the contents of the folder. If the selected object is a Schedule file, the Open Schedule File form will close and Astro Scheduler Engine file will open.
- Pressing the Delete key will cause a selected file or folder to be deleted.
File Name Combobox
The file name combobox allows you to specify the name of the schedule file. The name may be entered in by manually typing the file name into the combobox, by selecting the file from the main list view, or by clicking the button and selecting a fie. Note that if the file name is manually typed, the file extension (.ssc) need not be included.
Save As Type Combobox
The save as type combobox gives you the ability to define the file extension that will be added to the file name. To change the save as type, you may choose from the available selections using the button.
Save Button
Clicking the Save button causes the active schedule file to be saved in the selected storage location using the specified file name.
Cancel Button
Clicking the Cancel button closes the Save As Schedule File form without saving any file.
![]()