STK Premium (Space) or STK Enterprise
You can obtain the necessary licenses for this tutorial by
This lessons uses the Visual Basic Scripting Edition (VBScript) scripting language. Microsoft has announced that VBScript is deprecated and will be removed from future versions of Windows. You can continue to use VBScript with the STK software in current versions of Windows. Refer to Microsoft's documentation for more information and the deprecation timeline.
The results of the tutorial may vary depending on the user settings and data enabled (online operations, terrain server, dynamic Earth data, etc.). It is acceptable to have different results.
Capabilities covered
This lesson covers the following capabilities of the Ansys Systems Tool Kit® (STK®) digital mission engineering software:
- STK Pro
- Astrogator
Problem statement
Engineers and operators require a quick way to design high-fidelity spacecraft trajectories for mission planning and operations, all without external tools.
Solution
Use the Scripting Tool, a utility available within the STK/Astrogator® capability, to compute the initial guesses for the maneuver magnitude.
What you will learn
Upon completion of this tutorial, you will be able to:
- Open and use the Scripting Tool
- Use VBScript to define object properties, calc objects, and parameters
- Use the Scripting Tool in a target sequence
Video guidance
Watch the following video. Then follow the steps below, which incorporate the systems and missions you work on (sample inputs provided).
Using the starter scenario
To speed things up and enable you to focus on this lesson's main goal, a partially created scenario has been built for you. The partially created scenario is saved as a visual data file (VDF) in your STK install.
- Launch the STK application (
 ).
). - Click Open a Scenario
 in the Welcome to STK dialog box.
 - Go to <Install Dir>\Data\Resources\stktraining\VDFs.
- Select Target_Hohmann_Transfer.vdf.
- Click .
This lesson builds on the Hohmann Transfer Using Targeter tutorial. Please note, the propagator converges in that lesson without using the Scripting Tool. You can also choose to build on that lesson.
Saving the VDF as a scenario
Save and extract the VDF data in the form of a scenario folder. When you save a VDF in the STK application, it will save in its originating format. That is, if you open a VDF, the default save format will be a VDF (.vdf). If you want to save and extract a VDF as a scenario folder, you must change the file format by using the Save As feature. This will create a permanent scenario file complete with child objects and any additional files packaged with the VDF.
- Open the File menu.
- Select Save As....
- Select the STK User folder in the navigation pane when the Save As dialog box opens.
- Select the Target_Hohmann_Transfer folder.
- Click .
- Select Scenario Files (*.sc) as the Save as type.
- Select the Target_Hohmann_Transfer Scenario file in the file browser.
- Click .
- Click when the Confirm Save As dialog box opens to overwrite the existing scenario file in the folder and to save your scenario.
A scenario folder with the same name as the VDF was created for you when you opened the VDF in the STK application. This folder contains the temporarily unpacked files from the VDF.
Save (![]() ) often during this lesson!
) often during this lesson!
Adding a Sequence segment
Add a new
- Open Hohmann_Sat_Targeter's (
 ) Properties (
 ).
). - Right-click on the Inner Orbit (
 ) Initial State segment.
 - Select Insert Before... in the shortcut menu.
- Select Sequence (
 ) when the Segment Selection dialog box opens.
 - Click to confirm your selection and to close the Segment Selection dialog box.
- Click and drag all the segments into the Sequence () segment.
- Select the Sequence () segment.
- Select the Enabled check box in the Scripting Panel.
- Click .
Be sure you preserve the same order and structure of the MCS when you move the segments into the Sequence.

MCS segments nested in Sequence
Using the Scripting Tool
The Scripting Tool is a utility within Astrogator that enables you to write scripts in JScript, VBScript, Python, or MATLAB that will interact with object attributes, calculation object components, and custom-defined parameters. You can use the Scripting Tool to perform a variety of functions to augment the logic of the Mission Control Sequence.
There are four areas in the Scripting Tool:
| Option | Value |
|---|---|
| Object Properties | Allow you to get/set values from Astrogator segments. In this example, you will use this to set the desired orbits and the initial guesses for the maneuver magnitudes. |
| Calc Objects | Allow you to pull a value from any calculation object into the script. Examples include the current time, current orbital elements and information about engines. |
| Parameters | Allows you to define additional values which may be used for computations. They may be custom constants or variables which are set during the computations. |
| Scripting Area | Location where the actual script is written. You can use VBScript, JavaScript, MATLAB, or Python. |
You can find the tool on Sequence and Backward Sequence segments, on differential corrector and
Adding the initial parameter
Start by adding two parameters that specify the initial and final values of the semi-major axis. You can use seven types of parameters in a script: Boolean, Date, Double, Enumeration, Integer, Quantity, and String. Each parameter appears on a separate line with Name, Value, Unit, Type, Dimension, and User Comment fields. Use the Name field to identify the parameter and as a variable in the script. The Value, Unit, and Dimension fields are all dependent on the parameter's type. Value can be any real number. Dimension can be any unit type supported by the STK software. Unit can be any unit of the selected Dimension that is supported by the STK software.
- Click New (
 ) in the Parameters panel of the Scripting Tool.
 - Double-click in the Name field.
- Rename the parameter initial_a.
- Select the Enter key
- Click on the Type filed
- Select Quantity in the drop-down list
- Ensure that Dimension is set to DistanceUnit.
- Click in the Value field.
- Enter 6700 km.
- Select the Enter key.
Adding the final parameter
Create a second parameter for the final semi-major axis.
- Follow the steps above, using final_a, as the Name and 42164 km as the Value.
- Click to close the Parameter Properties when you are finished.
- Note that both parameters have been added to the Sequence's properties in the Parameters list.
Creating a new object property
So far, the initial_a and final_a parameters are just constants. You need to set the initial semimajor axis and the desired radius of apogee to use these values by defining them as object properties. Start with the initial one.
- Click New () in the Object Properties panel.
- Double-click in the Name field.
- Rename the Property a0.
The script will be able to use and change object properties assigned to it.
Selecting the object and attribute
Next, choose the object that contains the properties and the attribute that corresponds to the property that the script will change.
- Click Properties... () in the Object Properties toolbar.
- Double-click on the Object Value entry in the Component Details list when the Object Properties dialog box opens.
- Select the Inner Orbit () segment when the Component Selection dialog box opens.
- Click to confirm your selection and to close the Component Selection dialog box.
- Keep the ReadOnlyProperty set to false.
- Double-click on the Attribute entry.
- Select InitialState.Keplerian.sma from the selection drop-down list.
- Click to confirm your selection.
- Click to confirm your selections and close the Object Properties dialog box.
All segments nested within the Sequence in which the Scripting Tool is located are available for selection.
This size attribute sets the semi-major axis used to define the satellite's initial state. The attributes of each object are described in detail in the Connect documentation.
Creating a second object property
Now, define the second object property to modify. In this case, the desired radius of apoapsis.
- Create a new Object Property ().
- Rename the new Property a1.
- Click Properties... () in the Object Properties toolbar.
- Set the Object to the Start Transfer (
 ) Target Sequence.
 - Keep the ReadOnlyProperty set to false.
- Set the Attribute to Profiles.Differential Corrector.Results.DV1 : Radius Of Apoapsis.Desired.
- Click to confirm your selection.
- Click to close Object Properties dialog box.
The Differential_Corrector attribute defines the Differential_Corrector targeting profile. The Results attribute is used with Target Sequences to set equality constraints and the attributes of those results.
Setting the Desired Values
Now you can set your desired values in Astrogator.
- Select VBScript in the Language drop-down list in the Scripting area.
- Enter or copy and paste the following code onto a new line in the scripting area to set the a0 property to the initial_a parameter:
- Enter or copy and paste the following code onto a new line in the scripting area to set the a1 property to the final_a parameter:
a0 = initial_a
a1 = final_a
Object attributes, calculation objects, and parameters are all available as variables in the script, using the same names you specified. In the script, the variables are initialized to the value of the object properties, calculation objects, and parameters in the units associated with them, if applicable. Setting the value of a variable associated with an editable object property in the script will set the object property to that value in the MCS, in the specified unit of the object property, if applicable.
Adding a calc objects
Next, you need to compute the Delta-V required to achieve the orbits specified above. You'll use simple two-body equations of motion for those calc objects:
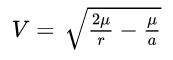
| Option | Value |
|---|---|
| μ | Gravitational constant |
| r | Distance from the satellite to the center of the Earth at the time of interest. |
| a | Semimajor axis |
For the initial and final circular orbits, this reduces to:
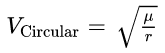
First, you need to get the value of μ to perform these calculations.
- Click New () in the Calc Objects panel.
- Rename the new Calc Object mu.
- Click Properties... () on the Calc Objects menu.
- Double-click on the CalcObject entry.
- Click when the Embedded Component Link Selection dialog box opens.
- Expand (
 ) the Constants (
 ) folder.
 - Select Gravitational Parameter (
 ).
). - Click to confirm your selection and to close the Component Link Selection dialog box.
- Click to confirm your change and to close the Embedded Component Link Selection dialog box.
- Click to confirm your changes and to close the New... dialog box.
Computing the initial guess for dv1
Now that you have all the necessary inputs, you can compute the initial guess for the first maneuver.
- Enter a new line in the scripting area after your two definitions.
- Enter or copy and paste the following code onto a new line in the scripting area:
- Enter or copy and paste the following code onto a new line in the scripting area:
- Enter or copy and paste the following code onto a new line in the scripting area:
- Enter or copy and paste the following code onto a new line in the scripting area:
v_init = sqr(mu/initial_a)
This computes the velocity in the circular initial orbit.
transfer_a = (initial_a + final_a) / 2.0
This calculates the semimajor axis of the transfer orbit.
v_transfer_peri = sqr(2.0*mu/initial_a - mu/transfer_a)
This allows you to determine the required initial velocity of the transfer orbit.
dv1 = v_transfer_peri - v_init
The maneuver magnitude is just the difference between these two velocities.
Setting the value for dv1
Now that you have the initial guess for the first maneuver, you need to apply it.
- Create a new Object Property ().
- Rename the Property dv1_guess.
- Click Properties... () in the Object Properties toolbar.
- Set the Object to the Start Transfer.DV1 (
 ) segment.
 - Keep the ReadOnlyProperty set to false.
- Set the Attribute to ImpulsiveMnvr.Pointing.Cartesian.X.
- Click to close the Object Properties dialog box.
- Enter or copy and paste the following code onto a new line in the scripting area:
- Enter or copy and paste the following code onto a new line in the scripting area:
- Click to save your changes and to close the Scripting Tool.
dv1_guess = dv1
This sets the dv1_guess value to be what you computed dv1 to be.
msgbox(dv1)
This adds a message box for testing to make sure you get the correct values.
Propagating the satellite with the script for dv1 guess
With the dv1 guess value set, reset the profiles and corrections in the Start Transfer target sequence and propagate the satellite.
- Select Start Transfer () in the MCS.
- Click in the Profiles and Corrections panel all values in the Start Transfer () Target Sequence.
- Click Run Entire Mission Control Sequence (
 ) in the MCS toolbar to Propagate the satellite.
 - Review the message in the message box that appears.
- Click to close the message box.
This is the message box you created in your script. The correct dv1 should be 2.4195 km/s.
The Target Sequence should converge quickly.
Computing the initial guess and setting the value for dv2
Complete the same setup for dv2. This requires you to compute the value for dv2 and then set it.
- Select the Sequence () segment in the MCS.
- Click .
- Create a new Object Property ().
- Rename the Property dv2_guess.
- Click Properties... () on the Object Properties toolbar.
- Set the Object to the Finish.Transfer.DV2 () segment.
- Keep the ReadOnlyProperty set to false.
- Set the Attribute to ImpulsiveMnvr.Pointing.Cartesian.X.
- Click to close the Object Properties dialog box.
- Enter or copy and paste the following code onto a new line in the scripting area:
v_transfer_apo = sqr(2.0*mu/final_a - mu/transfer_a)
v_final = sqr(mu/final_a)
dv2 = v_final - v_transfer_apo
dv2_guess = dv2
This code block adds the computations of dv2 and set it equal to dv2_guess.
You now have a completed script, which will compute the guesses for the maneuver magnitude.
The full script can be viewed here:![]()
Resetting both target sequences
With both guesses defined, reset the Target Sequences and re-run the MCS.
- Click to close the Scripting Tool.
- Select Start Transfer () in the MCS.
- Click .
- Select FinishTransfer () in the MCS.
- Click .
- Click Run Entire Mission Control Sequence () to propagate the satellite.
Both Target Sequences should converge quickly.
Saving your work
Clean up and close out your scenario.
- Close any open reports, properties, and the Report & Graph Manager.
- Save (
 ) your work.
Summary
You began by opening a previously-built scenario with an MCS featuring a Hohmann transfer using two Target Sequences. You added the MCS segments to a Sequence segment, then used the Scripting tool to create and define object properties, parameters, and calc objects to compute the initial guesses for the maneuver magnitude. The Scripting Tool allows you to perform your own computations without the need for external tools.
On your own
Try changing the values for initial_a and final_a to make sure the script continues to work.