In order to set breakpoints and debug your plugin, set STK as the startup executable.
/pers
STKFor potentially long computations or tasks, STK displays a progress indicator in the Status bar at the very bottom of the STK window. You can utilize that progress bar in your UI Plugin for the same purpose. This gives you access to the percentage progress indicator, as well as an updatable text field in the status bar. The progress indicator is ideally suited for repeated tasks occurring in a loop, where the progress indicator can be updated on each iteration.
STK, when it calls IAgUiPluginCommandTarget.Exec, passes an IAgProgressTrackCancel object. An IAgProgressTrackCancel object is also returned by IAgUiPluginSite.GetProgressTracker.
To use the progress indicator for a given block of code, call BeginTracking at the start, and EndTracking at the end. In between, you will need to update the progress, using the SetProgress function. In the below example, the "task" is simply a counter from 1 to 100.
| [C#] |
|---|
public class UiPluginExample: IAgUiPlugin, IAgUiPluginCommandTarget { ... private IAgUiPluginSite m_psite; private IAgProgressTrackCancel m_progressBar; public void OnStartup(IAgUiPluginSite PluginSite) { m_psite = PluginSite; m_progressBar = m_psite.GetProgressTracker(); ... } private void TestProgressBar() { m_progressBar.BeginTracking(AgEProgressTrackingOptions.eProgressTrackingOptionNone, AgEProgressTrackingType.eTrackAsProgressBar); for (int i = 0; i <= 100; i++) { m_progressBar.SetProgress(i, string.Format("Progress is at {0}...", i)); System.Threading.Thread.Sleep(100); if (!m_progressBar.Continue) break; } m_progressBar.EndTracking(); } } |
| [Visual Basic .NET] |
|---|
Public Class VBDana Implements IAgUiPlugin, IAgUiPluginCommandTarget, IAgUiPlugin2 ... Dim m_pSite As IAgUiPluginSite Dim m_progressBar As IAgProgressTrackCancel Public Sub OnStartup(PluginSite As IAgUiPluginSite) Implements AGI.Ui.Plugins.IAgUiPlugin.OnStartup m_pSite = PluginSite m_progressBar = m_pSite.GetProgressTracker() ... End Sub Private Sub TestProgressBar() m_progressBar.BeginTracking(AgEProgressTrackingOptions.eProgressTrackingOptionNone, AgEProgressTrackingType.eTrackAsProgressBar) For i As Integer = 0 To 100 m_progressBar.SetProgress(i, String.Format("Progress is at {0}...", i)) System.Threading.Thread.Sleep(100) If Not m_progressBar.Continue Then Exit For End If Next m_progressBar.EndTracking() End Sub End Class |
STK uses the Message Viewer to provide certain kinds of feedback to the user without the interruption of a dialog box. The IAgUiPluginSite interface provides a LogMessage method for this purpose. The message type controls the icon associated with the message, and messages can be sorted or filtered by type.
| [C#] |
|---|
m_psite.LogMessage(AgEUiPluginLogMsgType.eUiPluginLogMsgInfo, "MyPluginName: This message is for your information"); m_psite.LogMessage(AgEUiPluginLogMsgType.eUiPluginLogMsgAlarm, "MyPluginName: There is an error. Something is wrong!"); |
| [Visual Basic .NET] |
|---|
m_psite.LogMessage(AgEUiPluginLogMsgType.eUiPluginLogMsgInfo, "MyPluginName: This message is for your information") m_psite.LogMessage(AgEUiPluginLogMsgType.eUiPluginLogMsgAlarm, "MyPluginName: There is an error. Something is wrong!") |
You have many options when generating Help documentation for your UI Plugin. Compiled HTML, or .chm, is a Microsoft help format. There are free tools and tutorials available online for creating chm files. A .chm is a single file, but each individual page or topic in the .chm file can be linked and launched directly from your application.
The System.Windows.Forms namespace contains a Help class for working with .chm files. The IAgUiPluginSite2 interface, which extends IAgUiPluginSite, also provides a ShowHelp method, as shown below.
| [C#] |
|---|
// IAgUiPluginSite m_psite: instance of IAgUiPluginSite public void OpenHelp() { IAgUiPluginSite2 m_site2 = m_psite as IAgUiPluginSite2; m_site2.ShowHelp("C:\\Program Files (x86)\\AGI\\STK 11\\Help\\AgUiPlugins.chm", "AgUiPluginsLib~IAgUiPluginSite2.html", AgEUiPluginHelpDisplayType.eUiPluginHelpTopic); } |
| [Visual Basic .NET] |
|---|
'IAgUiPluginSite m_psite: instance of IAgUiPluginSite Public Sub OpenHelp() Dim m_site2 As IAgUiPluginSite2 = TryCast(m_pSite, IAgUiPluginSite2) m_site2.ShowHelp("C:\Program Files (x86)\AGI\STK 11\Help\AgUiPlugins.chm", "AgUiPluginsLib~IAgUiPluginSite2.html", AgEUiPluginHelpDisplayType.eUiPluginHelpTopic) End Sub |
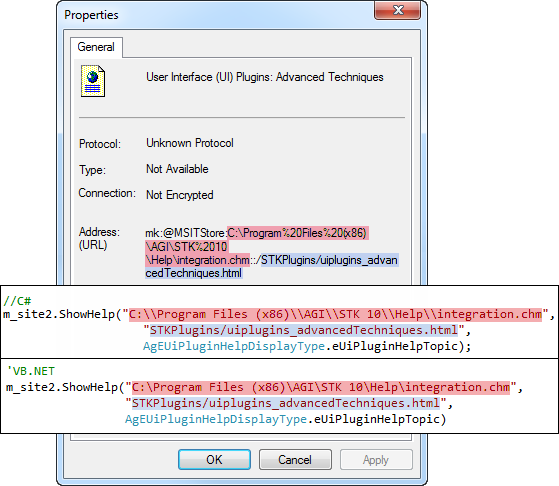
To populate the HelpFileUri and Data parameters, open the .chm file to the topic of interest. Right-click in the page and select Properties. Click in the Address (URL) field and use the keyboard up and down arrows to view the full URL. As shown below, the URI/filepath to the .chm is the HelpFileUri parameter. The information following the ::/ notation is the Data parameter. Note that the escape characters differ, based on the context.
If the topic contains named anchors for navigation within the page, you may append the anchor name to the Data string. For instance, to open this "Advanced Techniques" topic to the "Link to a .chm Help File" section:
| [C#] |
|---|
m_site2.ShowHelp("C:\\Program Files (x86)\\AGI\\STK 11\\Help\\integration.chm", "STKPlugins/uiplugins_advancedTechniques.html#chmHelp", AgEUiPluginHelpDisplayType.eUiPluginHelpTopic); |
| [Visual Basic .NET] |
|---|
m_site2.ShowHelp("C:\Program Files (x86)\AGI\STK 11\Help\integration.chm", "STKPlugins/uiplugins_advancedTechniques.html#chmHelp", AgEUiPluginHelpDisplayType.eUiPluginHelpTopic) |
Note that these examples are based on the default STK install location on 64-bit Windows. The conscientious programmer will programmatically query the install location of the .chm file on the user's machine, and use that variable to build the HelpFileUri string.
It is possible to associate an icon with a toolbar button or menu item, rather than text only. The below procedure demonstrates the use of an icon (.ico) file or image (.bmp, .gif, .jpg, .png or .tif) file.
Add a reference to the Microsoft.VisualBasic.Compatibility and System.Drawing namespaces.
| [C#] |
|---|
using System.Drawing; using System.Reflection; |
| [Visual Basic .NET] |
|---|
Imports System.Drawing Imports System.Reflection |
The file must be read in as an Icon or Image object, then converted to an OLE IPictureDisp object. Note that in C#, the file is identified in the resource stream by a string of the format "<Plugin Namespace>.<File Name>.<File Extension>". In VB, the file is identified in the resource collection by a reference to My.Resources.<FileName>.
| [C#] |
|---|
// Example 1 // Use MenuIcon.ico as the menu item icon public void OnDisplayContextMenu(IAgUiPluginMenuBuilder MenuBuilder) { Assembly currentAssembly = Assembly.GetExecutingAssembly(); Icon menuIcon = new Icon(currentAssembly.GetManifestResourceStream("MySampleUIPlugin.MenuIcon.ico")); stdole.IPictureDisp menuPicture = Microsoft.VisualBasic.Compatibility.VB6.Support.IconToIPicture(menuIcon) as stdole.IPictureDisp; MenuBuilder.AddMenuItem("MyCompany.MyPluginName.MySecondCommand", "Example Menu Item 1", "with an icon", menuPicture); } // Example 2 // Use ToolbarButton.jpg as the toolbar icon public void OnInitializeToolbar(IAgUiPluginToolbarBuilder ToolbarBuilder) { Assembly currentAssembly = Assembly.GetExecutingAssembly(); Image tlbrImage = Image.FromStream(currentAssembly.GetManifestResourceStream("MySampleUIPlugin.ToolbarButton.jpg")); stdole.IPictureDisp tlbrPicture = Microsoft.VisualBasic.Compatibility.VB6.Support.ImageToIPictureDisp(tlbrImage) as stdole.IPictureDisp; ToolbarBuilder.AddButton("MyCompany.MyPluginName.MyFirstCommand", "Example Button 1", "with an image", AgEToolBarButtonOptions.eToolBarButtonOptionAlwaysOn, tlbrPicture); } |
| [Visual Basic .NET] |
|---|
' Example 1 ' Use MenuIcon.ico as the menu item icon Public Sub OnDisplayContextMenu(MenuBuilder As AGI.Ui.Plugins.IAgUiPluginMenuBuilder) Implements AGI.Ui.Plugins.IAgUiPlugin.OnDisplayContextMenu Dim menuPicture As stdole.IPictureDisp = Microsoft.VisualBasic.Compatibility.VB6.Support.IconToIPicture(My.Resources.MenuIcon) MenuBuilder.AddMenuItem("MyCompany.MyPluginName.MySecondCommand", "Example Menu Item 1", "with an icon", menuPicture) End Sub ' Example 2 ' Use ToolbarButton.jpg as the toolbar icon Public Sub OnInitializeToolbar(ToolbarBuilder As AGI.Ui.Plugins.IAgUiPluginToolbarBuilder) Implements AGI.Ui.Plugins.IAgUiPlugin.OnInitializeToolbar Dim tlbrPicture As stdole.IPictureDisp = Microsoft.VisualBasic.Compatibility.VB6.Support.ImageToIPictureDisp(My.Resources.ToolbarButton) ToolbarBuilder.AddButton("MyCompany.MyPluginName.MyFirstCommand", "Example Button 1", "with an image", AgEToolBarButtonOptions.eToolBarButtonOptionNone, tlbrPicture) End Sub |
The context menu items in your plugin may only be appropriate for certain classes of objects; for example, satellites or aircraft. The IAgUiPluginSite.Selection property returns a collection of the objects currently selected in the object browser. The IAgUiPluginSelectedObject contains the full path of the object, which you can either parse to determine the object class, or use IAgStkObjectRoot.GetObjectFromPath to return an IAgStkObject, which has a ClassName property. The latter method is shown in the example below. As multiple types of objects may be selected, this example also ensures that ALL selected objects are of a class that is valid for the particular command.
| [C#] |
|---|
public void OnDisplayContextMenu(IAgUiPluginMenuBuilder MenuBuilder) { bool isValidType = true; List<string> supportedObjectClasses = new List<string>(new string[] { "SATELLITE", "AIRCRAFT" }); IAgStkObject stkobject; IAgUiPluginSelectedObjectCollection selectedobjects = m_psite.Selection; foreach (IAgUiPluginSelectedObject selectedobject in selectedobjects) { stkobject = m_root.GetObjectFromPath(selectedobject.Path); if (!supportedObjectClasses.Contains(stkobject.ClassName.ToUpperInvariant())) { isValidType = false; } } if (isValidType) { MenuBuilder.AddMenuItem("MyCompany.MyPluginName.SatelliteOrAircraftCommand", "Example Context-sensitive Menu Item", "Sample Menu Item", null); } } |
| [Visual Basic .NET] |
|---|
Public Sub OnDisplayContextMenu(MenuBuilder As AGI.Ui.Plugins.IAgUiPluginMenuBuilder) Implements AGI.Ui.Plugins.IAgUiPlugin.OnDisplayContextMenu Dim isValidType As Boolean = True Dim supportedObjectClasses As New List(Of String)(New String() {"SATELLITE", "AIRCRAFT"}) Dim stkObject As IAgStkObject Dim selectedobjects As IAgUiPluginSelectedObjectCollection = m_pSite.Selection For Each selectedobject As IAgUiPluginSelectedObject In selectedobjects stkObject = m_root.GetObjectFromPath(selectedobject.Path) If Not (supportedObjectClasses.Contains(stkObject.ClassName.ToUpper()) Then isValidType = False End If Next If (isValidType) Then MenuBuilder.AddMenuItem("MyCompany.MyPluginName.MySatelliteOrAircraftCommand", "Example Context-sensitive Menu Item", "Sample Menu Item", Nothing) End If End Sub |
For a plugin that will have several menu items, you may wish to group those menu items into a submenu. The below example adds a standard context menu item, then a submenu containing three menu items.
| [C#] |
|---|
public void OnDisplayContextMenu(IAgUiPluginMenuBuilder MenuBuilder) { MenuBuilder.AddMenuItem("MyCompany.MyPluginName.MenuItemCommand1", "Some Plugin Function", "Sample Menu Item", null); IAgUiPluginMenuBuilder SubMenuBuilder = MenuBuilder.AddPopupMenu("Export Results"); SubMenuBuilder.AddMenuItem("MyCompany.MyPluginName.SubMenuItemCommand1", "Export Image", "Sample SubMenu Item", null); SubMenuBuilder.AddMenuItem("MyCompany.MyPluginName.SubMenuItemCommand2", "Export VDF", "Sample SubMenu Item", null); SubMenuBuilder.AddMenuItem("MyCompany.MyPluginName.SubMenuItemCommand3", "Export CSV", "Sample SubMenu Item", null); } |
| [Visual Basic .NET] |
|---|
Public Sub OnDisplayContextMenu(MenuBuilder As AGI.Ui.Plugins.IAgUiPluginMenuBuilder) Implements AGI.Ui.Plugins.IAgUiPlugin.OnDisplayContextMenu MenuBuilder.AddMenuItem("MyCompany.MyPluginName.MenuItemCommand1", "Some Plugin Function", "Sample Menu Item", Nothing) Dim SubMenuBuilder As IAgUiPluginMenuBuilder = MenuBuilder.AddPopupMenu("Export Results") SubMenuBuilder.AddMenuItem("MyCompany.MyPluginName.SubMenuItemCommand1", "Export Image", "Sample SubMenu Item", Nothing) SubMenuBuilder.AddMenuItem("MyCompany.MyPluginName.SubMenuItemCommand2", "Export VDF", "Sample SubMenu Item", Nothing) SubMenuBuilder.AddMenuItem("MyCompany.MyPluginName.SubMenuItemCommand3", "Export CSV", "Sample SubMenu Item", Nothing) End Sub |
The standard location for plugin menu items is in the <Object Class> Plugins submenu of an object shortcut menu, as described in the topic Add a context menu item. Menu items may also be added directly to an object shortcut menu or to the STK application menus (File, Edit, View, etc).
Adding these higher-level menu items is similar in operation to the standard context menu item, with one key distinction: the OnDisplayContextMenu method is a member of the IAgUiPlugin interface, but the OnDisplayMenu method that we use to add higher-level menu items is a member of the IAgUiPlugin2 interface.
Furthermore, a higher-level menu item can be "added" or "inserted". A menu item is "added" to the bottom of the menu. A menu item is "inserted" above an existing item (indexed beginning at 0 and including separators). Take care when inserting menu items, as the number of existing items in a menu will vary by menu, STK object type, and licenses available to the user.
| [C#] |
|---|
public class UiPluginExample: IAgUiPlugin, IAgUiPluginCommandTarget, IAgUiPlugin2 |
| [Visual Basic .NET] |
|---|
Public Class MySampleUIPlugin Implements IAgUiPlugin, IAgUiPluginCommandTarget, IAgUiPlugin2 |
This will implement the IAgUiPlugin2 interface, exposing its members. IAgUiPlugin2 has only one public method, OnDisplayMenu.
| [C#] |
|---|
public void OnDisplayMenu(string MenuTitle, AgEUiPluginMenuBarKind MenuBarKind, IAgUiPluginMenuBuilder2 MenuBuilder) { // Example 1 // Add a menu item to the bottom of any STK Object shortcut menu if (MenuBarKind.Equals(AgEUiPluginMenuBarKind.eUiPluginMenuBarContextMenu)) { MenuBuilder.AddMenuItem("MyCompany.MyPluginName.ObjectMenuCommand", "STK Object Menu Item", "Sample menu item", null); } // Example 2 // Insert a menu item into the application View menu, above the 4th item (index 3), // then add a separator above the new item else if (MenuBarKind.Equals(AgEUiPluginMenuBarKind.eUiPluginMenuBarPopupMenu)) { if (MenuTitle.Contains("View")) { MenuBuilder.InsertMenuItem(3, "MyCompany.MyPluginName.ApplicationMenuCommand", "View Menu Item", "Sample menu item", null); MenuBuilder.InsertSeparator(3); } } } |
| [Visual Basic .NET] |
|---|
Public Sub OnDisplayMenu(MenuTitle As String, MenuBarKind As AGI.Ui.Plugins.AgEUiPluginMenuBarKind, MenuBuilder As AGI.Ui.Plugins.IAgUiPluginMenuBuilder2) Implements AGI.Ui.Plugins.IAgUiPlugin2.OnDisplayMenu ' Example 1 ' Add a menu item to the bottom af any STK Object shortcut menu If MenuBarKind.Equals(AgEUiPluginMenuBarKind.eUiPluginMenuBarContextMenu) Then MenuBuilder.AddMenuItem("MyCompany.MyPluginName.ObjectMenuCommand", "STK Object Menu Item", "Sample menu item", Nothing) ' Example 2 ' Insert a menu item into the application View menu, above the 4th item (index 3), ' then add a separator above the new item ElseIf MenuBarKind.Equals(AgEUiPluginMenuBarKind.eUiPluginMenuBarPopupMenu) Then If MenuTitle.Contains("View") Then MenuBuilder.InsertMenuItem(3, "MyCompany.MyPluginName.ApplicationMenuCommand", "View Menu Item", "Sample menu item", Nothing) MenuBuilder.InsertSeparator(3) End If End If End Sub |
To control the function and state of these new commands, populate the IAgUiPluginCommandTarget.Exec and IAgUiPluginCommandTarget.QueryState methods, as you would for any other command. See also Implement the Command Target Interface.
STK Programming Interface 11.0.1