
In this exercise you will go through the process of creating a PowerPoint slide with an embedded ActiveX component.
The complete source code for this example is given below.
Note: It may be necessary to change the macro
security level in order for the controls to work properly. To do
this open up PowerPoint, and click on Tools -> Macro ->
Security… in the menu. Change the security level to Medium or Low
and click OK. PowerPoint is now set to allow the Controls to be
accessed.
Newer versions of PowerPoint might simply display an error that
active content has been disabled, with a button that will enable
the content. In this case, simply clicking the button will likely
suffice.
Open up SimpleExample.ppt which resides in:
<STK install folder>Help\stkX\gettingStarted
Now do a SaveAs and change the name to Simple Example FINAL.ppt.
There are four items that will be added to the slide; three buttons and the AGI Globe Control. Start by adding the buttons.
In versions of PowerPoint prior to PowerPoint 2007, a new button can be added to the slide by using the Control Toolbox, pictured below.
If this toolbar is not found in your PowerPoint toolbar by default, right click on the gray space and check Control Toolbox.
For PowerPoint 2007 or later, these options are found in the Controls section of the Developer tab on the ribbon bar. If this tab is not present, right click on the ribbon, select "Customize the Ribbon..." In the Customize dialog that pops up enable the Developer tab by ensuring it is checked in the list of Main Tabs.
To add a command button, click the rectangular icon (fifth from the left in the above image), then click and drag a box on the slide. Add two more, for three buttons total. Right-clicking on a new button that has been added to the slide, choose to view the Properties of the control. A Properties dialog should now be visible somewhere on your screen (pictured below).
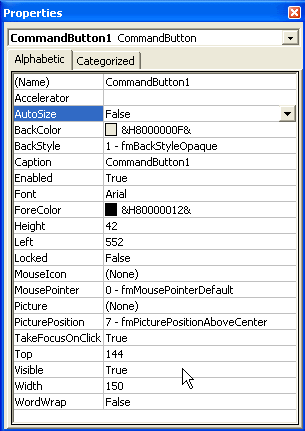
All of the necessary changes to the command buttons, with the exception of the code itself, will be made inside these property panels. Change the properties of this button, as well as all of the other necessary buttons, using the settings in the table below. The properties listed below will change the name, caption, position, size, and show an image if appropriate. The images can be found in the images subdirectory of the directory in which this example is located.
| (Name) | Caption | Left | Top | Width | Height | Enabled |
|---|---|---|---|---|---|---|
| Facility | Add Facility | 552 | 204 | 155 | 30 | False |
| Satellite | Add Satellite | 552 | 174 | 155 | 30 | False |
| Scenario | New Scenario | 552 | 144 | 155 | 30 | True |
The only remaining object that needs to be added to the slide is the 3D window. Add this object by clicking the last button in the Control Toolbox and choosing the AGI Globe Control from the list of available objects. Though it may be difficult to see, the control is now added to your slide.
Right click on the new Control and again select Properties. Enter the following:
Name: AxVO
Height: 354
Left: 12
Top: 102
Visible: true
Width: 540
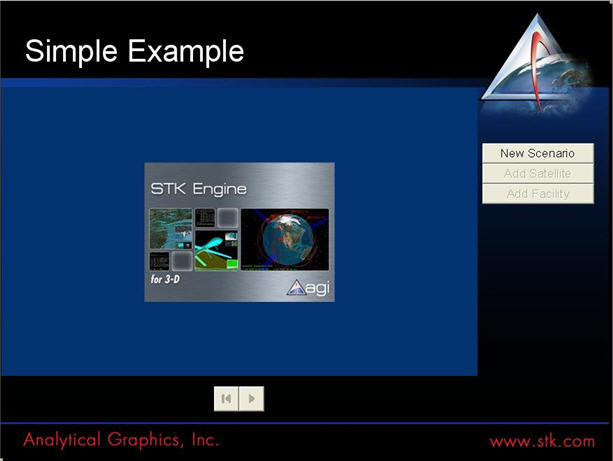
Once this is complete, save the presentation and press F5 to view the slide show. Although none of the functionality is there, you can view your slide and it should look like the image below.
Right click on any of the objects on the slide, and choose the View Code option. This will cause the Microsoft Visual Basic window to appear containing the code for the slide. This is where the buttons we just added to the slide will get their functionality.
Start by creating a SendCommand function, through
which all the commands in the slide will be directed. At the very
bottom of the code type in the following:
Function SendCommand(stkCommand As String)
    On Error Resume Next
    Set rVal = AxVO.Application.ExecuteCommand(stkCommand)

    If rVal.Count > 0 Then
        SendCommand = rVal(0)
    Else
        SendCommand = 0
    End If
End Function
This function will receive a Connect Command in the form of a
string, and then send it to the STK Application object associated
with the Globe control that sits on the slide. It is important to
include the “On Error Resume Next” line to ensure that
in the event of a NACK (or Not Acknowledge) statement
from STK the code will continue to run. The If-Then-Else statement
is in place to catch and return any data that STK would send back
to the code.
Now we will edit the code for each of the buttons. From the pull down menu on top left of the editor choose AnimFor, and from the pull down menu on the top right choose Click. A subroutine should appear in your code now. Inside this subroutine add the following line:
SendCommand("Animate * Start Forward")
When the AnimFor button is clicked now it will send the above Connect Command to the SendCommand function and tell STK to start animating the scenario forward.
Now edit the Scenario button’s subroutine. Add the following code:
Private Sub Scenario_Click()
    If Scenario.Caption = "New Scenario" Then
        SendCommand ("New / Scenario Scenario1")
        AnimFor.Enabled = True
        Reset.Enabled = True
        Facility.Enabled = True
        Satellite.Enabled = True
        Scenario.Caption = "Unload Scenario"
    Else
        SendCommand ("Unload / *")
        AnimFor.Enabled = False
        Reset.Enabled = False
        Facility.Enabled = False
        Satellite.Enabled = False
        Scenario.Caption = "New Scenario"
    End If
End Sub
There is a lot going on in this section of code. When the Scenario button is clicked it first checks the button’s caption. If the caption is set to New Scenario it sends the command to create the new scenario and then enables all the other buttons on the slide. It then changes the caption on the button to Unload Scenario so that the next time the button is clicked it performs the Else portion of the code.
If the Scenario button’s caption reads Unload Scenario, then it first unloads the scenario (and any objects that have been loaded), then disables all of the other buttons, and then sets the button’s caption back to New Scenario. After this has been done, the slide should have been returned to its original condition.
Now edit the Facility button. Add the following two lines to the button’s subroutine:
SendCommand("New / */Facility Exton")
Facility.Enabled = False
When this button is clicked it will create a new facility named Exton and then disable the button to make sure that no one can attempt to create this same facility twice in the same scenario.
Finally, edit the Satellite button. Much like the Facility button, this button should create a satellite and then disable the button. We will also add a SetState command to propagate the satellite.
SendCommand ("New / */Satellite Sat1")
SendCommand ("SetState */Satellite/Sat1 Classical J2Perturbation UseScenarioInterval 60 J2000 ""1 Jul 2009 12:00:00.00"" 7163000.137079 0.0 98.5 0.0 139.7299 360.0")
Satellite.Enabled = False
Save the code and then close the Microsoft Visual Basic editor. Then back in PowerPoint save the presentation once again. Finally, view the presentation. This time all of the functionality should exist behind all of your buttons, and a working version of STK now exists inside your presentation.
Function SendCommand(stkCommand As String)
    On Error Resume Next
    Set rVal = AxVO.Application.ExecuteCommand(stkCommand)

    If rVal.Count > 0 Then
        SendCommand = rVal(0)
    Else
        SendCommand = 0
    End If
End Function

Private Sub AnimFor_Click()
    SendCommand ("Animate * Start Forward")
End Sub

Private Sub Reset_Click()
    SendCommand ("Animate * Reset")
End Sub

Private Sub Scenario_Click()
    If Scenario.Caption = "New Scenario" Then
        SendCommand ("New / Scenario Scenario1")
        AnimFor.Enabled = True
        Reset.Enabled = True
        Facility.Enabled = True
        Satellite.Enabled = True
        Scenario.Caption = "Unload Scenario"
    Else
        SendCommand ("Unload / *")
        AnimFor.Enabled = False
        Reset.Enabled = False
        Facility.Enabled = False
        Satellite.Enabled = False
        Scenario.Caption = "New Scenario"
    End If
End Sub

Private Sub Facility_Click()
    SendCommand ("New / */Facility Exton")
    Facility.Enabled = False
End Sub

Private Sub Satellite_Click()
    SendCommand ("New / */Satellite Sat1")
    SendCommand ("SetState */Satellite/Sat1 Classical J2Perturbation UseScenarioInterval 60 J2000 ""1 Jul 2009 12:00:00.00"" 7163000.137079 0.0 98.5 0.0 139.7299 360.0")
    Satellite.Enabled = False
End Sub
STK Programming Interface 11.0.1