Localization |
The following localization exercise is based on the NavAnalyst sample reference application (which requires the Navigation Accuracy Library). After exploring the World-Readiness of DME Component Libraries and NavAnalyst, we will walk through the process of localizing NavAnalyst to a given language and locale.
The example used for the exercise below involves localization to French, but it is not necessary to know French (or any language other than English) to do this exercise. Also, if you prefer, you may substitute another language for French in the exercise. |
World-Readiness is an umbrella term commonly used to refer to globalization and localizability. Globalization is the engineering of an application to eliminate cultural presuppositions; localizability is the adaptation of an application so that its resources can easily be replaced by those of a given culture (language and locale). World-Readiness is commonly grouped with localization - the process of creating resources for a specific culture - under the umbrella term internationalization:
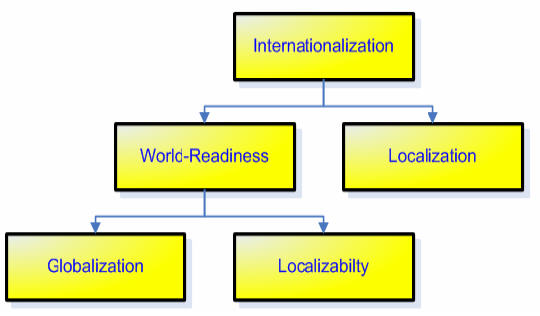
Reference: Smith-Ferrier, Guy, .NET Internationalization, Upper Saddle River, NJ: Addison-Wesley (2007), pp. 29-33. Concepts discussed by Smith-Ferrier but not included here are customization (under internationalization), and customizability (under World-Readiness). |
DME Component Libraries is fully World-Ready. It is globalized - for example all date, time and string operations take the active culture into account - and all strings are separated from the source code, making the library easily localizable.
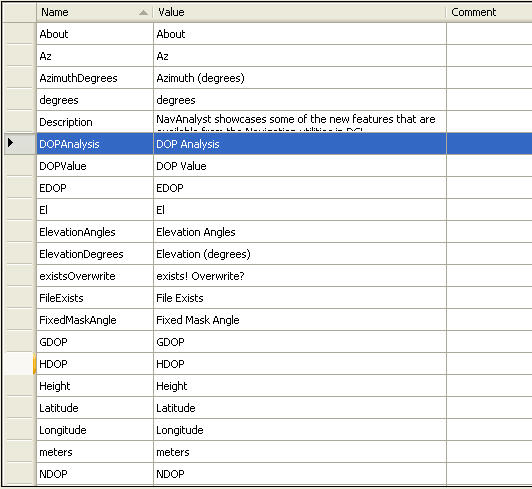
The NavAnalyst reference application is engineered to be World-Ready. Among other things, instead of hard coding string values in the source code, NavAnalyst uses strongly typed resource names, with values supplied by resource files. For example, titles for DOP and AzEl graphs and their axes are represented in the code as follows:
// Here and elsewhere we use strongly typed resources to support
// localization of the application. String values for each
// resource are defined in a resource file (in this case,
// Localization.resx).

// Initialize the graphs with their respective axis labels and titles
DOPGraph.GraphPane.Title.Text = Localization.DOPAnalysis;
DOPGraph.GraphPane.XAxis.Title.Text = Localization.TimeUTC;
DOPGraph.GraphPane.YAxis.Title.Text = Localization.DOPValue;

AzElGraph.GraphPane.Title.Text = Localization.ElevationAngles;
AzElGraph.GraphPane.XAxis.Title.Text = Localization.TimeUTC;
AzElGraph.GraphPane.YAxis.Title.Text = Localization.ElevationDegrees;

NavAccGraph.GraphPane.Title.Text = Localization.NavigationAccuracy;
NavAccGraph.GraphPane.XAxis.Title.Text = Localization.TimeUTC;
NavAccGraph.GraphPane.YAxis.Title.Text = Localization.PositionError;
The values for these string entities are spelled out in the resource file Localization.resx, which you can easily edit with the Visual Studio Resource Editor:
You can create a localized version of the resource file for any language, as shown here for French, and assign new values to the resource names:

We are now ready to show how easily NavAnalyst can be localized to any culture.
As indicated above, if we store the values of strings in resource files instead of defining them in the source code itself, we can localize to any language simply by adding a new resource file that specifies values appropriate to that language for the resource names. An easy way to do this is to copy the resource file, paste the copy into the Visual Studio project, and rename the copy using a file extension that contains a culture string for the desired language and, optionally, the locale. Some commonly used culture strings are:
Name | Language | Locale |
|---|---|---|
de-DE | German | Germany |
en | English | neutral |
en-GB | English | U.K. |
en-US | English | U.S. |
fr | French | neutral |
fr-CA | French | Canada |
fr-FR | French | France |
ja-JP | Japanese | Japan |
For other language and locale codes, see the definition of the CultureInfo class. For this exercise, we will use a neutral French culture (i.e. French language but no specific locale).
It is not necessary to know any language other than English to do this exercise. As explained below, using machine translation tools available on the Web, you can create an adequate 'demo translation' for design purposes. Also, if you have ability in a non-English language other than French and would prefer to use it here, simply select a different language code from the above table or from the complete list that accompanies the definition of the CultureInfo class, and name your localized resource file accordingly. For example, to do this exercise in Spanish, name the file Localization.es.resx. |
If you have not already done so, open the NavAnalyst sample application in Visual Studio, right-click on Localization.resx in the Solution Explorer, and make a copy of it.
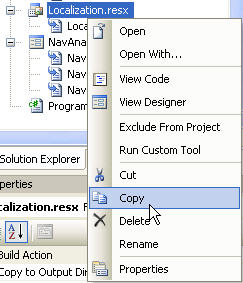
Right-click on the Visual Studio project and paste the copy of the resource file into it.
In the Solution Explorer, find the copy (which will have the name Copy of Localization.resx) and rename it to Localization.fr.resx.

 Note
NoteThe ...Designer.cs file under Localization.fr.resx will automatically be renamed to ...fr.Designer.cs.
Double-click Localization.fr.resx to open it in the Resource Editor, and replace some or all of the English strings in the value column with the corresponding French strings (see Note on Demo Translations below).
TipIt is not necessary to translate all of the English strings, since the purpose here is just to learn how to use the resource file to localize string values. Translation of a few selected items should suffice for that purpose.
Note on Demo Translations: As indicated above, you do not need to know French or any language other than English to do this exercise. You can do the exercise in any language that is supported by any of several widely available machine translation tools, such as Google Translate. We do not recommend that you rely on such a tool to create a localized version of your software to be distributed to customers or end users. You should assume that the output of such a tool will not be perfect and, indeed, may contain fundamental translation errors. However, as noted by Smith-Ferrier (2007) [cited above], pp. 10-11, a rough machine translation provides a low-cost way to get a demo version of your application up and running so that you can test its localizability. |
To localize the NavAnalyst graphical user interface, we simply make a copy of the main application window for each culture to which we want to localize and then edit the language, layout and other properties of the form and the controls on it.
Open the main form (NavAnalyst.cs) in Designer View.
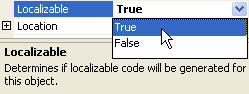
In the Properties dialog for the form, set the Localizable property to True.
 Note
NoteIn the following steps, you may substitute the language and locale of your choice. Also, as you can see if you browse the choices in the Language dropdown list, you may leave the locale neutral if you prefer.
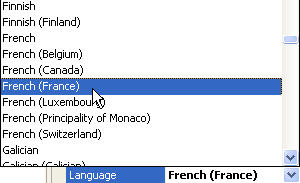
Set the Language property to French, with France as the locale.
Now translate the Text properties of some of the controls on the form, adjusting layout and changing other properties as necessary. Here are some examples of changes that you can make:
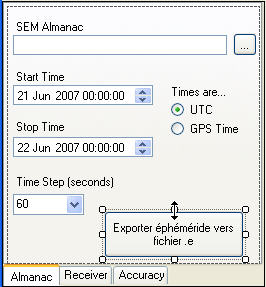
In the lower left corner of the form, on the Almanac tab, select the Export ephemeris to .e files button, and change its Text property to:
Exporter éphéméride vers fichier .e
You will see that the new text does not fit onto the button as presently sized. To remedy this, resize the button and relocate or resize neighboring controls as necessary:
On the Receiver tab, select the Receiver Solution Type label, and change its Text property to:
Solution de navigation du récepteur
The new text needs to wrap onto two lines to fit comfortably into the context:

Set the label's AutoSize property to False, and then resize the label to achieve the desired layout:

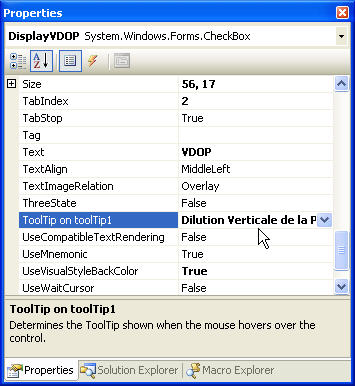
Tooltips provide a way to handle abbreviations on the GUI that may be widely used in the international community but are not necessarily familiar to all users in the local culture. Thus, you may opt to leave the abbreviation 'VDOP' unchanged (reflecting international usage) but translate its Tooltip (to accommodate local users):
Make other changes in the GUI, as desired. Your changes are saved to the file NavAnalyst.fr-FR.resx, which was created automatically when you selected French (France) as the form's Language property.
TipIt is not necessary to localize the entire GUI, since the purpose here is just to gain practice using resource files to localize language and layout.
In addition to the main form, you can create localized versions of other forms, such as the Help window and the About box.
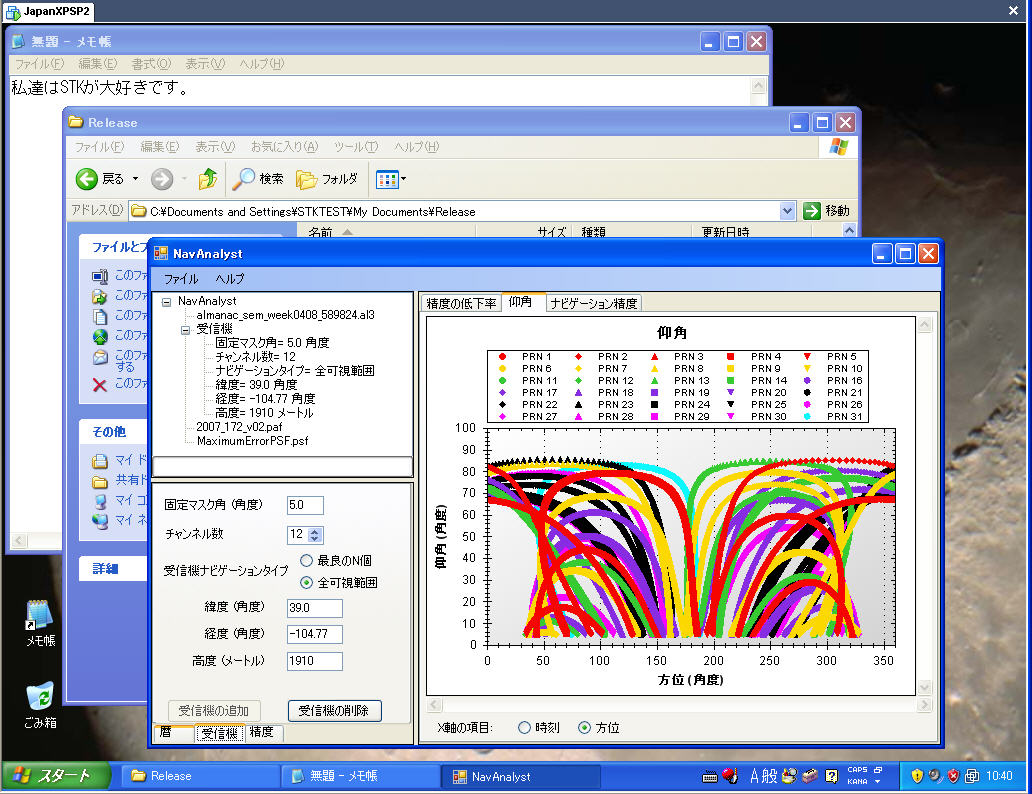
To test your localization code, you need to run the application in the target environment. Although, as shown below, you can switch the application's culture to the target culture, doing that will not tell you absolutely whether your application will function as expected in the version of Windows that is used in that culture. Instead, you should install the target environment on a new machine and then run your application in that environment. As Ferrier-Smith (2007), pp. 18-19, points out, a cost-effective way to do this, especially if you are localizing to a number of different cultures, is to use virtual machine (VM) software and set up a separate VM client for each culture of interest. The following illustration shows a Japanese-localized version of NavAnalyst running in a VM window that is hosting the Japanese version of Windows XP Professional Service Pack 2:
If the target environment is not available to you, or if you want to do quick local tests of changes in your localization code or resource files, you can switch the application's culture to the target culture using the ThreadCurrentUICulture property, which takes as a value a CultureInfo object representing the current culture (language and, optionally, locale). The NavAnalyst application contains commented code for setting the current culture to French, German, Italian and Japanese:
// Uncomment the appropriate code line to set the UI culture
// to French (France), German (Germany), Italian (Italy) or
// Japanese (Japan), or leave them all commented to use the
// default culture:
// Thread.CurrentThread.CurrentUICulture = new CultureInfo("fr-FR");
// Thread.CurrentThread.CurrentUICulture = new CultureInfo("de-DE");
// Thread.CurrentThread.CurrentUICulture = new CultureInfo("it-IT");
// Thread.CurrentThread.CurrentUICulture = new CultureInfo("ja-JP");
Simply uncomment one of these lines to switch the application to the desired culture. Refer to the definition of the CultureInfo class for other culture strings that you can use to define the language of the application and, if you wish, its locale. Namespace declarations to support the above code have already been added to NavAnalyst.cs:
using System.Threading;
using System.Globalization;
using AGI.Foundation.Navigation.Models;
Complete localization samples for French (France), German (Germany), Italian (Italy) and Japanese (Japan) accompany this release of DME Component Libraries. The localization files can be found at [Install Directory]\Examples\NavAnalyst\LocalizationExercise\[language]\, where [language] is French, German, Italian or Japanese. To bring any or all of these files into the NavAnalyst code, simply copy them up to the folder that contains the project file, add them to the project and rebuild the solution.
If you have used one of these cultures for the localization exercise, you may wish to save the localization files that you created to another location before copying the sample files up to the project folder. |
For example, to bring the Japanese localization files into the project:
Select the 3 localization files in [Install Directory]\Examples\NavAnalyst\LocalizationExercise\Japanese\ and copy them to: [Install Directory]\Examples\NavAnalyst\
NoteCopy only the localization files themselves, not the folder (Japanese) that contains them.
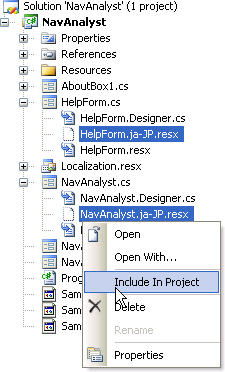
In the Project Explorer, right-click on NavAnalyst.ja-JP.resx and HelpForm.ja-JP.resx, and select Include In Project from the context menu:
Right-click on the project, and select Add, then Existing Item....
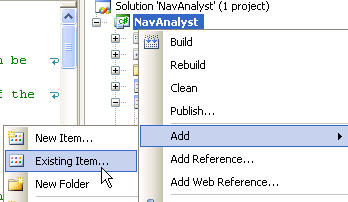
Select Localization.ja.resx, and click the Add button to add it to the project.
Build the solution.
French, German and Italian localization samples can be added to the project in a similar way. To demonstrate the localization, run it in the target environment or switch the application's culture to the target culture (see previous section).
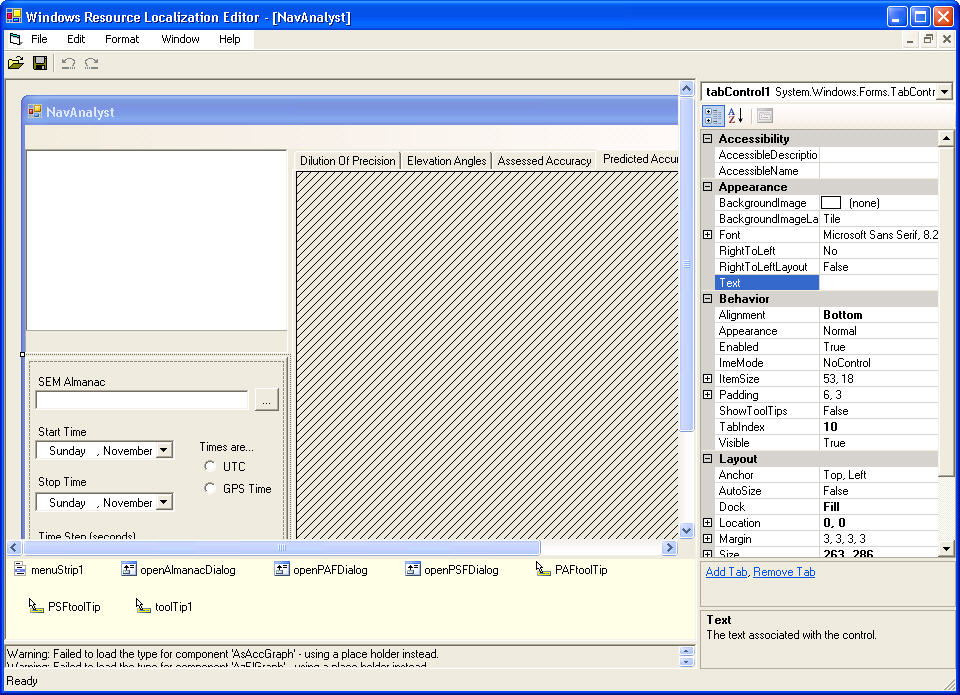
If the localization of your application is to be done by a third party, such as an international business partner, you may want to consider having the localizer use the Windows Resource Localization Editor (Winres.exe) to create culture-specific versions of the application's resource files. Winres.exe is part of the .NET Framework SDK and is available free of charge. An advantage of Winres.exe is that it lets localizers see how their translations fit into the available space. They can resize and relocate controls as necessary to accommodate the translated text, or, if their proposed translations are greatly in excess of the size of the original, they can try out shorter translations and get immediate feedback on how the abridged text looks on the application interface.
Before committing to the use of Winres.exe, you should consult the MSDN documentation to make certain it is the right solution for you (see also Smith-Ferrier (2007), pp. 89-100) and heed all the cautions that you find there (e.g. that the version of Winres.exe needs to be compatible with the version of Visual Studio that you are using). With that in mind, let's walk through a brief example of how you might use Winres.exe to create a Russian-localized version of NavAnalyst. Assume, for this exercise, that your localizer has the right version of Winres.exe, and that you are both working in the .NET 2.0 framework.
Provide the localizer with a copy of NavAnalyst.resx. Here you will simulate that step by placing a copy of that file somewhere on your local drive outside the NavAnalyst install area.
Open the copy of NavAnalyst.resx in Winres.exe:
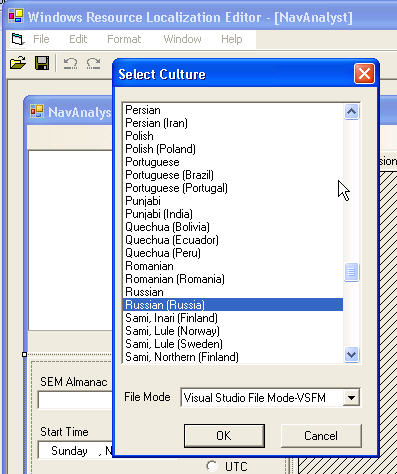
Select Save As... from the File menu, and then select Russian (Russia) as the culture of the new resource file. It will automatically be saved under the name NavAnalyst.ru-RU.resx.
 Note
NoteMake certain that the File Mode is set to Visual Studio File Mode - VSFM, which uses resource inheritance, i.e., the localized version contains only entries that differ from the parent. For further discussion, see Smith-Ferrier (2007), pp. 93-95.
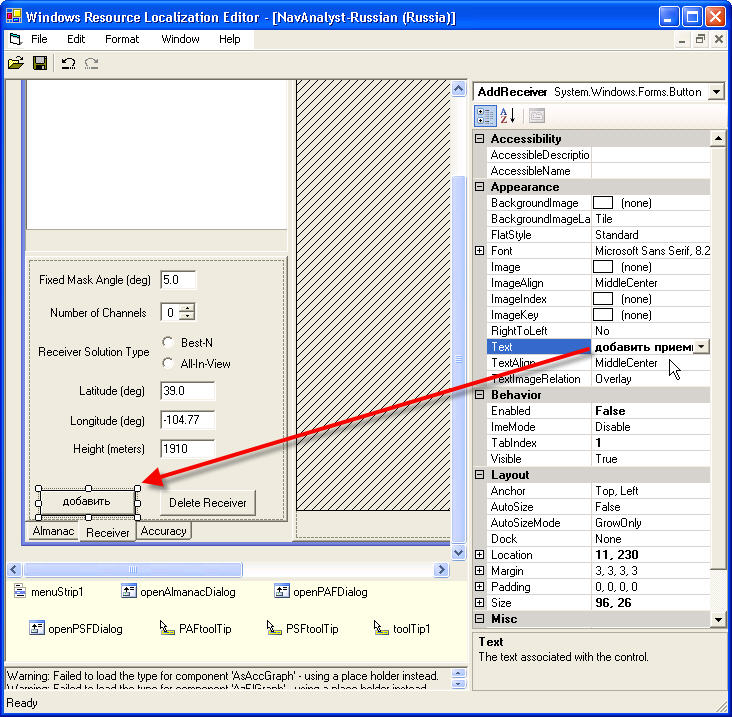
In the Winres.exe editing window, select the NavAnalyst Receiver tab, and then select the Add Receiver button.
Obtain a Russian translation (e.g. using one of the software tools mentioned above) of "add a receiver" - or any longish phrase in Russian or any language (this is just an exercise) - and insert it into the Text property field for the Add Receiver button:
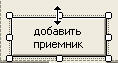
Resize the button as necessary to accommodate the new text:
Translate the text properties of as many other controls (including the main form) as you like, resizing and relocating the controls as necessary.
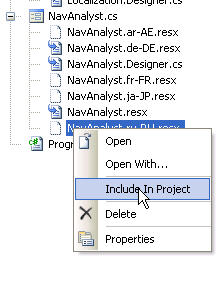
When you are finished, save your changes, close Winres.exe and copy or move NavAnalyst.ru-RU.resx into the directory from which you originally copied NavAnalyst.resx. (Here you are simulating the return of the Russian-localized file to you by your localizer.)
In the Visual Studio Solution Explorer, right-click on the new Russian resource file and include it in the project:
Build NavAnalyst and test your localization by running it in a "Russian (Russia)" environment (e.g. on a dedicated VM client) or by changing the CurrentUICulture, as described above.
A Russian version of Localization.resx (Localization.ru.resx) also needs to be created. This XML-formatted file can easily be edited with any text editing tool.