Connecting to STK from Delegates
Overview
The Moxie Engine uses analysis tool controllers to communicate with external tools like STK. At the start of a simulation, an analysis tool controller instantiates all of the delegates associated with it, injecting dependencies from the external tool into the delegates for them to use. You can implement custom analysis tool controllers for other tools, but since the UAV mission only requires STK, you will just use Moxie's STK controller in this tutorial. In this section, you will set up the STK controller and its STK toolbox dependency, initialize the STK object data, and use a SysML stereotype to configure the simulation to start the STK scenario when the simulation starts.
This section covers the following concepts:
- Moxie delegate module descriptors
- Moxie analysis tool controllers, especially the STK controller
- Moxie's STK toolbox
- Moxie's StkObjectSpatialEntity delegate
- Moxie simulation configuration with stereotypes, especially STK simulation configuration
public UAVDelegate( ...
        @InjectByName("stkToolbox") StkToolbox stkToolbox,
        @InjectByName("stkEarth") StkEarth stkEarth,
         ... ) {
    super(stkToolbox, stkEarth, timeProvider);
    mStkToolbox = stkToolbox;
     ...
    mStkToolbox.sendConnectCommand("Units_SetConnect / Internal");
}

public void initializeStkObject() {
    //Attach to the STK object.
    this.updateFromStkObject(stkObjectPathProperty().getValue());
    mStkUavObject = this.getStkObject();
}
Figure A1: Connecting to an STK object from a delegate
Prerequisites
| Prerequisite | Description |
|---|---|
| Moxie Installation | You must have installed Moxie and have the prerequisites for developing delegates for Moxie. |
| STK Installation | You must have installed 12 . |
| Tutorial Project |
You must start this section with the UAV Mission simulation project and delegate module project from the previous section. If you did not complete the previous section, you can use the files from the Moxie installation: \documentation\tutorialFiles\03\SignalEvents, but you may still need to configure the delegate module for your environment. You also need the UAV Mission STK scenario from the Moxie installation: \documentation\tutorialFiles\03\UAVMission.vdf. |
| Recommended Reading |
Before completing this section, you may want to read the following help topics:
|
Instructions
Replace the analysis tool controller
A delegate provider registers the module with the Moxie Engine by providing a delegate module descriptor that contains the analysis tool
controller and the list of delegates.
Since you will be integrating your simulation with STK,
you should replace the BuiltInAnalysisToolController with the StkController,
which includes dependencies for interacting with STK in addition to including all of the same built-in dependencies.
-
In the
UAVMissionDelegateProviderclass, remove the following import statement:import com.agi.moxie.api.analysistools.BuiltInAnalysisToolController; -
Add the following import statement:
import com.agi.moxie.stk.delegates.core.StkController; -
In the return statement of the
provideDescriptor()method, replace theBuiltInAnalysisToolController.classargument withStkController.class.
Add the STK toolbox dependency
The StkToolbox dependency is the primary means of interacting with STK from Moxie.
In the next section, you will use this dependency to control the STK scenario.
-
In the
UAVDelegateclass, add the following import statement:import com.agi.moxie.stk.utilities.toolbox.StkToolbox; -
Add the following private field declaration:
private StkToolbox mStkToolbox; -
In the constructor,
add the following dependency injection and field initialization:
public UAVDelegate( ...
        @InjectByName("stkToolbox") StkToolbox stkToolbox,
         ... ) {
    mStkToolbox = stkToolbox;
     ...
} -
At the end of the constructor,
add the following code to set the units when using STK Connect commands:
mStkToolbox.sendConnectCommand("Units_SetConnect / Internal"); -
Repeat the previous steps to add the
StkToolboxdependency to theComputerDelegateand theSensorPayloadDelegate.
Add the STK object initialization
Moxie provides the StkObjectSpatialEntity delegate to facilitate STK object references in your custom delegates.
-
In the
UAVDelegateclass, add the following import statements:import agi.stkobjects.IAgStkObject;
import com.agi.moxie.stk.delegates.core.StkEarth;
import com.agi.moxie.stk.delegates.core.StkObjectSpatialEntity; -
In the class declaration,
add
extends StkObjectSpatialEntityas follows:public abstract class UAVDelegate extends StkObjectSpatialEntity implements UAV -
Add the following private field declaration:
private IAgStkObject mStkUavObject; -
In the constructor,
add the following dependency injection and parent constructor call:
public UAVDelegate( ...
        @InjectByName("stkEarth") StkEarth stkEarth,
         ... ) {
    super(stkToolbox, stkEarth, timeProvider);
     ...
} -
In the
initializeStkObject()method, add the following code to attach to the STK object://Attach to the STK object.
this.updateFromStkObject(stkObjectPathProperty().getValue());
mStkUavObject = this.getStkObject(); -
Repeat the previous steps to initialize the STK object data in the
SensorPayloadDelegate, but replacemStkUavObjectwithmStkSensorObjectin the private field declaration and theinitializeStkObject()method.
Add an STK simulation configuration
Moxie provides several SysML stereotypes that allow you to configure how your simulation runs. You can use one of these stereotypes to automatically launch the STK scenario for the UAV Mission when the simulation starts.
- Copy the STK delegate module (\delegates\com.agi.moxie.stk) from the Moxie installation into your delegate module home directory (e.g., C:\Moxie\DelegateHome\com.agi.moxie.stk).
- Open the UAVMission.mdzip project from the previous section.
- In your No Magic modeling tool, select Options > Project Usages and click .
- In the Use Project dialog box shown in Figure B1, select From predefined location.
- In the Paths to used projects box, select <install.root>\modelLibraries.
-
In the list of .mdzip files,
select Moxie-STK.mdzip
and click .
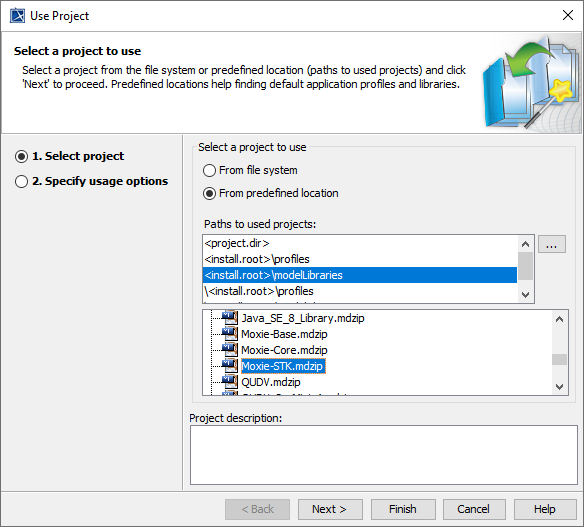
Figure B1: Importing the Moxie STK stereotypes
- Close the Used Projects window.
- In the Containment Tree, double-click the Simulation > simulation instance specification.
- Click the cell to the right of Applied Stereotype then click the button in the upper-right corner of the cell.
-
Search for and select
MoxieStkScenarioFromFile, and then click . -
Select Tags from the left pane of the specification window,
select the
scenarioFilePathfrom the center pane, and click . -
Enter the path to the STK scenario specified in the prerequisites for this section (e.g.,
..\UAVMission.vdf) and click . - Save your work and re-install the delegate module.
-
Run (
 ) the simulation
and observe that the STK scenario starts up alongside the SysML simulation
and that the scenario time advances as the simulation time does.
) the simulation
and observe that the STK scenario starts up alongside the SysML simulation
and that the scenario time advances as the simulation time does.
Notice that the UAV in the scenario takes off immediately instead of waiting for the startup procedures in the SysML. You will fix this in the next section by syncing the UAV's behavior between the SysML and STK.
- Close STK without saving.
Next Section >