Executing Multiple State Machines
Overview
Simulating behaviors at the mission level often requires multiple state machines. In this section, you will create a state machine for the UAV's onboard computer and a simulation dashboard that allows you to view the execution of both the computer and power system's state machines at the same time. You will also use the simulation state history log to help debug your simulation.
This section covers the following concepts:

Figure A1: Multiple State Machines
Prerequisites
| Prerequisite | Description |
|---|---|
| Moxie Installation | You must have installed Moxie. |
| Tutorial Project | You must start this section with the Moxie simulation project from the last section of the previous tutorial. If you did not complete that section, you can use the following project from the Moxie installation: \documentation\tutorialFiles\01\SimulationExecution.mdzip |
| Recommended Reading |
Before completing this section, you may want to read the following help topics:
|
Instructions
Create a state machine for the computer
- Open the project from the previous tutorial.
-
In the Containment Tree,
right-click the Structure >
Computerblock and select Create Diagram (or press ). -
Select SysML State Machine Diagram
and enter
Computer State Machineas its name. -
Select the state on the diagram
and enter
Standbyas its name. -
Click the Transition button (
 ) on the context toolbar.
Then click anywhere on the canvas to add a new state.
) on the context toolbar.
Then click anywhere on the canvas to add a new state.
-
Select the new state on the diagram
and enter
PoweringOnas its name. -
Click the Transition button () on the context toolbar.
Then click anywhere on the canvas to add a new state.
-
Select the new state on the diagram
and enter
PoweredOnas its name.
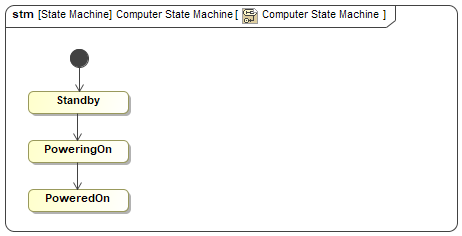
Figure B1: The computer state machine
Create a simulation dashboard
A simulation dashboard is useful for viewing all of the behaviors of your system simultaneously during a simulation.
- Right-click the Simulation package and select Create Diagram (or press ).
-
In the UML Diagrams category,
select Object Diagram
and enter
Simulation Dashboardas its name. You may need to click the button at the bottom of the Create Diagram dialog box in order to be able to select Object Diagram. -
Drag the Structure >
PowerSystem> PowerSystem State Machine > PowerSystem State Machine diagram onto the dashboard, and click the Show Diagram Overview Content button ( ) to display the state machine.
-
Drag the Structure >
Computer> Computer State Machine > Computer State Machine diagram onto the dashboard and click the Show Diagram Overview Content button () to display the state machine.
- In the Simulation Dashboard, click anywhere on the unused canvas area and press to auto-format the state machine diagrams.
Figure B2: The simulation dashboard
Examine the simulation state history log
The simulation state history log records every state and transition that executes, making it a useful tool for debugging unexpected behavior in your simulation.
-
Run (
 ) the simulation
and observe the animation only shows the PowerSystem State Machine executing.
) the simulation
and observe the animation only shows the PowerSystem State Machine executing.
- Select Moxie > Open Log File Directory in File Explorer (or press ).
- Open moxie_simulation.json in a text editor.
- Search for Computer. You should get no results, confirming that the Computer State Machine did not run. Close the log file.
Add the computer to the root instance specifications
Recall from the Simulation Execution section of the previous tutorial
that in order for a state machine to be executed,
it must be specified in the roots slot of the simulation instance specification.
- In the Containment Tree, double-click the Simulation > simulation instance specification and select Slots from the left pane of the specification window.
-
In the center pane,
select the
rootsslot. -
In the right pane,
click the Add button (
 ).
).
-
Select Simulation >
uav.computer. Then click and then . -
Run () the simulation again
and observe the animation now shows both state machines executing.
- (Optional) Open the simulation state history log file again to confirm the state history for the Computer State Machine is now included in the log.
- Save your work before continuing.
Next Section >