RPO Passive Safety Tool
When designing RPO sequences using STK's Astrogator capability, you can run a passive safety analysis to help ensure the target and actor (chase) satellites do not collide. By using the Passive Safety tool to analyze specific times of close-proximity operations, you can see when failures or other issues with maneuvers could cause the two satellites to pass closer than a designated safe distance from each other. This enables you to adjust your RPO sequence design until you have mitigated potential conjunctions.
Passive Safety tool setup
To open the Astrogator Passive Safety dialog box, click the Utilities menu button, select Astrogator, and select Passive Safety. You can then set the following parameters for your passive safety analysis:
| Parameter | Description |
|---|---|
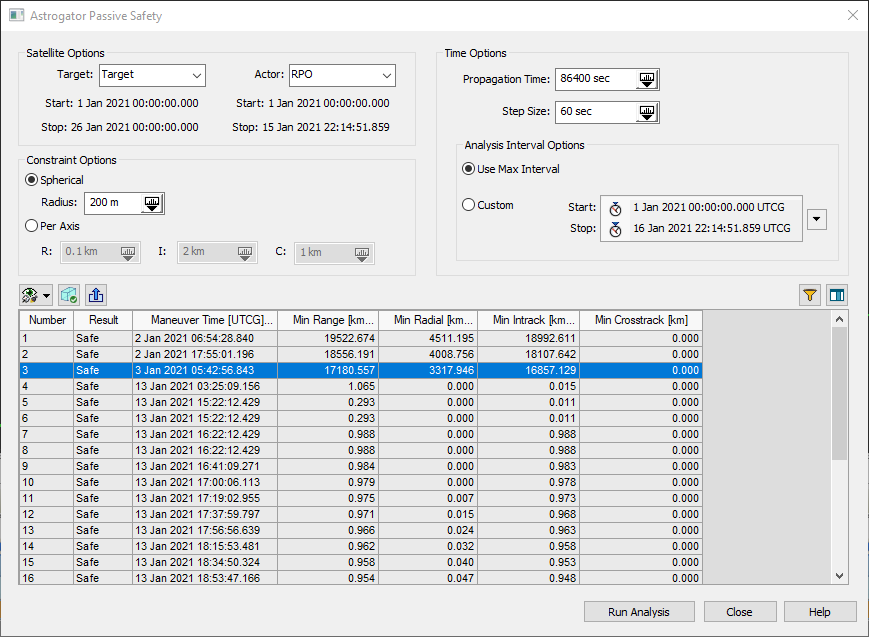
| Target | In the Satellite Options area of the dialog box, use the Target drop-down box to select the target satellite. The options include all satellites in the scenario. |
| Actor | In the Satellite Options area of the dialog box, use the Actor drop-down box to select the actor (chase) satellite. The options include all satellites in the scenario. |
| Constraint Options |
Use this to set the shape and size of the conjunction offset (safe distance) around the target satellite. Choose one of the following options:
|
| Propagation Time | Enter the amount of time for extending all actor satellite maneuvers for analysis. The default is 86,400 seconds (one day). |
| Step Size | Enter the amount of time between each check for possible conjunction. The default is 60 seconds. |
| Analysis Interval Options |
This is the span that the Passive Safety tool will use for checking for conjunction possibilities. Choose from one of the following options:
|
Passive safety analysis
After you set all the parameters in the Astrogator Passive Safety dialog box, click at the bottom. You will see the results appear in the table on the lower part of the dialog box.
The Passive Safety tool is especially effective for RPO sequences that attempt to maintain a certain constraint. These sequences often cause the actor (chase) satellite to execute small maneuvers to maintain constraint compliance. The tool runs through the series of anticipated maneuvers. After each maneuver, the tool propagates the chase satellite to the end of the analysis interval as though all of the subsequent maneuvers fail. The tool then checks the relative positions of the chase and target satellites at each step, with steps based on the Step Size setting. If the chase vehicle at any point enters the target satellite conjunction offset (Spherical or Per Axis), the tool sets the Result status indicator to "Unsafe" for that maneuver.
By default, the table displays information for the following read-only quantities:
| Quantity | Description |
|---|---|
| Number | This is the maneuver number in the sequence. |
| Result | This indicates the risk status of the maneuver: Safe or Unsafe. |
| Maneuver Time | Shows the start time of the maneuver. |
| Min Range |
This is the distance between the two satellites at the point of closest approach from the start time of the maneuver until the end of the analysis interval, assuming that all subsequent maneuvers do not execute. If you set Constraint Options to Spherical, then the tool uses this value to determine the Result indicator. |
| Min Radial |
This is the distance between the two satellites in the radial direction at the point of closest approach from the start time of the maneuver until the end of the analysis interval, assuming that all subsequent maneuvers do not execute. If you set Constraint Options to "Per Axis", then the tool uses this value to determine the Result indicator. |
| Min Intrack | This is the distance between the two satellites in the in-track direction at the point of closest approach from the start time of the maneuver until the end of the analysis interval, assuming that all subsequent maneuvers do not execute. If you set Constraint Options to "Per Axis", then the tool uses this value to determine the Result indicator. |
| Min Crosstrack | This is the distance between the two satellites in the cross-track direction at the point of closest approach from the start time of the maneuver until the end of the analysis interval, assuming that all subsequent maneuvers do not execute. If you set Constraint Options to "Per Axis", then the tool uses this value to determine the Result indicator. |
You can interact with the results in the following ways:
| Interaction option | Description |
|---|---|
| Show Table Columns ( |
The results table always shows the columns for Number, Result, and Maneuver Time. There are two general choices for the remaining columns:
You can also clear the general choice check boxes and individually select check boxes for the remaining column types. |
| Apply Filters ( |
The default is to show results for all the maneuvers. You can choose to show just the Safe maneuvers or just the Unsafe maneuvers by selecting or clearing these two check boxes. |
| Export to .csv file ( |
Click this icon to send a CSV file of the analysis results to the location of your choosing. |
| Display proximity geometry ( |
Click this icon to have the 3D Graphics window show the conjunction offset (Spherical or Per Axis) around the target satellite. |
| Display Maneuver and Set Animation Time options |
For this icon to become active, you must first select one of the maneuvers in the results table. Then use the selection arrow to choose an option icon for displaying the maneuver and setting the animation time. The icon options are the following:
After choosing your option, you can then click the icon to perform that action for the selected maneuver. |