Part 16:
STK Premium (Space) or STK Enterprise
You can obtain the necessary licenses for this tutorial by contacting AGI Support at support@agi.com or 1-800-924-7244.
The results of the tutorial may vary depending on the user settings and data enabled (online operations, terrain server, dynamic Earth data, etc.). It is acceptable to have different results.
Capabilities covered
This lesson covers the following capabilities of the Ansys Systems Tool Kit® (STK®) digital mission engineering software:
- STK Pro
- Conjunction Analysis
Problem statement
Engineers and operators need to easily address situations in which the launch or operation of a satellite or system of satellites, or a related Earth-based operation, may be affected by the actual or apparent proximity of other orbiting objects. Such effects range from a temporary delay or loss of access to the system to physical damage to space-based assets. In this scenario, you want to analyze one days' worth of data to determine the probability of your satellite having a conjunction with any other satellites or orbital debris.
Solution
Use the Advanced CAT tool, which is a part of the STK software's Conjunction Analysis capability, to carry out a close-approach analysis between a primary object (your satellite) and secondary objects (satellites presenting a possible risk of collision). A conjunction occurs when two orbiting objects are closer than the specified minimum acceptable distance. You choose whether the distance is measured between the ellipsoidal threat volumes of the objects or by the range between the objects. In this scenario, you will complete a linear analysis using two-line element sets (TLEs).
What you will learn
Upon completion of this tutorial, you will have a basic understanding of the following:
- How to update and use satellite database files for conjunction analysis
- How to use the Advanced CAT tool
- How to create a custom report using close approach event data
Video guidance
Watch the following video. Then follow the steps below, which incorporate the systems and missions you work on (sample inputs provided).
Creating a new scenario
First, you must create a new scenario, then build from there.
- Launch the STK application (
 ).
). - Click
 Create a Scenario in the Welcome to STK dialog box.
 - Enter the following options in the STK: New Scenario Wizard:
- Click when you finish.
- Click Save (
 ) when the scenario loads.
 - Verify the scenario name and location in the Save As dialog box.
- Click .
| Option | Value |
|---|---|
| Name | STK_CAT |
| Location | Default |
| Start | Default |
| Stop | Default |
The STK application automatically creates a folder with the same name as your scenario for you.
Preparing your STK workspace
For this scenario, you will not use the Timeline View or the 2D Graphics window. Close them.
- Close the Timeline View at the bottom of the STK workspace.
- Close the 2D Graphics window.
- Select the Window menu in the Menu Bar.
- Select Tile Vertically to maximize the 3D Graphics window.
Updating the satellite databases
Satellite database files contain both identification information and orbital characteristics. While the identification information does not change often over time, the orbital characteristics do, and so the epoch for any TLE used for ephemeris generation for an object is always a concern. Thus, if you are searching for space objects with certain orbital characteristics, you should first obtain an appropriately dated
The Advanced CAT tool does not by itself add any objects to your scenario; instead, it propagates ephemerides for objects that you select for the specified time frame. With the Advanced CAT tool, you can use analytical objects defined within the scenario or by an external file, including TLE sets, GPS almanac files, and GP data files (that is, TLE files that use the SGP4 propagator).
- Satellite object files (*.sa) in your scenario
- Your STK scenario directory
- The TCE subdirectory of your user directory (this is the path of the SGP4 registry entry)
- The default satellite database directory, for example, C:\ProgramData\AGI\STK_ODTK 13\Databases\Satellite
- <GENDB>\Satellite, where GENDB is the path of the STKGENDB registry entry
Before using the Advanced CAT tool, update the TLE database appropriate for your analysis period.
Accessing the scenario database properties
You can download the current directory on the
- Right-click on STK_CAT () in the Object Browser.
- Select Properties (
 ) in the shortcut menu.
 - Select the Basic - Database page when the Properties Browser opens.
Saving the database
This will update the satellite database with the most current data for your analysis period.
- Click .
- Ensure the Update Database option is selected when the Update Satellite Database dialog box opens.
- Click .
- Click to close the Information dialog box once the Database update is complete.
- Click to confirm your changes and to close the Update Satellite Database dialog box.
- Click to confirm your changes and to close the Properties Browser.
When performing an analysis for a past time period, the appropriate file would not be the most current file, but rather, an archived database(s) dated near the propagation time period. For such an analysis, use the Obtained Archived Database option. This option allows you to obtain an older version of the database from the date specified in the Archive Date field. If an archive is not available from the specified date, the archive for the next newest date is used instead. To avoid overwriting your default database file(s) with these archived file(s), click the Database ellipsis (![]() ) to set the database directory, in which the appropriately dated database file(s) will be saved, to your scenario folder. The Advanced CAT tool will look in and use the database file(s) in your scenario folder first, before searching the default location.
) to set the database directory, in which the appropriately dated database file(s) will be saved, to your scenario folder. The Advanced CAT tool will look in and use the database file(s) in your scenario folder first, before searching the default location.
Inserting the Primary satellite
The STK software's
If you have your own ephemerides, converted to *.e files, regardless of the reference frame, the STK application will handle all the conversions internally for whatever analysis needs to be performed. When using the Advanced CAT tool, the STK application needs *.e files, manually entered satellite properties, or TLE sets. Any reference frame is acceptable.
Inserting the satellite using the Orbit Wizard
For this scenario, you will use the Orbit Wizard to create a nominal primary satellite in order to focus on using the Advanced CAT tool.
- Bring the Insert STK Objects tool (
 ) to the front.
 - Select Satellite (
 ) in the Select An Object To Be Inserted list.
 - Select Orbit Wizard (
 ) in the Select A Method list.
 - Click .
Using Orbit Wizard
The Orbit Wizard is a satellite-level tool designed to assist you in either creating any one of several standard orbits or designing your own satellite orbit. The configurable options available depends on the orbit type selected.
- When the Orbit Wizard dialog box opens, set the following definitions for the satellite:
- Click to propagate My_Sat () and to close the Orbit Wizard dialog box.
| Option | Value |
|---|---|
| Type | Circular |
| Satellite Name | My_Sat |
| Inclination | 45 deg |
| Altitude | 700 km |
Inserting an AdvCAT object
The AdvCat object (![]() ) provides a convenient way for you to access the Advanced CAT tool to carry out close-approach analyses for multiple satellites and TLEs.
) provides a convenient way for you to access the Advanced CAT tool to carry out close-approach analyses for multiple satellites and TLEs.
Adding the AdvCAT object to the Insert STK Objects tool
Add the AdvCAT object to the Insert STK Objects tool to be able to insert it into your scenario.
- Bring the Insert STK Objects () tool to the front.
- Click .
- Ensure the New Object page is selected when the Preferences dialog box opens.
- Select the Show check box for the AdvCAT Object in the Define Default Creation Methods panel.
- Click to confirm your selection and to close the Preferences dialog box.
Inserting the Advanced CAT object
Insert an AdvCAT object into your scenario.
- Bring the Insert STK Objects tool () to the front.
- Insert an AdvCAT (
 ) object using the Insert Default () method.
Setting up and defining the analysis objects
In analyzing close approaches between a primary and secondary object, the Advanced CAT tool assigns a
Selecting the Primary object and defining its threat volume
Most of the
- Open AdvCAT1's () Properties ().
- Select the Basic - Main page when the Properties Browser opens.
- Select Satellite/My_Sat in the Available list in the Primary List panel.
- Note that the Type is Scenario Object; this is the satellite object file in your scenario folder.
- Move (
 ) Satellite/My_Sat to the Chosen list.
 - Since you're evaluating potential linear conjunctions and not using covariance settings, keep the default Class, Tangential, CrossTrack, and Normal values.
- Tangential (in-track) — the dimension of the threat volume ellipsoid along the X axis
- CrossTrack — the dimension of the threat volume ellipsoid along the Y axis
- Normal (radial) — the dimension of the threat volume ellipsoid along the Z axis
- Set the HardBodyRadius value to 3 m.
- Click to confirm your selection and to keep the Properties Browser open.
This also opens the Advanced CAT tool.
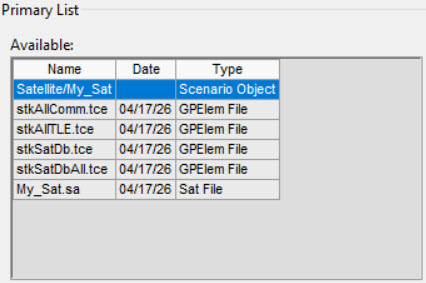
Advanced CAT tool Primary list selection
Your date will be different that shown in the image above.
You can
Actual threat volumes would be set based on established ellipsoid and covariance screenings.

Advanced CAT tool primary chosen list
Selecting the Secondary object and defining its threat volume
The Secondary List contains satellites that present a potential risk of collision with, or unacceptably close approach to, satellites in the Primary List. The U.S. Strategic Command (USSTRATCOM) keeps track of thousands of space objects. These objects constitute the space object catalog. While most of the catalog is made available to the public, some information is restricted. AGI provides the publicly released information for use with the STK application in the form of satellite database files and TLE sets. AGI updates this data at least once and up to three times a day. Your analysis will check for potential conjunctions between My_Sat and the complete satellite database.
- Select stkAllTLE.tce in the Available list in the Secondary List panel.
- Note that the Type is GPElem File, and that the Date is the same as Satellite/My_Sat in the Primary List.
- Move () stkAllTLE.tce to the Chosen list.
- Set the HardBodyRadius value to 2 m.
- Click to confirm your changes and to keep the Properties Browser open.
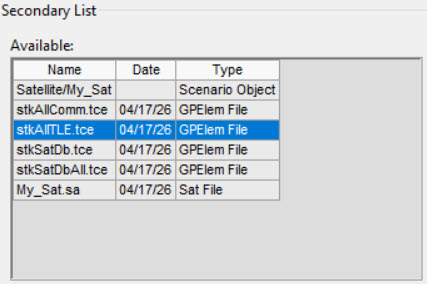
Advanced CAT tool Secondary list selection
Your date will be different than that shown in the image above.

Advanced CAT tool secondary Chosen list
Setting the Threshold value
Often, the threat volume represents the degree of uncertainty about an object's position at any given time. The Advanced CAT tool computes the range between the threat volumes of the two objects at specified time steps over a given interval. It gives a warning whenever the range falls below a user-selected threshold. A collision event occurs whenever the range between the two threat volumes becomes zero or negative. Increase the volume threshold.
- Enter 15 km in the Threshold field.
- Click to confirm your changes and to keep the Properties Browser open.
Reviewing the pre-filters
The basic idea behind close-approach processing is to start with all cataloged orbiting objects, then efficiently delete the members of the population that do not come within the specified distance of the reference object. The first step is eliminating as many members of the population as possible via geometric properties, which takes considerably less time than fully propagating these satellites and then computing close approaches. The final determination of the existence of close approaches is always done by sampling the ephemeris of the candidate and reference objects, but some pre-filters are usually applied to limit the amount of ephemeris generation that is required. Review the filters on the
- Select the Basic - Advanced page.
- Note the selected Pre-Filters and their values:
- Apogee / Perigee — The Advanced CAT tool uses the apogee/perigee pre-filter to cut candidate close-approach objects having a range of altitude that does not overlap with that of the reference object.
- Time — The goal of the time filter is to identify time intervals when each object in a pairing is close enough to the elliptical representation of the other object's trajectory to have a conjunction.
Computing possible conjunctions
After you have defined your close approach analysis parameters and selected and dimensioned your primary and secondary objects, you can perform your close approach analysis. When you
- Select the Basic - Main page.
- Select the Display Acknowledgment when done check box.
- Click .
- Click to close the Advanced CAT dialog box after reading the message.
- Keep AdvCAT1's () Properties open.
Select this option to have a message box appear when close approach computation is completed.
During the computation process, the Advanced CAT tool will display information in the
Creating a Close Approach by Min Range report
The Advanced CAT tool makes available a variety of
Generating a Close Approach By Min Range report
Generate a
- Right-click on AdvCAT1 () in the Object Browser.
- Select Report & Graph Manager... (
 ) in the shortcut menu.
 - Select Close Approach By Min Range (
 ) report style, located in the Installed Styles (
 ) folder, in the Styles panel when the Report & Graph Manager opens.
 - Click .
- Look through the report and focus on Object Name, Time In (UTCG), Time Out (UTCG), Min Separation (km) and Min Range (km) when the report opens.
- Object Name — This is the name of the secondary object involved in the close-approach event.
- Time In — This is the start time of the event. For this scenario, it is when the threat volume is within 15 kilometers of the primary's threat volume.
- Time Out — This is the stop time of the event. For this scenario, it is when the threat volume moves beyond 15 kilometers of the primary's threat volume.
- Min Separation — This is the separation distance between the primary and secondary threat volumes at the time of closest approach. If the ellipsoids intersect, then the value will be "Intersect."
- Min Range — This is the distance between the center points of the primary and secondary objects at the time of closest approach.
- When finished, close the report.
Recall that you configured the Advanced CAT tool to only report objects with threat volumes that come within 15 kilometers of your primary satellite's threat volume and also pass its pre-filters.
Customizing the report
Add three more
- Right-click on the Close Approach By Min Range () report in the Installed Styles () folder, located in the Styles panel.
- Select Duplicate (
 ) in the shortcut menu.
 - Select the Content page when the Properties Browser opens.
- Select the Events by Min Range-Min Range data provider element in the Report Contents list.
- Insert () the following data provider elements into the Report Contents list:
- Time of Close Appr (TCA) (
 ) — This is the time when the minimum range occurs between the primary and secondary bodies.
 - Relative Velocity () — This is the magnitude of the difference in the inertial velocities of the primary and secondary objects at a given time.
- Collision Probability (Analytic) () — This is the probability of collision computed using an analytic method derived from the book "Spacecraft Collision Probability" by F. Kenneth Chan.
- Click to confirm your selections and to close the Properties Browser.
This will automatically expand ( ) the Events by Min Range (
![]() ) data provider.
) data provider.
Renaming and running the report
Rename your custom report, then generate the report.
- Right-click on the Close Approach By Min Range (
 ) report style, located in the My Styles () folder, in the Styles panel.
 - Select Rename in the shortcut menu.
- Rename your custom report My Close Approach By Min Range.
- Click .
- Review the report.
- Look at the first Object Name in the report.
- Note the Time of Close Appr (TCA) (UTCG).
This is when the two satellites, not the threat volumes, are closest to each other. Again, this is based on TLE data, which don't contain covariance information.
Visualizing a close approach
You can use the information in your custom report to help visualize a close approach.
Identifying and inserting a close approach
Focus on the first satellite in the report.
- Copy the SSC number from the Object Name of the first satellite in the report.
- Bring the Insert STK Objects tool () to the front.
- Insert a Satellite () object using the From Standard Object Database (
 ) method.
 - Clear the Online check box in the Data Sources section when the Search Standard Object Data dialog box opens.
- Paste the SSC number that you copied into the Name or ID field.
- Click .
- Select the satellite in the Results list.
- Click .
- When the selected Satellite object propagates, click to close the Search Standard Object Data dialog box.
When you search for an SSC number, only local database files will be shown in the Results list.
Setting the animation time to the Time In
Use the report to set the animation time to the time when the threat volume first comes within 15 kilometers of the primary's threat volume.
- Return to the My Close Approach By Min Range report.
- Right-click on the Time In (UTCG) of your selected Object Name.
- Select Time In in the shortcut menu.
- Select Set Animation Time in the Time In submenu.
Viewing the event in the 3D Graphics window
Zoom to your primary satellite and view the animation in the 3D Graphics window.
- Bring the 3D Graphics window to the front.
- Right-click on My_Sat () in the Object Browser.
- Select Zoom To in the shortcut menu.
- Click Decrease Time Step (
 ) in the Animation Tool Bar until your Time Step value is 0.01 sec.
 - Click Step in Reverse (
 ) one time.
 - Using your mouse, zoom out until you can see the primary and secondary ellipsoids.
- Click Start (
 ) to animate the scenario.
 - Run the animation through the conjunction.
- After the conjunction, when the two satellites turn green again, click Pause (
 ).
).
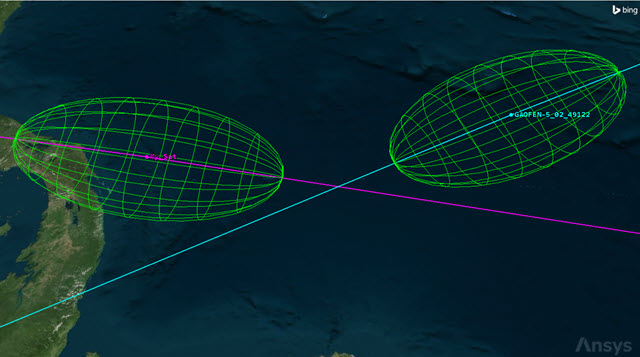
Primary and Secondary Ellipsoids
Setting the animation time to the Time of Close Approach
Set your animation time to the time when the minimum range occurs between the primary and secondary bodies.
- Return to the My Close Approach By Min Range report.
- Right-click on the Time of Close Appr (UTCG).
- Select Time of Close Appr (TCA) in the shortcut menu.
- Select Set Animation Time in the Time of Close Appr (TCA) submenu.
- Return to the 3D Graphics window.
- Using your mouse, zoom in so that you can get a good view of both satellites.
- When you're finished, Reset (
 ) the scenario.
 - In the 3D Graphics window, click Home View (
 ) on the 3D Graphics toolbar.
 - Close the My Close Approach By Min Range report and the Report & Graph Manager.
Visualizing all the satellites
At this time, only the satellites having threat volumes that fell within the 15-kilometer threshold and passing the pre-filters are visible in the 3D Graphics window. You can display all secondary ellipsoids if desired.
- Return to AdvCAT1's () Properties ().
- Select the 3D Graphics - Attributes page.
- Select the All option.
- Click to confirm your selection and to close the Properties Browser.
- Clear the check boxes for both Satellite () objects in the Object Browser.
- In the Animation Tool Bar, click Increase Time Step (
 ) until your Time Step value is 10.00 sec.
 - Click Start () to animate the scenario.
- Use your mouse to zoom out until you can see the geostationary belt.
- When you're finished, Reset () the scenario.
In the Visibility panel are the primary ellipsoid and secondary ellipsoids that have conjunctions.

All the Satellites in the 3D Graphics window
Remember, these satellites are represented by ellipsoids that are 20 × 10 × 5 kilometers in size.
Save your work
Clean up your workspace and save your scenario.
- Close any open reports, properties and tools.
- Save () your work.
Summary
You began by updating the local satellite database with satellites that matched your scenario time period. Then you inserted the primary satellite into the scenario. After inserting an AdvCAT object, you moved the primary satellite from the Available list to the Chosen list. Then you used the complete satellite database (stkAllTLE.tce) for the secondary objects by moving it from the Available list to the Chosen list. You updated the hard-body radii, set the threshold to 15 kilometers, and then launched the close approach computation process. Using the Events by Time In data provider and elements, you created a custom report that allowed you to view important information concerning possible conjunctions with your primary satellite. You ended by visualizing a close approach and by visualizing all the satellite ellipsoids from the stkAllTLE.tce database.
On your own
Throughout the tutorial are hyperlinks that point to in-depth information concerning the Advanced CAT tool. Now is a good time to go back through this tutorial and view that information. Experiment with other satellites, data providers, and pre-filters.
If you're interested in a more in-depth tutorial that uses covariance data and performs a nonlinear conjunction analysis, see the Assessing the Threat of a Collision Using the Advanced CAT Tool tutorial.