Part 13.3:
STK Pro, STK Premium (Air), STK Premium (Space), or STK Enterprise
You can obtain the necessary licenses for this tutorial by contacting AGI Support at support@agi.com or 1-800-924-7244.
Ensure you are working out of one module at a time. Some users have noted that Microsoft Excel will generate additional code modules if you relaunch the Excel workbook.
The results of the tutorial may vary depending on the user settings and data enabled (online operations, terrain server, dynamic Earth data, etc.). It is acceptable to have different results.
Capabilities covered
This lesson covers the following STK Capabilities:
- STK Pro
- STK Integration
Problem statement
Developers, engineers and operators need to quickly and easily automate repetitive tasks from outside of the STK application, integrate STK with other applications, such as Microsoft Excel, MATLAB, and Python, develop custom applications and leverage the AGI Object Model collection of COM libraries from other applications. You want to be able to create, drive and extract data from a simple STK scenario using Excel. You need to understand access to the following Application Programming Interfaces (API): the STK Object Model and Connect. Finally, you require a basic comprehension of STK Programming Help.
Solution
Use Excel to create a new instance of STK and expose the object root. Next, build a new scenario, populating it with a Satellite object and multiple Target objects. Create an access between the Satellite object and a selected Target object. Use the data providers, groups, and elements to retrieve access times from STK into Excel. Download, install and use the STK Excel Add-in plugin. Learn the power of STK Programming Help.
What you will learn
Upon completion of this tutorial, you will have a basic understand of the following:
- STK Programming Help
- STK Object Model
- Connect
- Data Providers
- Sending and Receiving Data Between STK and Excel
- STK Excel Add-in
STK and Excel should be shut down prior to starting this tutorial. This tutorial is not designed to teach you how to use Excel. It's an introduction to integrating Excel with STK and pulling data from STK into Excel. It's also an introduction to STK Programming Help and how important it is to be able to intelligently browse the help pages.
Video guidance
Watch the following video. Then follow the steps below, which incorporate the systems and missions you work on (sample inputs provided).
STK Programming Help
The STK Programming Help offers a wide variety of options to automate and customize STK and to integrate its technology into other applications. Only a small portion of the STK Programming Help is covered in this tutorial but it's a great starting point.
- Open your preferred Internet browser.
- Go to help.agi.com.
- Select STK Programming Help.

STK Programming Help Link
If you do not have an internet connection, you can find the Programming Help by extending the Help menu inside STK and selecting Programming Interface Help.
Integrating STK with other applications
STK’s Integration capability enables you to automate repetitive tasks from outside the STK application, integrate STK with other applications — such as Excel and MATLAB — develop custom applications, and leverage the AGI Object Model collection of COM libraries from other applications.
- Choose Select the Right Technology in the contents list on the left side of STK Programming Help.
- Select Integrate Technologies.
- Select clickable decision tree on the Integrate With Other Applications page.
- Take a moment to view the page and click some of the icons.
There are multiple clickable decision trees available in STK Programming Help. You can use the trees to quickly locate help pages that you need to be successful when using integration.
Automating repetitive tasks
To automate repetitive tasks in STK, you can use HTML, Connect, and STK Objects to build tools that are accessible from within STK.
- Return to STK Programming Help.
- Choose Select the Right Technology in the contents list.
- Select Automate Tasks.
- Select clickable decision tree on the Automate Repetitive Tasks page.
- Take a moment to view the page and click some of the icons.
Extending AGI products
AGI provides a variety of ways to extend our products. These extensibility mechanisms can be divided into two distinct areas: user interface extensibility and engine extensibility.
- Return to STK Programming Help.
- Choose Select the Right Technology in the contents list.
- Select Extend AGI Products.
- Click clickable decision tree on the Extend AGI Products Using Plugins and Custom User Interfaces page.
- Take a moment to view the page and click some of the icons.
There are other links throughout that aren't covered here. Take some time later on to become familiar with them.
Visualize
STK X allows developers to add advanced STK 2D, 3D visualization and analytical capabilities to applications with little effort.
- Return to STK Programming Help.
- Choose Library Reference in the contents list.
- Select Controls.
- Select STK X.
- Take some time to familiarize yourself with the contents of this page.
Using Core Libraries
The STK API consists of two major sub-systems: Connect and the STK Object Model.
- Connect is a library of string commands for STK, originally designed to operate over a TCP/IP socket.
- The STK Object Model is an object-oriented interface to STK, built on Microsoft COM technology.
- Return to STK Programming Help.
- Choose Using Core Libraries in the contents list.
- Note the advantages and disadvantages of using each library.
The choice of Connect or Object Model should be driven by the requirements of the application and the needs of the developer. It is important to note, however, that this need not be an exclusive choice. Connect commands can be used in a COM application side-by-side with Object Model Code.
Naming conventions
The STK Object Model contains naming conventions for classes, interfaces and enumerations.
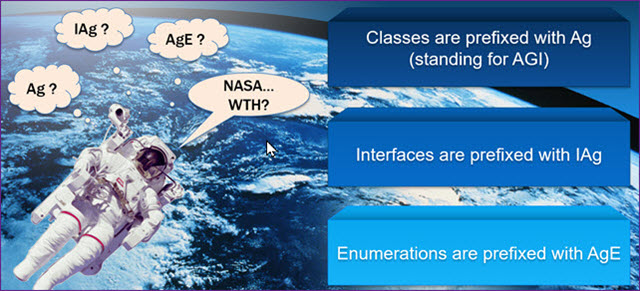
Naming Conventions
- Return to STK Programming Help.
- Choose Library Reference in the contents list.
- Select STK Object Model.
- Select Naming Conventions.
- Note the various naming conventions described on the Naming Conventions Used In the Various Core Libraries page.
- Select Abbreviations in the contents list.
- Note the abbreviations most commonly used in the names of classes, interfaces and other types in the STK Object Model.
Model diagrams
For the serious programmer, you can use diagrams to see how the STK traffic flow is connected. That way, you know what's to the right, left, above and below, all while deep-linking to the individual IAg interface pages.
- Return to STK Programming Help.
- Choose Using Core Libraries in the contents list.
- Select STK Object Model.
- Select STK Objects.
- Select Diagrams.
- Select STK Object Model Diagram (PDF) on the STK Objects Object Model Diagrams page.
- Zoom into the page for clarification if desired.
- Take some time to look at the STK 10.0 Object Model Diagrams PDF.
- STK Objects: STK Object Model Diagram (PDF) and Space Environment Object Model Diagram (PDF)
- STK X: STK X Diagram (PDF)
- STK VGT (Analysis Workbench): VGT Object Model Diagram (PDF)
- STK Util: STK Util Object Model Diagram (PDF)
- STK Astrogator: STK Astrogator Object Model Diagram (PDF)+
- Close the STK Object Model Diagram (PDF) when finished.
- Keep STK Programming Help open.
Diagrams exist for the following:
STK Excel Add-in
The STK Excel Add-in is a set of VBA libraries, macros, forms and toolbars that let Excel users interact with STK and STK scenarios directly from Excel. You can pull data from STK into Excel or pass certain data types from Excel into STK. The STK Excel add-in may already do what you require. At the end of this tutorial, the STK Excel Add-in tool will be used, so now is a good time to install it on your computer.
- Go to https://www.agi.com/ in your preferred browser.
- Click at the top of the page.
- Select Sign In in the shortcut menu.
- Enter your credentials in the Sign In page.
- Click .
Downloads
- After signing in, at the top of the page, select Support.
- Select Downloads once the menu opens.
- If presented, read the Software License Agreement. Otherwise, go to step 5.
- Click .
- On the Software Downloads page, locate Data and Auxiliary Extensions.
- Select STK Excel Add-in (v12.0.0).
This will download the install file as a zipped folder to your designated download location.
Installing the STK Excel Add-in
- Go to your download location.
- Unzip (Extract All) the STKExcelAdd-in_v12.0.0.zip folder to your preferred location.
- Open the extracted (unzipped) STKExcelAdd-in_v12.0.0 folder.
- Double-click STKExcelAdd-in_v12.0.0.
- If you receive a security warning, click .
- Run the installer.
- Keep STK Programming Help open.
- Close any open folders and web pages that your desire.
Configuring Excel
Enable the Developer tab and the STK Excel Add-in.
- Launch Excel.
- Click Blank workbook once Excel launches.
![]()
Blank Workbook
Excel Developer Tab
Turn on the Developer tab in Excel if you want to create a macro, export and import XML files or insert controls. If it's not already turned on, complete the following steps.
- Right-click anywhere on the ribbon.
- Select Customize the Ribbon...
- Select Main tabs (if necessary) under Customize the Ribbon shortcut menu in the Excel Options dialog box.
- Select the Developer check box.
- Click .
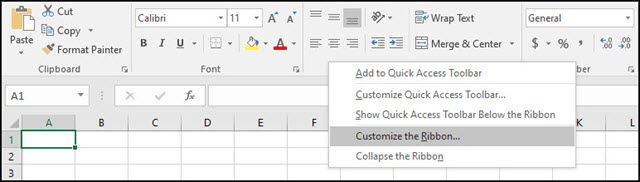
Excel Ribbon
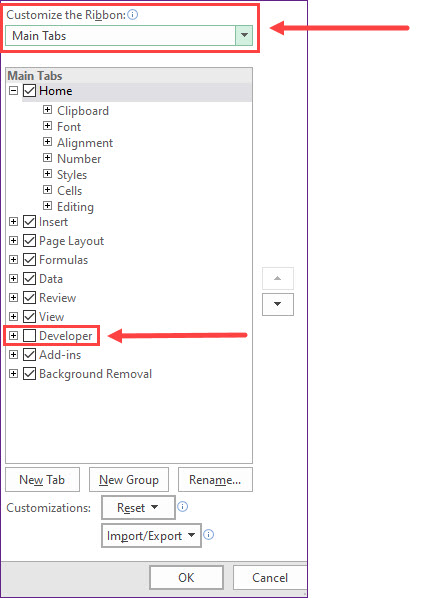
Main Tabs
Turning on the STK Excel Add-in
- Select the Developer tab.
- Click .
- Select the Stk Add-in 12 X64 check box in the Add-ins dialog box.
- Click .
- Close Excel. This is required.

Developer Tab
Creating an Excel Workbook
Create a workbook and save the file to a custom folder.
- Launch Excel.
- Click Blank Workbook.
- Select the File menu when the workbook opens.
- Click Save As in the contents list on the left.
- Select Browse.
- Select Desktop in the Save As dialog box.
- Select New folder in the menu bar.
- Rename New folder to STK_Excel.
- Click .
- Type STK_Excel_Workbook in the File name: field.
- Open the Save as type: shortcut menu.
- Select Excel Macro-Enabled Workbook.
- Click .
Form Control Button
Turn on the Excel Form Control button.
- Select the Developer tab.
- Click .
- Click Button (Form Control) in the shortcut menu.
- Hold down your left mouse button and draw out a small box (2 cells by 2 cells) in the Excel workbook.
- Type Launch_STK in the Macro name: field when the Assign Macro tool dialog box opens.
- Click .
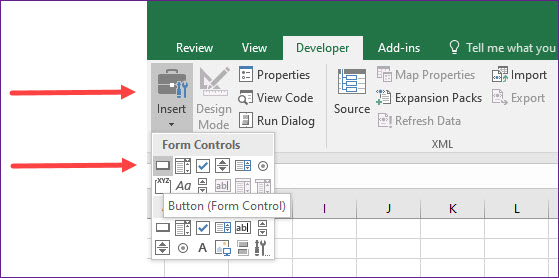
Form Controls
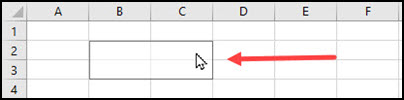
Small Button Box
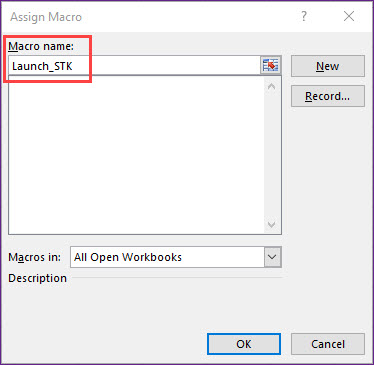
Macro Name
Change the Button's Name
Give the button a unique name.
- Bring the Excel workbook to the front.
- Highlight the button name (e.g. Button 1) in the button.
- Type Launch STK.
Creating an STK Instance from Excel
You will use the Excel script file to build a simple STK scenario from which you will extract data into Excel. You can use VB script or the STK object model and for automation you can use your preferred method. STK Connect will be demonstrated in this tutorial. All the components of Integration are fully documented, and AGI maintains a GitHub repository of Code samples to help you get started with the STK Object Model . There is a learning curve, so start with STK Programming Help.
Ensure you are working out of one module at a time. Some users have noted that Microsoft Excel will generate additional code modules if you relaunch the Excel workbook.
- Bring the Microsoft Visual Basic for Applications - [Module 1 (Code)] window to the front.
- Create global variables by Typing or copying and pasting the following code inside the Visual Basic editor above Sub Launch_STK (). This will create global variables.
- Create a new instance of STK. Type or copy and paste the following Code within Sub Launch_STK().
- Click Save STK_Excel_Workbook.xlsm (Ctrl+ S) (
 ).
).
|
|
|
|
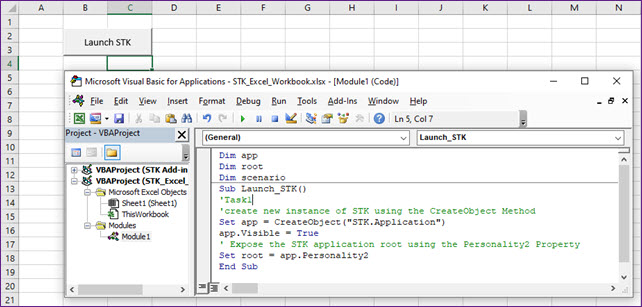
Launch STK Button and Task 1 Code
Understanding Task 1
Set app = CreateObject("STK.Application")
The CreateObject Method expects a string, in this case STK.Application.

CreateObject Method
- Bring STK Programming Help to the front.
- Choose Library Reference in the Contents list.
- Select Application Object Model.
- Select STK UI Application.
- In Classes, Select AgUiApplication on the Project Overview page.
- In Interfaces, select IAgUiApplication on the AgUiApplication Object page.
- In Public Methods, select CreateObject on the IAgUiApplication Interface page.
- In Syntax, look at the [Visual Basic .NET] Syntax on the CreateObject Method (IAgUiApplication) page.
Making STK Visible
app.Visible = True
Visible Property (IAgUiApplication) makes the main window visible.
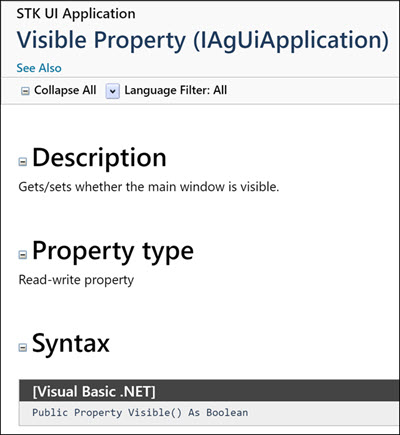
Visible Property
- Select Library Reference in the contents list.
- Select Application Object Model.
- Select STK UI Application.
- Select Properties.
- Select Visible Property (IAgUiApplication).
Exposing the STK Application Root
Set root = app.Personality2
Personality2 Property (IAgUiApplication) returns a new instance of the root object of the STK Object Model.
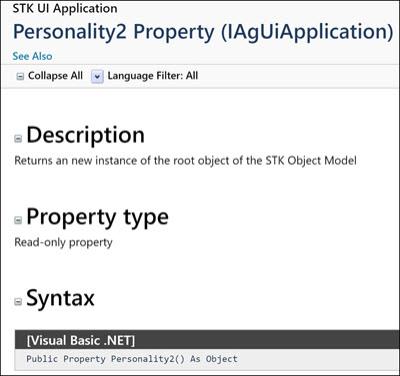
Personality2 Property
- Select Library Reference in the contents list.
- Select Application Object Model.
- Select STK UI Application.
- Select Properties.
- Select Personality2 Property (IAgUiApplication).
Running the Sub Routine
You can run the sub routine by clicking the Launch STK button or by selecting the sub routine and clicking the green Run button.
- Bring the Microsoft Visual Basic for Applications - [Module 1 (Code)] window to the front.
- Click Save STK_Excel_Workbook.xlsm (Ctrl+ S) ().
- Click inside the Sub Launch_STK () code.
- Click Run Sub/UserForm (F5) (
 ).
).

Save Button

Sub/UserForm (F5) Button
The STK application window appears.
After testing a sub routine, when you return to the workbook and create a new button, STK will close.
Creating a New STK Scenario
After launching STK, create a new scenario and set the time period.
- Return to the Excel workbook.
- Click in the Developer tab.
- Click Button (Form Control) in the Form Controls window.
- While in the Excel workbook, hold down your left mouse button and draw out a new button below the Launch STK button.
- Type Create_Scenario in the Macro name: field when the Assign Macro dialog box opens.
- Click .
- Return to the Excel workbook.
- Change the name of Button 2 to Create Scenario.
- Bring the Microsoft Visual Basic for Applications - [Module 1 (Code)] window to the front.
- Type or copy and paste the following Code within Sub Create_Scenario ().
- Click Save STK_Excel_Workbook.xlsm (Ctrl+ S) ().
|
|
You will create a new scenario called New_Scenario.
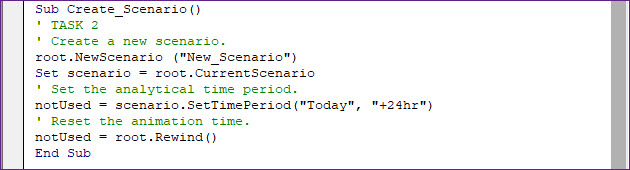
Task 2 Code
Understanding Task 2
This section will show you another way to use STK Programming Help.
Understanding NewScenario Method
NewScenario Method (IAgStkObjectRoot) creates a new scenario and expects a scenario name as a string.
Throughout this tutorial, code from the Tasks will be in BOLD text. You will also find resources to understand the code's function.
You use this method in line 3 of Task 2: root.NewScenario ("New_Scenario")
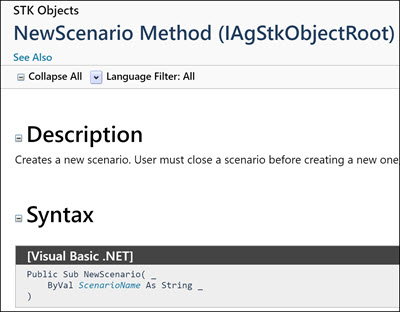
NewScenario Method
- Return to STK Programming Help.
- Type NewScenario in the search field.
- Click Enter.
- Select STKObjects~IAgStkObjectRoot~NewScenario.
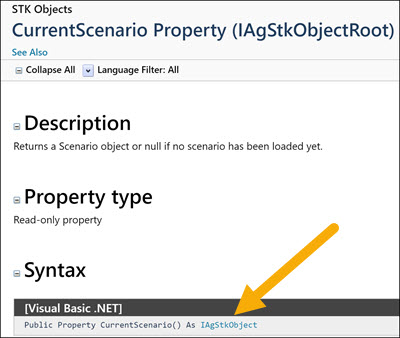
Understanding CurrentScenario Property
CurrentScenario Property (IAgStkObjectRoot) returns a Scenario object or null if no scenario has been loaded yet.
You use this method in line 4 of Task 2: Set scenario = root.CurrentScenario
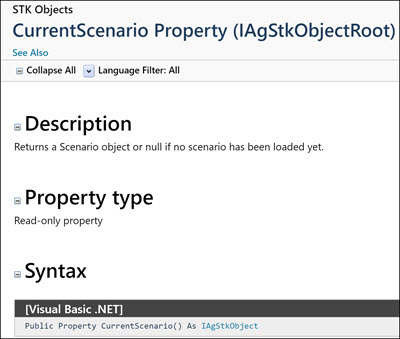
CurrentScenario Property
- Return to STK Programming Help.
- Type CurrentScenario in the search field.
- Click Enter.
- Select STKObjects~IAgStkObjectRoot~CurrentScenario.
Understanding SetTimePeriod()
SetTimePeriod Method (IAgScenario) sets the Scenario time period. startTime/stopTime use DateFormat Dimension.
You use this method in line 6 of Task 2: notUsed = scenario.SetTimePeriod("Today", "+24hr")
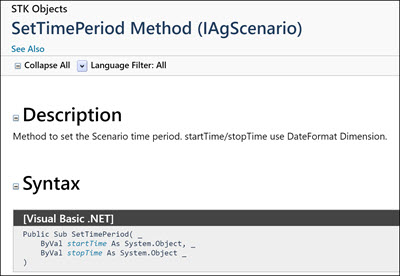
SetTimePeriod Method
- Return to STK Programming Help.
- Enter SetTimePeriod in the search field.
- Click Enter.
- Select STKObjects~IAgScenario~SetTimePeriod.
You will see throughout the code the variable notUsed. VBA expects something back even if STK doesn't return anything. Therefore, whenever you change properties of an object such as time or coordinates, you will use the variable notUsed.
Understanding Rewind()
Rewind Method (IAgAnimation) is used to stop and reset the animation.
You use this method in line 8 in Task 2: notUsed = root.Rewind()
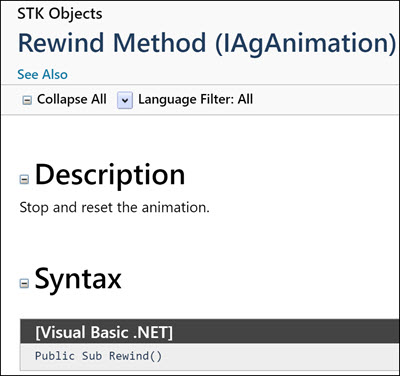
Rewind Method
- Return to STK Programming Help.
- Type Rewind in the search field.
- Click Enter.
- Select STKObjects~IAgAnimation~Rewind.C
Summary of Task 2
In Task 2, you are creating a Scenario object named New_Scenario and setting its analysis time from midnight local time based on your time zone (Today) and running the scenario for 24 hours. Then you are essentially clicking the red Reset button in the Animation Toolbar of STK to reset your scenario time.
STK Programming Help Search Examples
These were two examples of using STK Programming Help. When you are looking at Code snippets and such, in the search window, you can type something from the Code such as Personality2 and it will provide choices to select from. It would take a long time to browse the STK Programming Help throughout this tutorial, so hyperlinks are used to simplify and speed things up. However, practice makes perfect, so feel free to search on your own.
Running Both Sub Routines
- Bring the Microsoft Visual Basic for Applications - [Module 1 (Code)] window to the front.
- Click Save (Ctrl+ S) () in STK_Excel_Workbook.xlsm.
- Bring the Excel workbook to the front.
- Click .
- Click once STK opens.
- Bring STK to the front.
Viewing the Scenario object properties
- Right-click on New_Scenario (
 ) in the Object Browser.
 - Select Properties (
 ).
). - Note the Analysis Period Start: and Stop: times when the Properties Browser opens.
- Click to close the New_Scenario's () properties ().
- Look at Current Scenario Time in the Animation Toolbar. You set it for midnight local time (Today). You will see that the code reset it to the equivalent UTCG date and time.
- Return to the Excel workbook.
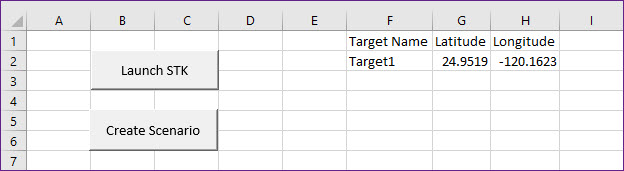
Configuring Target1 Objects
Populate the scenario by inserting 25 Target (![]() ) objects.
) objects.
- Type the following column headers into Excel:
- Select cell F2.
- Enter Target.
- Select cell G2.
- Copy and paste the following Excel RAND function into the Formula Bar:
- Click . The Excel RAND function returns a random number between 0 and 1. This Code will return a random number between -90 and 90.
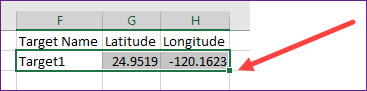
- Select cell H2.
- Copy and paste the following Excel RAND function into the Formula Bar:
- Click . This Code will return a random number between -180 and 180. Your values will be different from the image.
| Cell | Value |
|---|---|
| F1 | Target Name |
| G1 | Latitude |
| H1 | Longitude |
=(RAND()-0.5)*180
=(RAND()-0.5)*360
Target Name, Latitude and Longitude
Creating Multiple Targets and Random Latitudes and Longitudes
- Select cell F2.
- Hold the Shift key and select cell H2.
- Place your cursor on the small black box located at the lower right corner of cell H2.
- Hold down your left mouse button and drag the black box to cell H26 and release your mouse button. This will create 25 targets and 25 random latitudes and longitudes (your values will be different than the example).
- Click Save (Ctrl+ S) () while in the Excel workbook.
Small Black Box
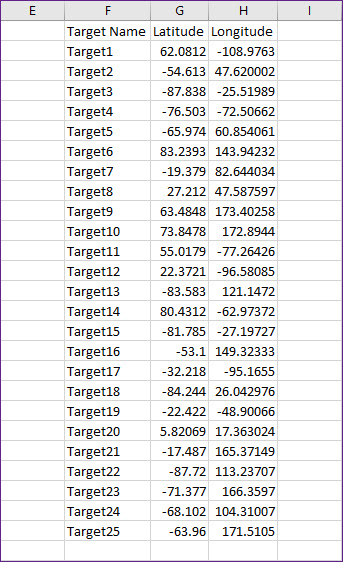
Twenty Five Targets and Random Locations
Inserting the Targets into STK
Insert the targets into STK using Target (![]() ) objects.
) objects.
- Click in the Developer tab.
- Click Button (Form Control) in the Form Controls window.
- While in the Excel workbook, hold down your left mouse button and draw out a new button below the Create Scenario button.
- Type Insert_Targets in the Macro name: field of the Assign Macro dialog box.
- Click .
- Return to the Excel workbook.
- Change the name of Button 3 to Insert Targets.
- Bring the Microsoft Visual Basic for Applications - [Module 1 (Code)] window to the front.
- Type or copy and paste the following Code within Sub Insert_Targets().
- Click Save (Ctrl+ S) () in STK_Excel_Workbook.xlsm.
|
|
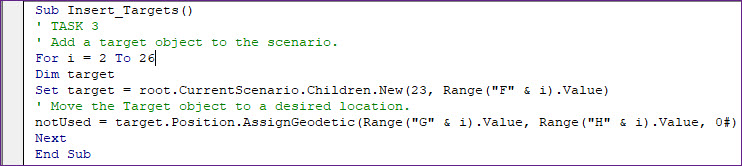
Task 3 Code
Understanding Task 3
Review the following sections to learn more about each line of Task 3 and discover resources in the STK Programming Help.
Understanding how to loop through rows in the code
You are looping through rows 2 to 26 of your Excel workbook. You create a new Target object on each line for 25 targets total.
You use a loop in line 3 of Task 3: For i = 2 to 26
Understanding the CurrentScenario Method
You use the CurrentScenario Method in line 5 of Task 3: Set target = root.CurrentScenario.Children.New(23, Range("F" & i).Value)
You will navigate to the CurrentScenario Method in the STK Programming Help for more information.
- Return to STK Programming Help.
- Type currentscenario in the search field.
- Click .
- Select STKObjects~IAgStkObjectRoot~CurrentScenario from the search results.
- Select IAgStkObject in the Visual Basic .NET Syntax list.
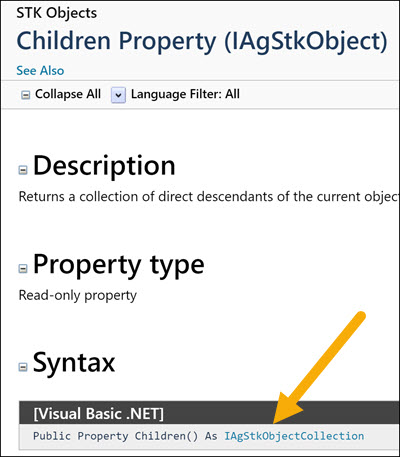
- Select Children in Public Properties.
Select IAgStkObject
Children Property
Children Property (IAgStkObject) returns a collection of direct descendants of the current object.
- Select IAgStkObjectCollection from the Visual Basic .NET Syntax list.
- Select New In Public Methods.
Select IAgStkObjectCollection
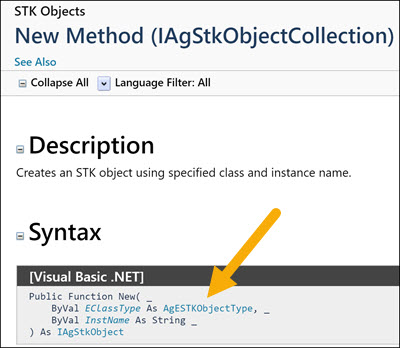
New Method
New Method (IAgStkObjectCollection) creates an STK object using specified class and instance name.
- Select AgESTKObjectType from the Visual Basic .NET Syntax list.
- Scroll down the Member list until you locate eTarget. To insert a new Target (
 ) object, you can use eTarget or the value 23. Your code uses the value 23.
AgESTKObjectType Enumeration shows the object type enumerations, associated value and the STK objects.
Next, STK wants a string for the name. You want the name in cell F2. To use all the target names, in VBA, you use Range. You want cell F and the ampersand (&) allows you to concatenate strings. It will start in F2 and finish in F26.
Select AgESTKObjectType
Assigning Locations of objects
In short, the Position Property gets the position of the target. The AssignGeodetic Method is a helper method to assign the position using the Geodetic representation. Learn more about the Position Property (IAgTarget) and the AssignGeodetic Method (IAgPosition) in the STK Programming Help.
You use both of these method in line 7 of Task 3: notUsed = target.Position.AssignGeodetic(Range("G" & i).Value, Range("H" & i).Value, 0.0)
Within the AssignGeodetic method:
- Range("G" & i).Value will read cells G2 though G26 for the latitudes.
- Range("H" & i).Value, 0.0) will read cells H2 though H26 for the longitudes. The altitude is 0.0 for all the targets which will place them on top of the WGS84 ellipsoid if you don't have terrain or on top of the terrain if you're using terrain such as Terrain Server. In the Code, Excel converts the value 0.0 is converted to 0#. (Don't worry about it.)
Running all three sub routines
- Bring the Excel workbook to the front.
- Click in the Excel workbook.
- Click once STK opens.
- After the scenario is created, click .
- Bring STK to the front.
You created an instance of STK, created a scenario with a 24 hour analysis period and inserted 25 random Target objects around the Earth.
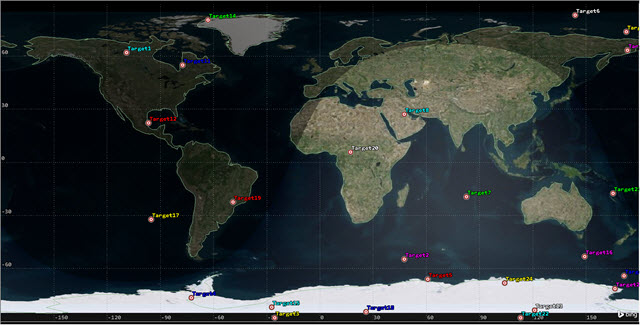
2D Graphics View of Random Targets Around the Earth
Inserting a Satellite Object into STK
You have launched STK, created a new scenario, set the time period and inserted 25 randomly placed Target (![]() ) objects. Now you will insert and propagate a Satellite (
) objects. Now you will insert and propagate a Satellite (![]() ) object.
) object.
- Return to the Excel workbook.
- Click in the Developer tab.
- Click Button (Form Control) in the Form Controls window.
- While in the Excel workbook, hold down your left mouse button and draw out a new button below the Insert Targets button.
- Type Insert_Satellite in the Macro name: field of the Assign Macro dialog box.
- Click .
- Bring the Excel workbook to the front.
- Change the name of Button 4 to Insert Satellite.
- Bring the Microsoft Visual Basic for Applications - [Module 1 (Code)] window to the front.
- Type or copy and paste the following Code within Sub Insert_Satellite ().
- Click Save (Ctrl+ S) () in STK_Excel_Workbook.xlsm.
|
|

Task 4 Code
Understanding Task 4
Review the following sections to learn how each line of Task 4 works.
Understanding the Children Property in Task 4
You use the Children property to insert a Satellite (![]() ) object in this case. This code uses the value 18 which loads a Satellite (
) object in this case. This code uses the value 18 which loads a Satellite (![]() ) object into your scenario called LeoSat. Previously, you used similar code to insert a Target (
) object into your scenario called LeoSat. Previously, you used similar code to insert a Target (![]() ) object into the scenario.
) object into the scenario.
You used this property in line 4 of Task 4: Set satellite = root.CurrentScenario.Children.New(18, "LeoSat")
Understanding the ExecuteCommand() Method
You use the ExecuteCommand Method to propagate the Satellite (![]() ) object. In general, the method executes a custom CONNECT action. Learn more about the connect command ExecuteCommand Method (IAgStkObjectRoot) in the STK Programming Help.
) object. In general, the method executes a custom CONNECT action. Learn more about the connect command ExecuteCommand Method (IAgStkObjectRoot) in the STK Programming Help.
You used this method in line 6 of Task 4: root.ExecuteCommand ("SetState */Satellite/LeoSat Classical TwoBody UseScenarioInterval 60 ICRF ""UseAnalysisStartTime"" 7200000.0 0.0 90 0.0 0.0 0.0")
SetState Connect Command
Look at the Alphabetical Listing of Connect Commands to understand the SetState connect command.
- Return to STK Programming Help.
- Choose Library Reference in the Contents list.
- Select Connect Command Library.
- Click Alphabetical Listing of Connect Commands from the Connect Command Listings page.
- Click S at the top of the Alphabetical Listing page.
- Select the SetState Classical command.
- Scroll through the SetState Classical page and note the following:
- Syntax will help you understand the input values of your SetState command.
- The description chart explains each input and its associated unit.
- In the Examples section, there are multiple examples that can be copied and edited for your particular scenario.
Running all four sub routines
- Return to the Excel workbook.
- Click .
- Click once STK opens.
- After the scenario is created, click .
- After the targets are inserted, click .
- Bring STK to the front.
You created an instance of STK, a scenario with a 24 hour analysis period, inserted 25 random Target (![]() ) objects around the Earth and inserted and propagated a Satellite (
) objects around the Earth and inserted and propagated a Satellite (![]() ) object.
) object.
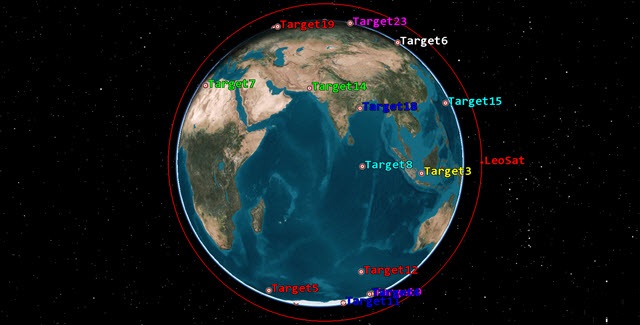
3D View of Random Target Objects and Satellite Object
Creating an Access
Determine when the LeoSat (![]() ) can access Target1 (
) can access Target1 (![]() ).
).
- Return to the Excel workbook.
- Click in the Developer tab.
- Click Button (Form Control) in the Form Controls window.
- While in the Excel workbook, hold down your left mouse button and draw out a new button below the Insert Satellite button.
- Type Compute_Access in the Macro name: field of the Assign Macro dialog box.
- Click .
- Bring the Excel workbook to the front.
- Rename Button 5 to Compute Access.
- Bring the Microsoft Visual Basic for Applications - [Module 1 (Code)] window to the front.
- Type or copy and paste the following Code within Sub Compute_Access ().
|
|
Understanding Task 5
Review these sections to understand more about Task 5.
Understanding GetObjectFromPath()
In short, the method gets the object instance that matches the path provided. Learn more about the GetObjectFromPath Method (IAgStkObjectRoot) in the STK Programming Help.
You use this method in lines 4 and 6 from Task 5:
Set sat = root.GetObjectFromPath("Satellite/LeoSat")
Set tar1 = root.GetObjectFromPath("Target/Target1")
Understanding the GetAccessToObject()
In short, the method returns an IAgStkAccess object to compute access to. Learn more about the GetAccessToObject Method (IAgStkObject) in the STK Programming Help.
You use this method in line 8 from Task 5: Set access = sat.GetAccessToObject(tar1)
Understanding the ComputeAccess() Method
In short, the ComputeAccess() recomputes the access between two objects. Learn more about the ComputeAccess Method (IAgStkAccess) in the STK Programming Help.
You use this method in line 10 in Task 5: access2 = access.ComputeAccess()
Data Providers
The content of a report or graph is generated from the selected data providers for the report or graph style. You can view data providers, groups and elements when using the Report & Graph Manager inside of STK. Data providers are also broken out in detail in STK Programming Help.
- Return to STK Programming Help.
- Select Library Reference in the Contents list.
- Select Data Providers Reference.
- On the Data Providers by Object page, you can spend a lot of time looking at an object's data providers, groups and elements.
- Keep this page open.
Retrieve and View the Access Data in Excel
You created an access from LeoSat (![]() ) to Target1 (
) to Target1 (![]() ). Retrieve and view the access data in Excel.
). Retrieve and view the access data in Excel.
- Bring the Microsoft Visual Basic for Applications - [Module 1 (Code)] window to the front.
- Type or copy and paste the following Code at the bottom of the Sub Compute_Access().
- Click Save STK_Excel_Workbook.xlsm ().
|
|
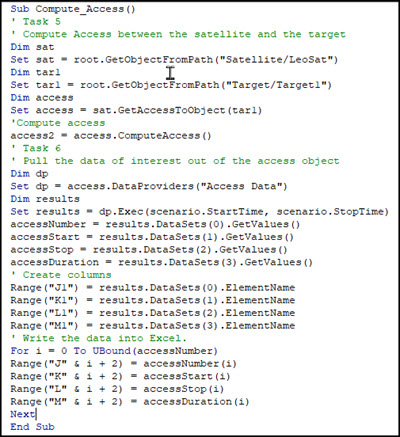
Tasks 5 and 6
Understanding Task 6
Review the sections to learn about the different methods and properties in Task 6. Also, you will discover resources in the STK Programming Help to understand these methods and properties further.
Understing the DataProviders Property
The DataProviders Property returns the object representing a list of available data providers for the object. Learn more about the
You use this property in line 4 of Task 6: Set dp = access.DataProviders("Access Data")
- Return to STK Programming Help.
- Select Access on the Data Providers by Object page. This page provides data providers available for the Access object.
- Select Access Data in the Available Data Providers list. Access Data is the specified data provider.
- Select Access in the Data Provider Variants list.
- Look at the Data Provider Elements list to understand the following code.
Understanding the Exec() Method
The Exec Method computes the data within a specified Start and Stop time. Learn more about the
You use this method in line 6 of Task 6: Set results = dp.Exec(scenario.StartTime, scenario.StopTime)
Understanding the DataSets() Property and the GetValues Method
The DataSets() Property returns a collection of data sets within a specified interval. The GetValues retrieves an array of values of the elements in the dataset. In this instance, you're creating an access from the satellite to the target based on the scenario start and stop times.
When pulling data from the data provider elements list, it follows the sequence as seen in the list. For example, the first element, Access Number, is 0 (zero). Start Time is 1 (one), Stop Time is 2 (two) and Duration is 3 (three). In the code, accessNumber = results.DataSets(0).GetValues() simply means that you are you are pulling the results from the data provider (Access Data) and then the data provider element Access Number.
You can learn more about the DataSets Property (IAgDrInterval) and the GetValues Method (IAgDrDataSet) in the STK Programming Help.
You use this property and method in lines 7 to 10 of Task 6:
accessNumber = results.DataSets(0).GetValues()
accessStart = results.DataSets(1).GetValues()
accessStop = results.DataSets(2).GetValues()
accessDuration = results.DataSets(3).GetValues()
Understanding the ElementName Property
You use the DataSets() Property again, but you pair that property with a new one. The ElementName Property returns the name of the dataset. In Task 6, you are writing the element names as headers for columns J1 through M1. Learn more about the ElementName Property (IAgDrDataSet) in the STK Programming Help.
You use this property in lines 12 to 15 of Task 6:
Range("J1") = results.DataSets(0).ElementName
Range("K1") = results.DataSets(1).ElementName
Range("L1") = results.DataSets(2).ElementName
Range("M1") = results.DataSets(3).ElementName
Understanding filling the data in your table
You use a loop to add data to your table in line 17 to 21 in Task 6:
For i = 0 To UBound(accessNumber)
Range("J" & i + 2) = accessNumber(i)
Range("K" & i + 2) = accessStart(i)
Range("L" & i + 2) = accessStop(i)
Range("M" & i + 2) = accessDuration(i)
You will loop through all the data that it returns and write it to the appropriate cell.
Run all five sub routines
- Bring the Excel workbook to the front.
- Click .
- Click once STK opens.
- After the scenario is created, click .
- After the targets are inserted, click .
- After the satellite is inserted, click . Your data will look similar to but different than the following example.
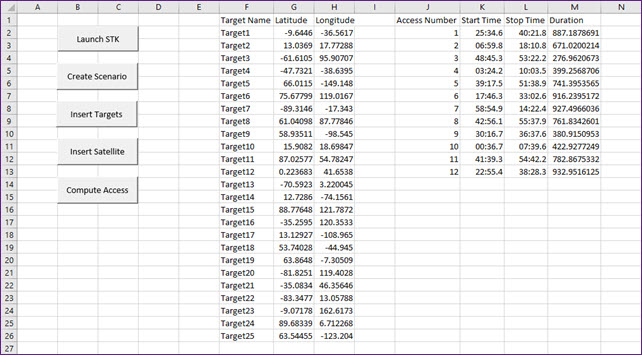
Buttons, Targets, and Access Data
Format cells
Excel formats the start and stop times differently than SKT (e.g. day, month, year, time). You can select the cells containing the start and stop times, right-click on the selection, open the Format Cells option and set the format to dd mmm yyyy hh:mm:ss.000. Or you can use the following Code.
- Bring the Microsoft Visual Basic for Applications - [Module 1 (Code)] window to the front.
- Type or copy and paste the following Code at the bottom of the Sub Compute_Access().
- Click Save STK_Excel_Workbook.xlsm (Ctrl+ S) ().
- Bring the Excel workbook to the front.
- Click . Your data will look similar to but different than the following example.
- Click Save ().
|
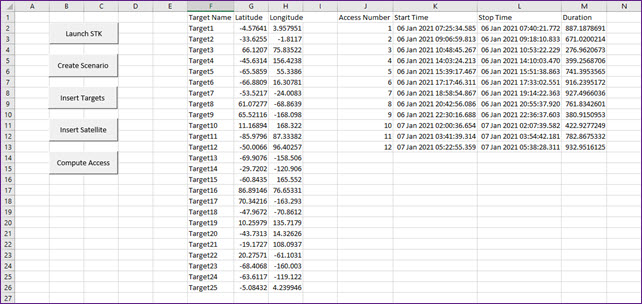
Reformatted Cells
STK Excel Add-in
At the beginning of the tutorial, you downloaded and installed the STK Excel Add-in. Use that now.
- Select the Add-ins tab.
Custom Toolbars
If you're using the STK Excel Add-in, in the Excel ribbon, you should see the Custom Toolbars.
| Button | Function |
|---|---|
 | Create or Attach to STK 12 |
 | Open or Close a scenario 12 |
 | Extract Data From an STK 12 Data Provider |
 | Insert Data Into STK 12 |
 | Undo the last Get Data operation |
 | About this Add-in |
Attaching the Excel Workbook to STK
Since you already have a running instance of STK, you can attach Excel to your scenario.
- Select cell P in the Excel workbook. You want an empty cell plus three empty cells to the right. You will be choosing four elements.
- Click Create or Attach to STK 12 () from the Custom Toolbars.
- Select Attach to an existing STK 12 application instance.
- Click to close the information window.
- Click Extract Data From an STK 12 Data Provider () to open the Generate Data Provider Report tool.
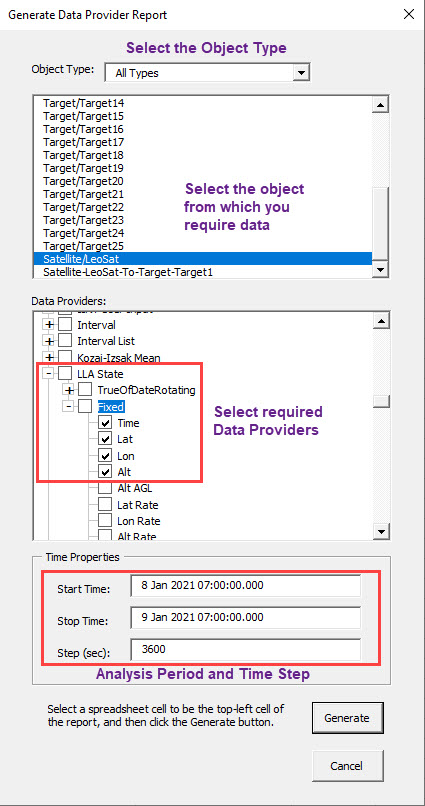
Generate Data Provider Report Tool
Selecting your data providers
- Select Satellite/LeoSat from the object list.
- Expand (
 ) LLA State (Data Provider) in the Data Providers: list.
 - Expand () Fixed
- Select the following data provider elements.
- Time
- Lat
- Lon
- Alt
- Use the default Start Time and Stop Time values.
- Change Step (sec): to 3600. This will make the data easier to read.
- Click .
- Close the Generate Data Provider Report tool.
- You can expand columns P/Q/R/S in the Excel workbook if desired to see all of the data.
You can see the Time, Latitude, Longitude, and Altitude of the satellite in one hour increments over the 24 hour analysis period.
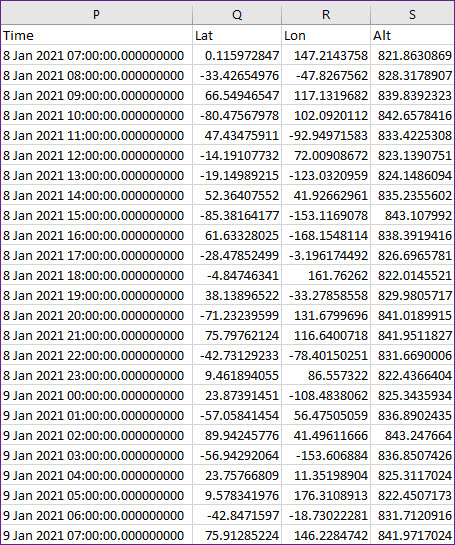
Data Provider Report
Summary
You began by viewing a small portion of the STK Programming Help pages. Then you performed the following:
- Downloaded and installed the STK Excel Add-in.
- Opened Excel and enabled the Developer tab and turned on the STK Excel Add-in.
- After closing and then opening Excel, you created an Excel Macro-Enabled Workbook (*.xlsm).
- Created the first button and code which launched an instance of STK.
- Created the second button and code to create a new Scenario object with a run time of 24 hours and reset the scenario to the new analysis time period.
- In the Excel workbook, you created three columns: Target Name, Latitude and Longitude. In the Latitude column, you set a random number formula that entered values between -90 and 90. In the Longitude column, you set a random number formula that entered values between -180 and 180. You created 25 random targets.
- Created the third button and code which loaded 25 random Target objects into the scenario.
- Created a fourth button and code which propagated a LEO Satellite in the scenario.
- Created a fifth button and code that computed access between the Satellite object and a Target object and imported the access times into Excel.
- Changed the fifth button code to format the access times to match the format in STK.
- Used the STK Excel Add-in to import selected LLA Data Provider Elements concerning the Satellite object into Excel.
Close Excel
- Return to Excel.
- Press Ctrl+S on your keyboard to save your workbook.
- Close Excel. This will also close STK.
On Your Own
Throughout the tutorial, hyperlinks were provided that pointed to in depth information concerning the STK Object Model and Connect. Now's a good time to go back through this tutorial and view that information. Obviously, there is a lot to learn. However, this tutorial should have provided some familiarization on how to use STK Programming Help. Explore!
You can try multiple tutorials to become more familiar with the STK Object Model and Connect: Tutorials, Code Samples, Code Snippets, and Online Resources.