STK Pro
The results of the tutorial may vary depending on the user settings and data enabled (online operations, terrain server, dynamic Earth data, etc.). It is acceptable to have different results.
Capabilities Covered
This lesson covers the following STK Capabilities:
- STK Pro
Problem Statement
It’s exciting to be able to see a satellite moving in the night sky - even more so when it’s the International Space Station (ISS). You’d like to determine when you can see the ISS from your present location (call it MyHouse) when it flies overhead within the next three (3) weeks.
Break It Down
You have some information that may be helpful. Here’s what you know:
- You will start looking for ISS tomorrow.
- You are interested in passes that occur over the next three weeks (21 days).
- You can see ISS with the naked eye from the ground when it is illuminated.
- You can see ISS with the naked eye when it is dark on the ground.
- When you are on the ground trying to see something in space, the lower you look along the horizon, the more atmosphere you have to look through and the better the chance that something will be in the way.
Solution
Build a scenario that allows you to calculate a simple line-of-sight access between MyHouse and the International Space Station (ISS) that considers lighting and elevation limitations.
Video Guidance
Watch the following video. Then follow the steps below, which incorporate the systems and missions you work on (sample inputs provided).
Model the World!
This scenario might be used a hundred times from various locations at various times. The specific date isn’t important. It is more important that you get information that lets you know when you can see the ISS right now. That being the case, it seems like it might be a real time saver to set the scenario start time to Today.
Let’s try it!
-
Click the
 Create a Scenario button.
- Enter the following in the New Scenario Wizard:
- When you finish, click .
- When the scenario loads, click Save (
 ). A folder with the same name as your scenario is created for you in the location specified above.
 - Verify the scenario name and location and click .
| Option | Value |
|---|---|
| Name | Where_is_ISS |
| Description | When will ISS be visible over the next three (3) weeks? |
| Location | C:\Users\<username>\Documents\STK 12\ |
| Start | Today |
| End | + 21 days |
You can click the drop-down arrow beside the Start and Stop options to expose a drop-down menu of available times, dates, formats, and units. You can set the scenario analysis period by typing Now, Today, NoonToday, Tomorrow, NoonTomorrow, or +/- a specified number of days or weeks in the appropriate fields. See Time Keywords in STK Time for a discussion of these time keywords. Using the date constant time component Today as the Start time will ensure that the analysis period is updated each time the scenario is opened to correspond to the current date and time.
Disable Terrain Server
- Right-click on the scenario () and open the Properties (
 ).
). - Select the Basic - Terrain page.
- Clear the Use terrain for analysis check box.
- Click to apply changes and dismiss the Properties Browser.
Model My House
The Insert STK Objects tool offers a variety of methods for introducing different types of locations. For this example, it will be sufficient to mark the location of your house. We will call the location, MyHouse. An easy way to introduce a location is to create the object using the place location address search tool.
To use the Search By Address feature, you will need a vaild internet connection. If you don't have an internet connection, you can use the City Database tool to select the nearest city to your location.
- Bring the Insert STK Objects tool (
 ) to the front.
 - Select the following:
- Click the button.
- Enter the address where you are currently taking this class or the address of your home.
- Select your town or address when the search results appear.
- Click the button to use that entry to insert an STK Place object (
 ).
). - Close the Insert by Address search tool.
- In the Object Browser, rename the new Place object () MyHouse.
By default, new facilities are inserted at the latitudinal and longitudinal coordinates of AGI headquarters near Philadelphia. If you are at AGI headquarters, select Insert Default as the method to position the facility at that location.
| Option | Value |
|---|---|
| Select an Object to be Inserted: |
|
| Select a Method |
|
Renaming Objects
STK provides a variety of options for renaming objects in the Object Browser.
- Select the object, and click the name of the object to make it editable.
- Right-click the object and select Rename from the context menu that appears
- Select the object in the Object Browser, and click the F2 button on your keyboard.
Can I See My House on the Bing Maps Overlay?
This option is only available for those who have an internet connection. It is not required to complete this exercise. If you don't have an internet connection, you can skip to the next section.
Now that you have your house inside STK, let’s take a look at what it might look like in the 2D and 3D Graphics window using Microsoft Bing Maps.
Through AGI’s partnership with Microsoft, STK/TIM users can stream global high-resolution Microsoft Bing Maps raster imagery onto their STK, AGI Viewer, and STK Engine 3D globes. You can select from different data sets (e.g. aerial imagery, roads, etc.) to provide enhanced situational awareness.
- Bring the 3D Graphics window to the front.
- Click the Microsoft Bing Maps (
 ) icon.
 - Select the Aerial option.
- Click .
Change Your Perspective
Let's get a closer look at MyHouse in the 3D Graphics window.
- In the Object Browser, right-click on MyHouse () and select Zoom To.
- Mouse around in the 3D Graphics window to get a better look at MyHouse ().
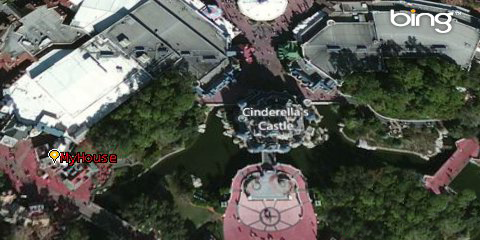
3D View: MyHouse
Get a Better Look
- Bring the 2D Graphics window to the front.
- Zoom (
 ) as many times as needed until MyHouse () is clearly visible.
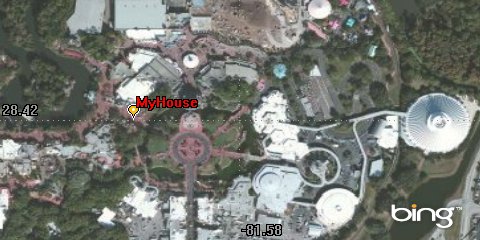
2D View: MyHouse
Model ISS
You can also introduce predefined satellite models based on database entries.
- Bring the Insert STK Objects tool () to the front.
- Select the following:
- Click the button.
| Option | Value |
|---|---|
| Select an Object to be Inserted |
|
| Select a Method |
|
The STK Satellite Database
The Satellite Database is another database tool shipped with STK for your use. The unclassified Satellite Database that comes with basic STK is published by USSTRATCOM. This database contains positional data for thousands of satellites in the form of two-line element sets (TLE). There is an online database and a local installed database. You can update your locally installed database using the Update Database Files... button on the Scenario's Basic Database properties page or from agi.com/resources.
You will use the Satellite Database tool to model ISS.
Let’s see if you can find a database entry for ISS, and use it to insert an STK satellite object (![]() ).
).
- When the Satellite Database Search tool appears, type ISS in the Name or ID field and click .
- Select the ISS entry (25544).
- Click to introduce an STK satellite object (
 ) representing ISS into the scenario.
 - Close the Satellite Database Search tool.
You can search ISS, but to narrow the search results a bit, enter 25544 in the Name or ID field.
You don’t need to create any more objects, so you can close the Insert STK Objects tool (![]() ) now if you like.
) now if you like.
Satellite Properties
Let's take a look at the properties for the satellite imported from the database.
- Double-click ISS_25544 ().
- Ensure that the Basic - Orbit page is selected.
- Click in the TLE Source area. A window that displays the two-line element (TLE) information that will be used to propagate the SGP4 satellite will appear.
- When you finish, click to dismiss the TLE Preview window.
- Leave ISS_25544’s () properties open.
If the ISS orbit track does not look smooth in the 3D Graphics window, you can adjust the Step Size from 300 seconds to 60 seconds on the ISS_25544 Properties > Basic - Orbit page. The Step Size is the interval between computed ephemeris output points.
When Can I See ISS From My House
You have two objects in your scenario, one satellite representing ISS and one facility representing MyHouse. You need to know when ISS is within MyHouse’s line-of-sight. Calculate a simple access to determine when you can see the ISS. You will be looking for an elevation as close to 90 degrees as possible. This represents when the ISS is directly overhead. Perfect for viewing the bright space station.
- Click the Access tool button (
 ) on the STK Tools toolbar.
 - Set the Access For option to MyHouse ().
- Select ISS_25544 () in the Associate Objects list.
- Click button in the Reports area.
When the Access Tool opens, the Access For object will automatically be set to the object selected in the Object Browser.
Access is automatically computed when you generate any type of Access report, graph, or display. You do not need to click the Compute button before generating data from the Access tool.
Where is the ISS?
STK generates and displays an Access report. The Access report that you created tells you WHEN access occurs. Knowing when to look for ISS is helpful, but you also want to know where to look for ISS. See if you can determine WHERE ISS is with respect to MyHouse when access occurs.
- Select the Access tool () to bring it to the front.
- Click button in the Reports area.
- Close the Access tool ().
- Leave the Access and AER reports open.
- Take a look at the Access and AER reports that you created.
- Note the answers to these questions:
- How many accesses are there?
- What is the total duration of all the accesses?
- What is the range of elevation angle over all accesses?
The Access report lists the start and stop time for each instance that ISS is within MyHouse’s line-of-sight. The AER report gives the azimuth, elevation, and range of ISS during each period of access.
Model Real World Conditions
According to the information that you have, you can only see ISS with the naked eye from the ground when it is in direct sun and when it is dark at MyHouse. Take another look at the times when MyHouse can see ISS.
- Are these access times useful to you?
- How can you ensure that STK will only provide access times that meet your criteria?
In order to model realistic system limitations, STK provides constraints. Constraints allow you to place limitations on the performance of objects. STK provides several different types of constraints. The types of constraints available will depend on the object on which the constraint is being imposed.
All constraints work in an AND configuration meaning that when multiple constraints are set, they must all be satisfied in order for an access to occur (e.g., Basic constraints AND Sun constraints AND Temporal constraints,... must all be satisfied in order for an access to occur). If any single constraint is violated, that access is invalidated.
Constrain the ISS
Your list says you can only see ISS with the naked eye from the ground when the spacecraft is in direct sun. You need to exclude access that occurs when ISS is NOT in direct sunlight because although it will pass over you, it won’t be illuminated such that you will be able to see it from the ground with the naked eye.
Sky Lighting
You can use a Sun constraint to model this limitation. Sun Constraints enable you to impose lighting constraints based on the position of the Sun and Moon. When a Lighting option is set, it indicates that access to an object, which uses one or more constraints, is valid only under these specified lighting conditions.
- Open ISS_25544’s () properties ().
- Select the Constraints - Sun page.
- Select the Lighting check box towards the bottom of the page.
- Select Direct Sun from the adjacent list.
- Click to accept the changes, and dismiss ISS_25544’s () properties ().
- Take a look at the access and AER reports that you created. On each one, press the refresh (
 ) button.
 - Note the answers to the following questions:
- How many accesses are there?
- What is the total duration of the accesses?
- Do accesses occur during daylight hours?
Change to Local Time
Your default report access times are in Universal Time (UTCG). You want to change the time to the local time. This will simulate the current conditions in MyHouse.
- Select the AER report to bring it to the front.
- Click the Report Units button (
 ) at the top of the Report Data window.
 - When the Units dialog appears, select DateFormat in the Units list.
- Select Gregorian LCL (LCLG) from the New Unit Value list.
- Click to save the change and dismiss the Units window.
-
Gregorian LCL is dependent on your system clock and time zone. If MyHouse is located in a time zone other than the one your computer is set to, the resulting access times would be invalid.
- Return to the Access report.
- Take a look at the access and AER report.
- Now, do accesses occur between sunset and sunrise?
You will see that the default time unit is set to Gregorian UTC (UTCG).
Constrain MyHouse
Your list says you can only see ISS with the naked eye when it is dark in MyHouse. You need to exclude accesses that occur during daylight hours in MyHouse because, although the ISS will pass over you, it won't be dark enough in MyHouse to spot ISS from the ground with the naked eye.
Ground Lighting
For your analysis, you need MyHouse to be available only at night. To model the lighting conditions you need to impose a separate constraint on MyHouse based on the position of the Sun.
- Open MyHouse’s () properties ().
- Select the Constraints - Sun page.
- Select the Lighting check box.
- Select Umbra (no sun light) from the adjacent list.
- Click . Do not close the properties ().
When Can I See ISS From MyHouse
Constraining MyHouse ensures that it will be considered in your analysis only when it is totally shadowed from the sun. Check to see how that has affected access to ISS.
- Bring the Access report to the front.
- Refresh ( or F5) the Report Data window.
- Bring the AER report to the front.
- Refresh ( or F5) the Report Data window.
- Take a look at the access and AER reports that you created.
- Note the answers to the following questions:
- How many accesses are there?
- What is the total duration of the accesses?
- How did applying a lighting constraint to MyHouse affect accesses?
- At what elevation does the first access occur?
Elevation Constraints
You know that when you are on the ground trying to see something in space the lower you look along the horizon the more atmosphere you have to look through and the better the chance that something will be in the way. To help avoid the elevation angle problem, STK allows you to put an elevation angle constraint on a ground-based location. A good typical minimum elevation is 6-8 degrees, but it can be more depending on the area, the surrounding terrain, and even buildings.
To model a more realistic representation of MyHouse’s (![]() ) availability, impose a minimum elevation angle constraint.
) availability, impose a minimum elevation angle constraint.
- Return to MyHouse’s () properties ().
- Select the Constraints - Basic page.
- Select the Min check box in the Elevation Angle area.
- Enter 6 deg in the adjacent textbox.
- Click to accept the changes, and dismiss MyHouse’s () properties ().
Now, When Can I See ISS
The elevation angle constraint models a more realistic representation of MyHouse’s availability. Check to see how that has affected the number of accesses.
- Bring the Acces report to the front.
- Refresh ( or F5) the Report Data window.
- Bring the AER report to the front.
- Refresh ( or F5) the Report Data window.
- Take a look at the access and AER reports that you created.
- Note the answers to the following questions:
- How many accesses are there?
- What is the total duration of the accesses?
- How did applying an elevation constraint to MyHouse affect accesses?
- At what elevation does the first access occur?
- When you finish, close all open report windows.
Where Am I?
Now, you have data that lets you know exactly where and when to look for ISS from MyHouse, but wouldn’t it be nice if you could visually identify when the accesses occur and when the constraints that you’ve set are valid? That would give you a nice visual representation of accesses.
Accessing Window Properties
Suppose you wanted to change the properties of a visualization window itself? What if you needed to adjust the lighting display in the window and not just for an object, or change the central body? Every visualization window (2D and 3D) has its own properties just like STK objects. Properties for windows have their own Properties Browser which is accessed in the same manner as object properties.
You can access window properties on one of the following ways:
- Right-click anywhere in the window, and select Properties () from the menu that appears.
- Click the Properties () button on the toolbar that corresponds to the window whose properties you would like to access.
Lighting Conditions in the 2D Graphics Window
You can set lighting conditions in the 2D Graphics window that will provide a visual representation of how the lighting constraints that you set are affecting the objects in your scenario.
- Select the 2D Graphics window to bring it to the front.
- Open the 2D Graphics window properties ().
- Select the Lighting page.
- Select the Show Outline check box in the Sunlight/Penumbra section.
- Select the Show check box in the Subsolar Point section.
- Click .
When you display outlines on the map in the 2D Graphics window, lighting conditions are displayed on the surface of the Earth. ISS is several kilometers above the Earth, so the times at which it crosses the solar terminator in the 2D Graphics window will not be exact, but they do provide a general idea of the lighting conditions for ISS. If you want to display exact lighting for ISS in the 2D Graphics windowgo to the ISS Properties, 2D Graphics - Lighting page. You can also see the ISS lighting conditions by zooming to the ISS in the 3D Graphics window.
Get Moving!
The ISS object marker is positioned according to the current animation time in both windows, and its ground and orbit tracks are clearly visible.
- Ensure that the 2D and 3D Graphics window are clearly visible in your STK Workspace.
- Play (
 ) the animation.
 - Watch as your objects move along in the 2D Graphics window as animation progresses.
- Can you identify the approximate times when ISS moves in and out of periods of sunlight?
- Reset (
 ) the animation again.
 - Play () the animation.
- Pause (
 ) the animation when you see an access.
 - Now, check the time in the Animation toolbar.
- Does that time show up on your access report?
- Close any remaining Report Data windows.
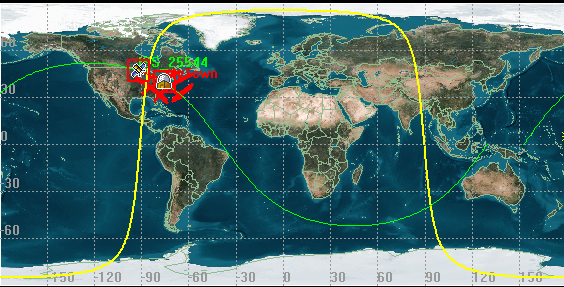
2D View: Access From MyHouse to ISS
![]()
Animation toolbar during access from MyHouse to ISS
The time of access will be different in your report because your scenario is based on relative time (Today +\-).
Change Your Perspective
- Reset () the animation.
- Right-click ISS_25544 () in the Object Browser.
- Select Zoom To.
- Mouse around in the window to get a better look at ISS_25544 ().
- Play () the animation.
- Is ISS always in sunlight when access occurs?
The ISS satellite looks quite different than the default satellite. If you load a satellite using the Satellite Database tool, information for the inserted satellite appears on the Description page of its basic properties, and when available, the appropriate 3D model is also loaded.
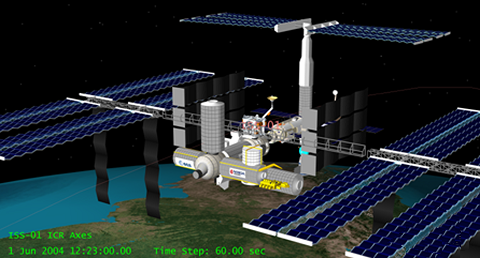
3D View: ISS Model
Save Your Work
- Reset () the animation.
- Save () your work.
- Close the scenario ().