Surface Mesh Primitive |
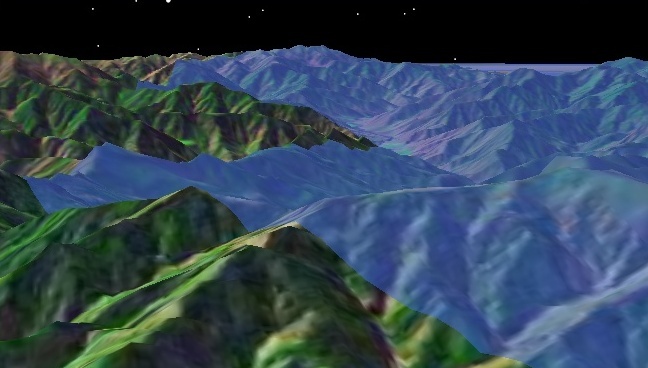
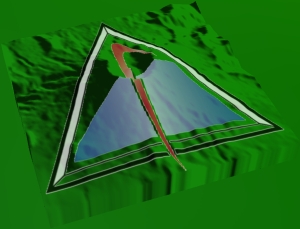
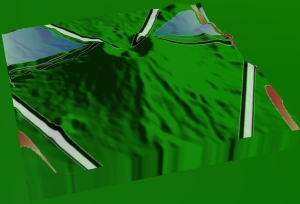
SurfaceMeshPrimitive is similar to TriangleMeshPrimitive, but it only renders meshes on the surface of a globe. Arbitrary mesh or meshes at altitude cannot be rendered with the surface mesh. The main advantage of the surface mesh over the triangle mesh is it will conform to terrain, as shown below:
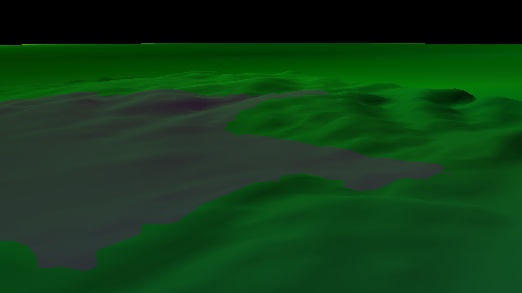
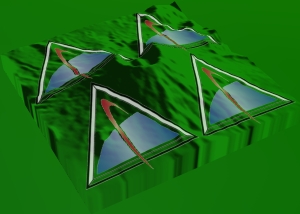
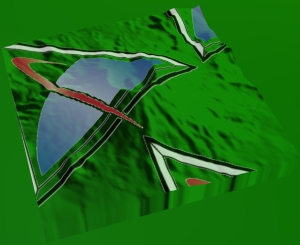
In addition to conforming to terrain, the surface mesh can have a texture applied to it as shown below.
Given the advantages of the surface mesh, you may wonder why you would ever use the generic triangle mesh to render meshes on the surface. There are two reasons.
The surface mesh requires a video card and drivers that support OpenGL 2.0. This has been available since 2004 but you may still want to call the supported method before assuming the surface mesh is supported.
Performance. Although the surface mesh is highly optimized, including use of geometry shaders when ran on Shader Model 4 video cards, it is still slower than the triangle mesh. Performance tests showed the triangle mesh to be 55-75% faster than the surface mesh on a GeForce 8800 GTX.
The following example from the HowTo adds terrain to the globe then creates a surface mesh representing the 925 zip code that conforms to the terrain.
EarthCentralBody earth = CentralBodiesFacet.getFromContext().getEarth();
TerrainOverlay terrainOverlay = getScene().getCentralBodies().getEarth().getTerrain().add(terrainPath);

SurfaceMeshPrimitive mesh = new SurfaceMeshPrimitive();
Color purple = new Color(0x800080);
mesh.setColor(purple);
mesh.set(SurfacePolygonTriangulator.compute(earth, areaTargetPoints));
SceneManager.getPrimitives().add(mesh);
The following example from the HowTo shows how to apply a texture to a surface mesh.
SurfaceMeshPrimitive mesh = new SurfaceMeshPrimitive();
mesh.setTranslucency(0.3f);
mesh.setTexture(SceneManager.getTextures().fromUri(textureUri));
mesh.set(SurfaceExtentTriangulator.compute(earth, terrainOverlay.getExtent()));
SceneManager.getPrimitives().add(mesh);
The extent triangulator is used to compute a mesh on the surface. As shown in the previous two examples, both the extent and polygon triangulator can be input to the surface mesh. The extruded polyline triangulator cannot be input since it does not provide meshes on the surface. A texture is created, in the same way it is created for markers, and passed along with the triangulator to define the surface mesh. The texture in this example has an alpha channel, which is why the entire extent is not filled.
The surface mesh provides the set method to allow dynamic updates.
When applied to a surface mesh, texture edges align to latitudinal and longitudinal lines where the top edge is north. The texture extends to the bounding extent of the surface mesh. The texture can be scaled, translated, and rotated by assigning a TextureMatrix to the surface mesh. Performing transformations like these over time can create effects like water movement.
When a surface mesh is rendered, texels in the texture are mapped to pixels on the screen. Texture coordinates are used to lookup texels. A texture lies on a plane, and its coordinates are in the range [0, 1] in both the u and v directions, as shown below:
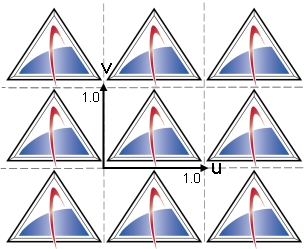
This is texture space. The texture repeats for values outside the range. The texture coordinates u and v are multiplied by the 4x4 matrix prior to the lookup. Modifying this texture matrix changes the way texels are mapped to pixels.
If no texture matrix is specified or the default texture matrix, which is the identity matrix, is assigned, the u and v coordinates are unchanged.
mesh.setTextureMatrix(new TextureMatrix());
Use a scaling matrix to tile the texture. The first example below scales textures coordinates so that they fall within [0, 2] causing four copies of the texture to be rendered. In the example, the AffineTransform type is used to simplify matrix construction. In the second example, the texture coordinates only range within [0.5, 0.5] so that only one quarter of the texture is rendered.
AffineTransform matrix = new AffineTransform();
matrix.scale(2.0f, 2.0f);
mesh.setTextureMatrix(new TextureMatrix(matrix));
matrix.scale(0.5f, 0.5f);
mesh.setTextureMatrix(new TextureMatrix(matrix));
The following example constructs a translation matrix so that texture coordinates fall within [0.5, 1.5]. Translation can be used to create texture animation effects.
matrix.translate(0.5f, 0.5f);
mesh.setTextureMatrix(new TextureMatrix(matrix));
This example constructs a rotation matrix that rotates texture coordinates 30 degrees counter-clockwise from the north.
matrix.rotate(-30.0f);
mesh.setTextureMatrix(new TextureMatrix(matrix));
This example first translates (-0.5, -0.5), then rotates -30 degrees, and finally translates (0.5, 0.5). This rotates the texture around its center. Note that the transformations are applied in the opposite order described.
matrix.translate(0.5f, 0.5f);
matrix.rotate(-30.0f);
matrix.translate(-0.5f, -0.5f);
mesh.setTextureMatrix(new TextureMatrix(matrix));

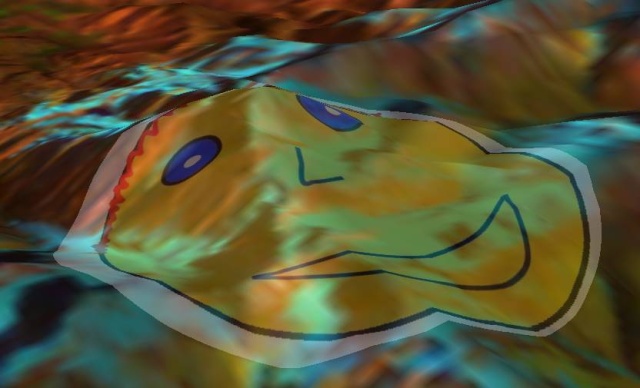
A more interesting example allows one to map the four corners of a texture to new corners. A common example involves mapping an image taken from a UAV's camera onto the Earth where the cartographic coordinate of each corner of the image is known. If such an image were added as a texture to a surface mesh that was a rectangle initialized from the image's latitude and longitude bounding extent, the following results:
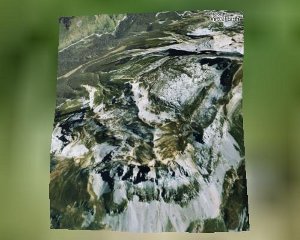
This fails to map the image correctly. The cartographic coordinate of each corner is not mapped to the correct location on the Earth. A better approach is to compute a texture matrix that maps each image corner to the correct location. Such a matrix results in the following:
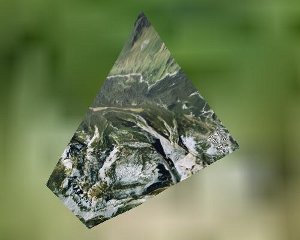
This more accurately shows where the image actually extends. It is obvious that the camera took the image from the southwest. The example code from the HowTo follows:
// Load the UAV image where each corner maps to a longitude and latitude defined
// in degrees below.
//
//    lower left  = (-0.386182, 42.938583)
//    lower right = (-0.375100, 42.929871)
//    upper right = (-0.333891, 42.944780)
//    upper left  = (-0.359980, 42.973438)
Texture2D texture = SceneManager.getTextures().fromUri(terrainPath);
// Define the bounding extent of the image. Create a surface mesh that uses this extent.
CartographicExtent extent = new CartographicExtent(Trig.degreesToRadians(-0.386182),
                                                   Trig.degreesToRadians(42.929871),
                                                   Trig.degreesToRadians(-0.333891),
                                                   Trig.degreesToRadians(42.973438));
SurfaceMeshPrimitive mesh = new SurfaceMeshPrimitive();
mesh.setTexture(texture);
mesh.setTranslucency(0.0f);
mesh.set(SurfaceExtentTriangulator.compute(earth, extent));

// Create the texture matrix that maps the image corner points to their actual
// cartographic coordinates.  A few notes:
//
// 1. The TextureMatrix does not do any special processing on these values
//    as if they were cartographic coordinates.
//
// 2. Because of 1., the values only have to be correct relative to each
//    other, which is why they do not have to be converted to radians.
//
// 3. Because of 2., if your image straddles the +/- 180 degs longitude line,
//    ensure that longitudes east of the line are greater than those west of
//    the line.  For example, if one point were 179.0 degs longitude and the
//    other were to the east at -179.0 degs, the one to the east should be
//    specified as 181.0 degs.
Rectangular c0 = new Rectangular(-0.386182, 42.938583);
Rectangular c1 = new Rectangular(-0.375100, 42.929871);
Rectangular c2 = new Rectangular(-0.333891, 42.944780);
Rectangular c3 = new Rectangular(-0.359980, 42.973438);
mesh.setTextureMatrix(new TextureMatrix(c0, c1, c2, c3));

// Enable the transparent texture border option on the mesh so that the texture will not
// bleed outside of the trapezoid.
mesh.setTransparentTextureBorder(true);

// Add the surface mesh to the scene manager
SceneManager.getPrimitives().add(mesh);
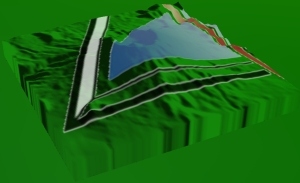
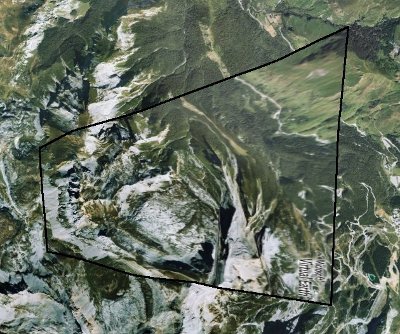
While far better than the original, this mapping is not perfect; it does not account for terrain or the curve of the Earth. The pixels at the corners are correct, but all of the other pixels are not. The below shows the remapped texture outlined in black over top of terrain and the correctly georegistered Bing Maps for Enterprise imagery. Note that the edges do not line up. The farther the pixel is from the camera location, the more off the pixel is. This error is reduced for geographically smaller images.
Despite this issue, this method is often the best that can be done if the user only has the cartographic coordinates of the corners. If the user has the position, attitude, and the field of view of the camera, the image can be more properly georegistered. See the Raster and Projection Streams topic for more information.