Configuring a Moxie Simulation Project
Overview
Before you can run a simulation with Moxie, you need to ensure your No Magic project (.mdzip) is configured correctly. There are two ways to do this:
- Create a new project using the Moxie simulation project template. Use this option if you would like to start from scratch with a new project.
- Update an existing project to use Moxie. Use this option if you already have a model or state machines in a project and you would like to configure that project to use Moxie.
This section covers the following concepts:
- The Moxie model libraries
- Simulation configurations and simulation configuration diagrams
- Moxie simulation instance specifications
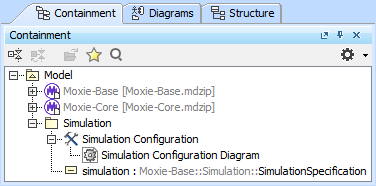
Figure A1: The Moxie simulation project packages
Prerequisites
| Prerequisite | Description |
|---|---|
| Moxie Installation | You must have installed Moxie. |
| Recommended Reading | Before completing this section, you may want to read the following help topics: |
Instructions for creating new projects
- In your No Magic modeling tool, select File > New Project... (or press ).
- On the left side of the New Project dialog box shown in Figure B1, in the Simulation category, select Moxie Simulation Project.
- Enter a Name and Project location.
- (Optional) Select the Create directory for project and related data checkbox. This makes it easier to see which files are associated with which project.
-
Click when finished.

Figure B1: Creating a Moxie simulation project
- In the Containment Tree, you should now see the Moxie-Base, Moxie-Core, and Simulation packages. The Simulation package should contain a Simulation Configuration, a Simulation Configuration Diagram, and a simulation instance specification named simulation.
-
(Optional)
Double-click the Simulation Configuration Diagram to open it
and drag the
simulationinstance specification onto the diagram. This shows all of the simulation-related parameters in one location. -
(Optional)
In the Simulation Configuration Diagram,
select the
animationSpeedproperty and enter80. This slows down the state machine animation so that you can easily observe each transition when you run the simulation. - Save your work before continuing.
Next Section >
Instructions for updating existing projects
Import the Moxie model libraries
- Open your No Magic project file (.mdzip).
- In your No Magic modeling tool, select Options > Project Usages and click .
- In the Use Project dialog box shown in Figure C1, select From predefined location.
- In the Paths to used projects box, select <install.root>\modelLibraries.
-
In the list of .mdzip files,
select Moxie-Core.mdzip
and click .
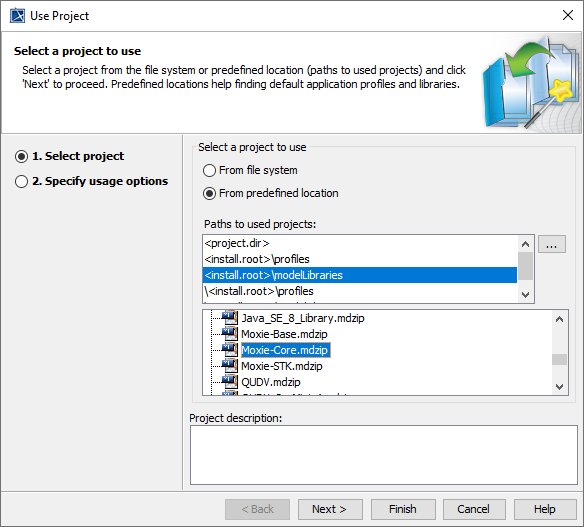
Figure C1: Importing the Moxie model libraries
If you do not see Moxie-Core.mdzip in the list, Moxie is not installed correctly. Please revisit the Installation Guide and make sure you have completed all of the steps.
- Close the Used Projects window.
- In the Containment Tree, you should now see the Moxie-Base and Moxie-Core packages.
Create a simulation configuration
- In the Containment Tree, right-click the top-level Model and select Create Element (or press ).
-
In the General category,
select Package,
enter
Simulationas its name, and press . - Right-click the Simulation package and select Create Diagram (or press ).
-
In the Simulation category,
select Simulation Configuration Diagram,
enter
Simulation Configuration Diagramas its name, and press . - In the Containment Tree, notice the hammer/wrench icon directly under the Simulation Configuration Diagram. This icon represents the simulation configuration, which was automatically created for you when you created a simulation configuration diagram.
-
Right-click the icon,
select Rename
(or press ),
enter
Simulation Configurationas its name, and press . - (Optional) In the Containment Tree, drag the Simulation Configuration Diagram into the Simulation Configuration. This keeps them grouped together as you add more elements and move things around, in addition to saving you some space in the Containment Tree.
Create a simulation instance specification
- In the Containment Tree, right-click Moxie-Base > Simulation > SimulationSpecification and select Tools > Create Instance....
- In the 1. Select parts page, clear and reselect SimulationSpecification to ensure that no sub-elements are selected, then click .
- In the 2. Select a package page, select the Simulation package and click .
- In the 3. Create a diagram page, clear the Create a new diagram checkbox and click .
-
In the Containment Tree,
right-click the new
simulationSpecificationinstance specification, select Rename (or press ), entersimulationas the instance specification name (without changing the classifier after the:), and press .Figure C2: The simulation configuration, diagram, and instance specification
-
(Optional)
Double-click the Simulation Configuration Diagram to open it
and drag the
simulationinstance specification onto the diagram. This shows all of the simulation-related parameters in one location.
You will still need to set the simulation instance specification's roots slot before
running a simulation.
Set the simulation configuration properties
- In the Containment Tree, right-click the Simulation Configuration and select Specification (or press ).
- In the upper-right corner of the Simulation Configuration Specification window shown in Figure C3, select Expert in the Properties filter.
-
Click the cell to the right of Execution Target,
search for
simulation, and selectsimulation : SimulationSpecification. - Click the cell to the right of Engines Priority then click the button in the upper-right corner of the cell.
- In the Engine Management and Ordering dialog box, select the Moxie Engine.
- Click until Moxie Engine is at the top of the list, then click .
-
You should now see Moxie Engine at the top of the Engines Priority list.
Click to exit the window.

Figure C3: The simulation configuration properties
- Save your work before skipping to the final section of this tutorial.
Final Section >