STK Premium (Air) or STK Enterprise
You can obtain the necessary licenses for this tutorial by contacting AGI Support at support@agi.com or 1-800-924-7244.
This lesson requires STK 12.7 or newer to complete.
The results of the tutorial may vary depending on the user settings and data enabled (online operations, terrain server, dynamic Earth data, etc.). It is acceptable to have different results.
Capabilities covered
This lesson covers the following STK Capabilities:
- STK Pro
- Aviator
- Aviator Pro
Problem
You want to simulate, visualize, and analyze an aircraft airborne refueling mission. The mission is long distance and normally requires a lot of computational time. You want a way to speed up the process of simulation.
Solution
Use STK, STK's Aviator capability, the Aviator Formation Flyer, and the Aviator Pro capability's Rendezvous / Formation strategy to create a mission with which you can build and analyze a long distance airborne refueling mission.
What you will learn
Upon completion of this tutorial, you will understand:
-
how to simulate the flight route of an aircraft
-
how to simulate an aircraft refueling
-
how to measure the amount of fuel involved in refueling the aircraft
Video guidance
Creating a new scenario
First, you must create a new STK scenario and then build from there.
- Launch STK (
 ).
). - Click
 Create a Scenario in the Welcome to STK dialog box.
 - Enter the following in the STK: New Scenario Wizard:
- Click when you finish.
- Click Save (
 ) when the scenario loads. STK creates a folder with the same name as your scenario for you.
 - Verify the scenario name and location in the Save As window.
- Click .
| Option | Value |
|---|---|
| Name: | Formation_Flyer |
| Location: | Default |
| Start: | 13 Jun 2023 16:00:00.000 UTCG |
| Stop: | + 3 hr |
Save (![]() ) often during this lesson!
) often during this lesson!
Disabling Terrain Server
Analytical and visual terrain is not required in this analysis. Turn off the Terrain Server.
- Right-click on Formation_Flyer () in the Object Browser.
- Select Properties (
 ).
). - Select the Basic - Terrain page.
- Clear Use terrain server for analysis.
- Click to accept the changes and close the Properties Browser.
Inserting a Place object
You will use a Place (![]() ) object as a reference point for your mission.
) object as a reference point for your mission.
- Select Place (
 ) in the Insert STK Objects Tool.
 - Select Insert Default () as the method.
- Click
- Right-click on Place1 () in the Object Browser.
- Select Rename.
- Rename Place1 () to Ref_Point.
Inserting an Aircraft object as your Tanker
Insert an Aircraft (![]() ) object which you will use to create your tanker.
) object which you will use to create your tanker.
- Insert an Aircraft (
 ) object using the Insert Default () method.
 - Rename Aircraft1 () to Tanker.
Using the Aviator propagator
Aviator provides an enhanced method for modeling aircraft - more accurate and more flexible than the standard Great Arc propagator.
- Open Tanker's () properties ().
- Select the Basic - Route page when the Properties Browser opens.
- Open the Propagator: shortcut menu.
- Select Aviator.
- Click .
- Click on the Flight Path Warning dialog box.
- Read the information in the dialog box.
- Click to close the Flight Path Warning dialog box.
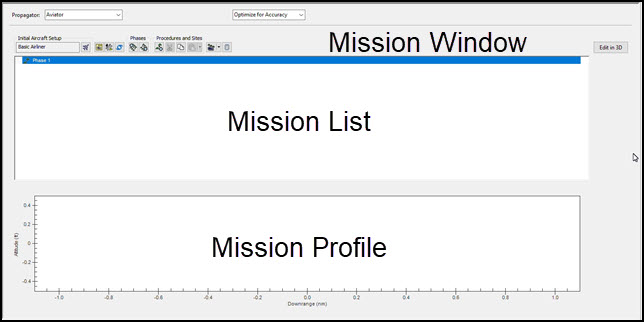
Mission Window
The mission window is used to define the aircraft's route when Aviator has been selected as the propagator.
- Take a moment to know the difference between the Mission List and the Mission Profile.
Mission Window
Tanker's Properties
You will use the Basic Airliner as your tanker.
- Select Phase 1 in the Mission List.
- Click Insert Procedure After (
 ) in the Procedures and Sites toolbar.
Site Properties
You will use the Relative to stationary STK Object (![]() ) site type to place Tanker (
) site type to place Tanker (![]() ) in its initial location.
) in its initial location.
- Select Relative to stationary STK Object (
 ) in the Select Site Type: list.
 - Type Reference Point in the Name: field.
- Select Ref_Point () in the Link To Stationary STK Object: list.
- Set the following:
- Click .
| Option | Value |
|---|---|
| Bearing: | 270 deg |
| Range: | 100 nm |
Procedure Properties
Tanker (![]() ) will fly in a circular holding pattern until the aircraft that requires air refueling rendezvouses with Tanker (
) will fly in a circular holding pattern until the aircraft that requires air refueling rendezvouses with Tanker (![]() ).
).
- Select Holding - Circular (
 ) in the Select Procedure Type: list
 - Clear Use Aircraft Default Cruise Altitude in the Altitude panel.
- Enter 20000 ft in the MSL Altitude: field.
- Set the following in the Hold Options panel:
- Click .
- Click to accept your changes and to close the Properties Browser.
| Option | Value |
|---|---|
| Diameter: | 15 nm |
| Number of Full Turns: | 4 |
Viewing your progress in the 3D Graphics window
Set your 3D Graphics window view so that you can see Tanker's (![]() ) holding pattern and the reference point.
) holding pattern and the reference point.
- Bring the 3D Graphics window to the front.
- Right click on Tanker () in the Object Browser.
- Select Zoom To.
- Use your mouse to zoom out until you can see Tanker () and Ref_Point ().
- Recenter your view using Grab Globe (
 ) or Zoom In (
 ) in the 3D Graphics window toolbar.
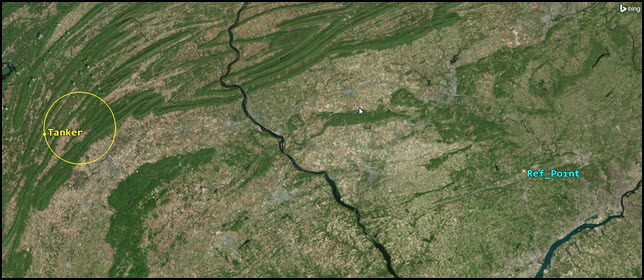
Tanker and Reference Point
Inserting an Aircraft object as your refueling aircraft
Insert an Aircraft (![]() ) object which you will use to create the aircraft that is refueling.
) object which you will use to create the aircraft that is refueling.
- Insert an Aircraft () object using the Insert Default () method.
- Rename the Aircraft2 () to Receiver.
Using the Aviator propagator
Change Receiver's (![]() ) propagator to Aviator.
) propagator to Aviator.
- Open Receiver's () properties ().
- Select the Basic - Route page when the Properties Browser opens.
- Open the Propagator: shortcut menu.
- Select Aviator.
- Click .
Initial aircraft setup
Use the Basic Fighter as the refueling aircraft.
- Click Select Aircraft (
 ) in the Initial Aircraft Setup toolbar.
 - Select Basic Fighter in the Select Aircraft dialog box.
- Click to close the Select Aircraft dialog box.
- Click to accept your selection and to keep the Properties Browser open.
Site Properties
You will use the Relative to stationary STK Object (![]() ) site type to place your fighter in its initial location.
) site type to place your fighter in its initial location.
- Select Phase 1 in the Mission List.
- Click Insert Procedure After () in the Procedures and Sites toolbar.
- Select Relative to stationary STK Object () in the Select Site Type: list.
- Type Reference Point in the Name: field.
- Select Ref_Point () in the Link To Stationary STK Object list.
- Set the following:
- Click .
| Option | Value |
|---|---|
| Bearing: | 270 deg |
| Range: | 50 nm |
Procedure Properties
Use an Enroute procedure. An Enroute procedure traverses between the end of the previous procedure and the site of the current procedure, calculating trajectory and performance based on aircraft performance models.
- Select Enroute (
 ) in the Select Procedure Type: list.
 - Clear Use Aircraft Default Cruise Altitude in the Altitude panel.
- Enter 25000 ft in the MSL Altitude: field.
- Open the Nav Mode: shortcut menu in the Navigation Options panel.
- Select Start on Course.
- Enter 270 deg in the course field.
- Click .
- Click to accept your changes and to keep the Properties Browser open.
End of Previous Procedure
The end of the previous procedure can be used as a waypoint to define the site of the next procedure.
- Select Enroute () in the Mission list.
- Click Insert Procedure After () in the Procedures and Sites toolbar.
- Select End of Previous Procedure (
 ) in the Select Site Type: list when the Site Properties dialog box opens.
 - Click .
Basic Maneuver
A Basic Maneuver procedure is a single action undertaken by the aircraft. It is unlike most procedures in STK's Aviator capability, which represent sets of actions that together comprise a common flying procedure. You will use the Basic Maneuver procedure to rendezvous with Tanker (![]() ).
).
- Select Basic Maneuver (
 ) in the Select Procedure Type: list when the Procedure Properties dialog box opens.
 - Type Rendezvous in the in the Name: field.
Rendezvous / Formation Strategy
The Rendezvous / Formation strategy is a 3D strategy, operating in the wind frame, in which the aircraft uses multi-mode guidance to maintain formation with a cooperative aircraft. You will place Receiver (![]() ) 225 degrees off of Tanker's (
) 225 degrees off of Tanker's (![]() ) left wing at one nautical mile and 500 feet below Tanker (
) left wing at one nautical mile and 500 feet below Tanker (![]() ).
).
- Select the Horizontal / Navigation tab.
- Open the Strategy: shortcut menu.
- Select Rendezvous/Formation.
- Select Tanker () in the Cooperative Target: list.
- Set the following in the Position panel:
| Option | Value |
|---|---|
| Relative Bearing: | 225 deg |
| Relative Range: | 1 nm |
| Altitude Split: | -500 ft |
Basic Stop Conditions
Each Basic Maneuver requires at least one stopping condition, which dictates when the maneuver will end regardless of whether any other goals are met. You can define more than one stopping condition if you want, and the maneuver will stop if any condition is met.
- Clear Time of Flight: and Downrange: in the Basic Stop Conditions panel.
- Click twice.
- Click to accept your changes and to close the Properties Browser.
View your progress in the 3D Graphics window
Set your 3D Graphics window view so that you can see Receiver (![]() ) rendezvous with Tanker (
) rendezvous with Tanker (![]() ) in the holding pattern.
) in the holding pattern.
- Bring the 3D Graphics window to the front.
- Right click on Tanker () in the Object Browser.
- Select Zoom To.
- Use your mouse to zoom out until you can see Tanker () and Receiver ().
- Recenter your view using Grab Globe () or Zoom In () in the 3D Graphics window toolbar.
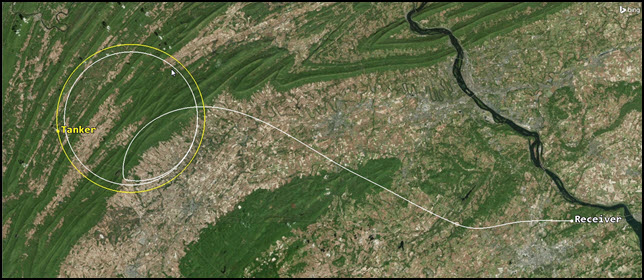
Rendezvous
Determine the rendezvous time
When the Receiver (![]() ) has rendezvoused with Tanker (
) has rendezvoused with Tanker (![]() ), both aircraft will exit the holding pattern and fly west with Receiver (
), both aircraft will exit the holding pattern and fly west with Receiver (![]() ) topping off its fuel load when needed.
) topping off its fuel load when needed.
- Bring the 3D Graphics window to the front.
- Click Increase Time Step (
 ) in the Animation toolbar until your X Real Time Multiplier: is 16.
 - Click Start (
 ) to animate your scenario.
 - Click Pause (
 ) when Receiver () is inside the holding pattern and following Tanker (). The time should be approximately 13 Jun 2023 16:13:00.000.
Controlling Procedure Time
If the timing of a procedure is important to your mission goal, you can specify how the procedure time will be defined by clicking or selecting Set Time (![]() ) from the right-click menu in the mission list, which will open the Procedure Time window. Use Set Interrupt Time to stop the current procedure in progress at the specified time and begin the next procedure.
) from the right-click menu in the mission list, which will open the Procedure Time window. Use Set Interrupt Time to stop the current procedure in progress at the specified time and begin the next procedure.
- Open Tanker's () properties ().
- Select the Basic - Route page when the Properties Browser opens.
- Right click on Holding - Circular () in the Mission List.
- Select Set Time... (
 ) in the shortcut menu.
 - Select the Set Interrupt Time: check box when the Holding - Circular Time dialog box opens,
- Enter 13 Jun 2023 16:13:00.000 UTCG (or the time when your aircraft form up) in the Set Interrupt Time: field.
- Click to close the Holding - Circular Time dialog box.
- Click to accept your changes and to close the Properties Browser.
View your progress in the 3D Graphics window
Set your 3D Graphics window view so that you can see when the procedure is interrupted.
- Bring the 3D Graphics window to the front.
- Right click on Tanker () in the Object Browser.
- Select Zoom To.
- Use your mouse to zoom out until you can see Tanker () and Receiver ().
- Recenter your view using Grab Globe () or Zoom In () in the 3D Graphics window toolbar.

Interrupted Procedure
Create a new stopping condition for Receiver
Use the stop condition After Target Current Procedure. Use this setting to stop after the target completes the procedure that it is performing when the aircraft rendezvous with it.
- Open Receiver's () properties ().
- Select the Basic - Route page when the Properties Browser opens.
- Double click on Rendezvous () in the Mission List.
- Open the Stop Condition: shortcut menu when the Basic Maneuver Properties dialog box opens.
- Select After Target Current Procedure. This stops Receiver's () rendezvous time when Tanker's () procedure is interrupted.
- Click to close the Basic Maneuver Properties dialog box.
- Click to accept your changes and to close the Properties Browser.
Create a new procedure for Tanker
Once the Receiver (![]() ) has rendezvoused with Tanker (
) has rendezvoused with Tanker (![]() ), both aircraft will turn west and fly a straight course during which Receiver (
), both aircraft will turn west and fly a straight course during which Receiver (![]() ) will take on fuel when required.
) will take on fuel when required.
- Open Tanker's () properties ().
- Select the Basic - Route page when the Properties Browser opens.
- Select Holding - Circular () in the Mission List.
- Click Insert Procedure After () in the Procedures and Sites toolbar.
Site Properties
- Select Relative to stationary STK Object () in the Select Site Type: list.
- Type Reference Point in the Name: field.
- Select Ref_Point () in the Link To Stationary STK Object list.
- Set the following:
- Click .
| Option | Value |
|---|---|
| Bearing: | 270 deg |
| Range: | 1000 nm |
Procedure Properties
Tanker (![]() ) will fly on a bearing of 270 degrees from the reference point for a distance of 1000 nautical miles. Use the Enroute (
) will fly on a bearing of 270 degrees from the reference point for a distance of 1000 nautical miles. Use the Enroute (![]() ) procedure to keep its altitude at 20000 feet MSL.
) procedure to keep its altitude at 20000 feet MSL.
- Select Enroute () in the Select Procedure Type: list.
- Clear Use Aircraft Default Cruise Altitude in the Altitude panel.
- Enter 20000 ft in the MSL Altitude: field.
- Click .
- Click to accept your changes and to close the Properties Browser.
Place Receiver in formation with Tanker
Now that Tanker (![]() ) is leaving its holding pattern, you want Receiver (
) is leaving its holding pattern, you want Receiver (![]() ) to get in formation with it prior to refueling.
) to get in formation with it prior to refueling.
- Open Receiver's () properties ().
- Select the Basic - Route page when the Properties Browser opens.
- Select Rendezvous () in the Mission List.
- Click Insert Procedure After () in the Procedures and Sites toolbar.
Site Properties
- Select End of Previous Procedure () in the Select Site Type: list.
- Click .
Procedure Properties
- Select Basic Maneuver () in the Select Procedure Type: list.
- Type In Formation in the Name: field.
- Select the Horizontal / Navigation tab.
- Open the Strategy: shortcut menu.
- Select Rendezvous/Formation.
- Select Tanker () in the Cooperative Target: list.
Procedure Properties
- Set the following in the Position panel:
- Clear Enable in the Collision Avoidance Logic panel. This enables Receiver () to get close to Tanker () with no restrictions.
- Clear Fuel State: and Downrange: in the Basic Stop Conditions panel.
- Enter 00:02:00.000 HMS in the Time of Flight: field. This places Receiver () behind and below Tanker () for 2 minutes.
- Click twice.
- Click to accept your changes and to keep the Properties Browser open.
| Option | Value |
|---|---|
| Relative Bearing: | 225 deg |
| Relative Range: | 200 ft |
| Altitude Split: | -50 ft |
Add Fuel State to the Mission Profile
Currently, the Mission Profile is showing Altitude and Downrange in the Primary Y Axis. You can add Fuel State to the Secondary Y Axis.
- Right click in the Mission Profile.
- Select Profile Options/Properties... in the shortcut menu.
- Select the Secondary Y Axis check box when the Profile Options/Properties dialog box opens.
- Select Fuel State in the Secondary Y Axis list.
- Click to close the Profile Options/Properties dialog box.
- Click to accept your changes and to keep the Properties Browser open.

Receiver's Mission Profile
Determine when Receiver is ready to refuel
Now that the Receiver (![]() ) is behind Tanker (
) is behind Tanker (![]() ), determine when it will refuel.
), determine when it will refuel.
- Select In Formation () in the Mission List.
- Click Insert Procedure After () in the Procedures and Sites toolbar.
Site Properties
- Select End of Previous Procedure () in the Select Site Type: list.
- Click .
Procedure Properties
Formation Flyer was introduced in STK 12.7. Formation Flyer is used to satisfy a case of maintaining formation and doing so with much less computational cost over the full rendezvous routine. It can handle straight flight and basic turns. It is not designed to come into formation from an arbitrary point, only to maintain formation. It can handle basic turns, but the results may vary depending on the aggressiveness of the turns. The cost should be significantly less than the full rendezvous.
The Receiver (![]() ) will plug into Tanker (
) will plug into Tanker (![]() ) when its fuel state reaches 15000 pounds (lbs) and top off its fuel load.
) when its fuel state reaches 15000 pounds (lbs) and top off its fuel load.
- Select FormationFlyer (
 ) in the Select Procedure Type: list.
 - Open the Stop Condition: shortcut menu.
- Select After Fuel State.
- Enter 15000 lb in the Stop Fuel State: field.
- Click .
- Look at the Mission Profile. The Plugin procedure ends when Receiver's () fuel state hits 15000 pounds.
- Click to accept your changes and to keep the Properties Browser open.
Receiver is ready to refuel
When Receiver (![]() ) reaches 15000 pounds of fuel, it is ready to top off its fuel load.
) reaches 15000 pounds of fuel, it is ready to top off its fuel load.
- Select FormationFlyer () in the Mission List.
- Click Insert Procedure After () in the Procedures and Sites toolbar.
Site Properties
- Select End of Previous Procedure () in the Select Site Type: list.
- Click .
Procedure Properties
- Select Basic Maneuver () in the Select Procedure Type: list.
- Type Plugin - Refuel in the Name: field.
- Open the Strategy: shortcut menu.
- Select Rendezvous/Formation.
- Select Tanker () in the Cooperative Target: list.
Procedure Properties
- Set the following in the Position panel:
- Clear Enable in the Collision Avoidance Logic panel.
- Clear Fuel State: and Downrange: in the Basic Stop Conditions panel.
- Enter 00:10:00.000 HMS in the Time of Flight: field.
- Click Finish twice.
- Click to accept your changes and to keep the Properties Browser open.
| Option | Value |
|---|---|
| Relative Bearing: | 180 deg |
| Relative Range: | 100 ft |
| Altitude Split: | -50 ft |
Refuel / Dump Properties
The Refuel / Dump tool (![]() ) allows you to simulate adding or removing fuel in flight during the associated procedure.
) allows you to simulate adding or removing fuel in flight during the associated procedure.
- Right click on Plug - In Refuel () in the Mission List.
- Select Refuel/Dump... (
 ) in the shortcut menu.
 - Open the Mode: shortcut menu when the Refuel/Dump Properties dialog box opens.
- Select Top off.
- Enter 50000 lb/hr in the Rate: field.
- Enter 00:03:00.000 HMS in the Start Time Offset: field.
- Click to close the Refuel/Dump Properties dialog box.
- Look at the Mission Profile. You can see that the fuel state increased.
- Click to accept your changes and to keep the Properties Browser open.
Reuse previous procedures and sites
The Receiver (![]() ) has topped off its fuel. It will get back in formation for a while until it needs to top off its fuel again.
) has topped off its fuel. It will get back in formation for a while until it needs to top off its fuel again.
- Select both In Formation () and FormationFlyer () in the Mission List.
- Click Copy Procedures (
 ) in the Procedures and Sites toolbar.
 - Select Plugin - Refuel ().
- Click Paste Procedures After (
 ) in the Procedures and Sites toolbar.
 - Click to accept your changes and to keep the Properties Browser open.
You could continue to copy and paste procedures as many times as needed during the scenario to keep the refueling aircraft's fuel topped off.
X Real Time Factor
You can turn on X Real Time Factor in the Mission Profile to see how Formation Flyer substantially lowers the compute time of your scenario.
- Right click in the Mission Profile.
- Select Profile Options/Properties... in the shortcut menu.
- Select X Real Time Factor in the Primary Y Axis list.
- Click to close the Profile Options/Properties dialog box.
- Click to accept your changes and to keep the Properties Browser open.
- Select a procedure in the Mission List, it will be highlighted in the Profile.
- Place your cursor anywhere along the X Real Time Factor line. You will see Downrange, X Real time Factor and Fuel State.

X Real Time Factor
You can see how X Real Time Factor increases in the Mission Profile when using Formation Flyer (the higher the value and less computation time). This allows you to calculate long distance missions, flying in formation, much quicker than older versions of Aviator.
Tanker's fuel state
You visualized the fuel state of Receiver (![]() ) to show an increase of fuel during refueling. Conversely, you need to show Tanker (
) to show an increase of fuel during refueling. Conversely, you need to show Tanker (![]() ) dumping fuel at the same time.
) dumping fuel at the same time.
- Return to Receiver's () properties ().
- Right click on the lowest fuel state in the Mission Profile.
- Select Set Animation Time in the shortcut menu. You will use this time to create an interrupt time for Tanker ().
- Click to close the Properties Browser.
- Click inside the Current Scenario Time field in the Animation toolbar.
- Copy the time (e.g. approximately 13 Jun 2023 16:42:00.000). Your time will most likely be different. That's OK.
Setting an interrupt time
- Open Tanker's () properties ().
- Select the Basic - Route page when the Properties Browser opens.
- Right click on Enroute () in the Mission List.
- Select Set Time... () in the shortcut menu.
- Select Set Interrupt Time: when the Enroute Time dialog box opens.
- Paste the time you copied in the Set Interrupt Time: field.
- Click to close the Enroute Time dialog box.
- Click to accept your changes and to keep the Properties Browser open.
Creating a new procedure
- Select Enroute () in the Mission List.
- Click Copy Procedures () in the Procedures and Sites toolbar.
- Click Paste Procedure After () in the Procedures and Sites toolbar.
- Double click on the second Enroute () in the Mission List.
- Type Refueling One in the Name: field when the Enroute Properties dialog box opens.
- Click to close the Enroute Properties dialog box.
Editing Refueling One
- Right click on Refueling One () in the Mission List.
- Select Set Time... () in the shortcut menu.
- Clear the Set Interrupt Time: check box in the Refueling One Time dialog box.
- Click to close the Refueling One Time dialog box.
- Click to accept your changes and to close the Properties Browser.
Refuel Total
Determine the approximate fuel total that Receiver (![]() ) took during refueling.
) took during refueling.
- Open Receiver's () properties ().
- Select the Basic - Route page when the Properties Browser opens.
- Select Plugin - Refuel () in the Mission List.
- Right click on the highest fuel state in the Mission Profile after Receiver () has topped off its fuel.
- Select Profile Data at Cursor... in the shortcut menu.
- Locate Refuel Total when the Plugin - Refuel dialog box opens.
- Note the amount (e.g. 5076 lb). Your total might be different. That's ok.
- Close the Plugin - Refuel dialog box.
- Click Cancel to close the Properties Browser.
Tanker
You need to subtract the fuel that Tanker (![]() ) passed to Receiver (
) passed to Receiver (![]() ).
).
- Open Tanker's () properties ().
- Select the Basic - Route page.
- Right click on Refueling One in the Mission List.
- Select Refuel Dump... () in the shortcut menu.
- Set the following in the Refuel/Dump Properties dialog box.
- Click OK to close the Refuel/Dump Properties dialog box.
| Option | Value |
|---|---|
| Mode: | Dump quantity |
| Quantity: | the amount you noted that Receiver took (e.g. 5076 lb) |
Adding Fuel State to the Mission Profile
Currently, the Mission Profile is showing Altitude and Downrange in the Primary Y Axis. You can add Fuel State to the Secondary Y Axis.
- Right click in the Mission Profile.
- Select Profile Options/Properties... in the shortcut menu.
- Select the Secondary Y Axis check box when the Profile Options/Properties dialog box opens.
- Select Fuel State in the Secondary Y Axis list.
- Click to close the Profile Options/Properties dialog box. You can see when Tanker () refuels Receiver in the Mission Profile.
- Click to accept your changes and to keep the Properties Browser open.
Adding a data display to the 3D Graphics window
Use the data display to display dynamic data for your object in the 3D Graphics window. The data display is useful when presenting information that requires both visual and textual data.
- Select the 3D Graphics - Data Display page.
- Click
- Select Flight Profile by Time in the Add a Data Display dialog box list.
- Click to close the Add a Data Display dialog box.
- Click to accept your changes and to close the Properties Browser.
Adding a data display for Receiver
- Open Receiver's properties.
- Select the 3D Graphics - Data Display page.
- Click
- Select Flight Profile by Time in the Add a Data Display dialog box list.
- Click to close the Add a Data Display dialog box.
- Open the X Origin: shortcut menu in the Position panel.
- Select Right.
- Click to accept your changes and to close the Properties Browser.
Viewing your scenario in the 3D Graphics window
You can view your scenario in the 3D Graphics window. Tanker's (![]() ) data display is in the upper left corner of the window and Receiver's (
) data display is in the upper left corner of the window and Receiver's (![]() ) the upper right corner. You can zoom in to either aircraft and set your animation time to a time that corresponds to a procedure to view the rendezvous and plugin.
) the upper right corner. You can zoom in to either aircraft and set your animation time to a time that corresponds to a procedure to view the rendezvous and plugin.
- Bring the 3D Graphics window to the front.
- Click Start () in the Animation toolbar to animate your scenario.
- When done, click Reset (
 ).
).
Summary
This tutorial showed you how to set up two aircraft that are going to perform an airborne refueling operation. A tanker aircraft was in a holding circular orbit. An aircraft requiring fuel formed up on the tanker's wing. They left the circular holding pattern and flew a long straight leg. Using Aviator and various procedures, you showed when the tanker and aircraft requiring fuel lined up and chose how much fuel to pump.
You were introduced to a new feature in STK 12.7, Formation Flyer. You learned how Formation Flyer significantly reduces computational time when performing long range analysis.