STK Premium (Space) or STK Enterprise
You can obtain the necessary licenses for this tutorial by contacting AGI Support at support@agi.com or 1-800-924-7244.
The results of the tutorial may vary depending on the user settings and data enabled (online operations, terrain server, dynamic Earth data, etc.). It is acceptable to have different results.
This lesson requires STK 12.8 or newer to complete in its entirety. If you have an earlier version of STK, you can view a legacy version of this lesson.
Capabilities covered
- STK Pro
- STK SatPro
Problem Statement
You require a simple and fast way to create a group of satellites that provide 24-hour coverage over a location on the ground. You want to represent an entire constellation of satellites as a single object in STK to provide basic visualization, a minimal memory footprint, and efficient save and load operations. You need to determine how long the satellites will remain in orbit. You want to create a two-line element (TLE) set of the original satellite to be used in future analysis.
Solution
Build a scenario in STK where you create a Walker constellation using the Satellite Collection object. The Satellite Collection object models a group of satellites as a single object in the Object Browser. The associated satellites do not appear in the Object Browser, but are available for analysis purposes within other computational tools such as STK's Coverage capability, CommSystem, DeckAccess, and AdvCAT. Use the Lifetime Tool to determine approximately how long your satellites will remain in orbit. Use the Generate TLE tool to create a TLE of your satellie.
What you will learn
Upon completion of this tutorial, you will understand how to:
- implement the Satellite Collection object
- use the Walker Tool
- use Chains
- use the Lifetime Tool
- generate a TLE (Two Line Element) file
Video guidance
Watch the following video. Then follow the steps below, which incorporate the systems and missions you work on (sample inputs provided).
Creating a new scenario
First, you must create a new STK scenario and then build from there.
- Launch STK (
 ).
). - Click
 Create a Scenario in the Welcome to STK dialog box.
 - Enter the following in the STK: New Scenario Wizard:
- Click when you finish.
- Click Save (
 ) when the scenario loads. STK creates a folder with the same name as your scenario for you.
 - Verify the scenario name and location in the Save As dialog box.
- Click .
| Option | Value |
|---|---|
| Name: | Satellite_Constellation |
| Location: | Default |
| Start: | Default |
| Stop: | Default |
Save (![]() ) often during this lesson!
) often during this lesson!
Disabling Terrain Server
Analytical and visual terrain is not required in this analysis.
- Right-click on Satellite_Constellation () in the Object Browser.
- Select Properties (
 ).
). - Select the Basic - Terrain page when the Properties Browser opens.
- Clear Use terrain server for analysis.
- Click to accept your change and to close the Properties Browser.
Inserting a Place object
Begin by inserting a Place (![]() ) object that functions as your ground station. This location is the main target for your analysis.
) object that functions as your ground station. This location is the main target for your analysis.
- Select Place (
 ) in the Insert STK Objects tool.
 - Select the From City Database (
 ) method.
 - Click the .
- Type Colorado Springs in the Name: field when the Search Standard Object Data dialog box opens.
- Click .
- Select Colorado Springs - Colorado - USA in the Results: list.
- Click .
- Click to close the Search Standard Object Data dialog box.
Create a seed satellite (Imaging Satellite)
The Walker Tool makes it easy to generate a Walker constellation using the Two Body, J2, J4, or SGP4 orbit propagators. First, define a satellite with the characteristics and orbit you need. The original satellite that is used to create the Walker constellation is referred to as the “Seed” satellite. The satellites generated using the Walker tool are referred to as children. Use the Orbit Wizard to create the “seed” satellite from which the other satellites will be derived.
- Insert a Satellite (
 ) object using the Orbit Wizard (
 ) method.
 - Set the following in the Orbit Wizard:
- Click to save your changes, to close the Orbit Wizard and to propagate Leo_Sat ().
| Option | Value |
|---|---|
| Type: | Circular |
| Satellite Name: | Leo_Sat |
| Inclination: | 90 deg |
| Altitude: | 550 km |
Creating a Satellite Collection object
You can use the Walker Tool to create a Satellite Collection (![]() ) object in STK or to add a shell to an existing satellite collection.
) object in STK or to add a shell to an existing satellite collection.
- Insert a SatelliteCollection (
 ) object using the Walker Tool () method.
Walker Tool
The Walker Tool automatically generates a satellite collection subset for each plane and an additional subset that includes all the satellites. Since all the satellites in the constellation have the same period and inclination, the satellite collection considers them to be in one shell. The Walker Tool assigns the seed satellite as the reference object for all entries in the shell.
- Click when the Walker Tool opens.
- Select Leo_Sat () in the Select Object dialog box.
- Click to close the Select Object dialog box.
- Set the following in the Walker Tool:
- Type Leo_Sats in the Name field in the Container Options panel.
- Click .
- Click to close the Walker tool.
- Clear the Leo_Sat () check box in the Object Browser.
| Option | Value |
|---|---|
| Type: | Delta |
| Number of Sats per Plane | 9 |
| Number of Planes: | 5 |
You don't need to see Leo_Sat (![]() ) in the 2D and 3D Graphics windows.
) in the 2D and 3D Graphics windows.
View the constellation of satellites in the 3D Graphics window
The satellites appear as dots in both the 2D and 3D Graphics window. You can adjust their size if required.
- Open Leo_Sats () properties ().
- Select the Graphics - Attributes page when the Properties Browser opens.
- Change AllSatellites Marker Size to 7.
- Click to accept your change and to close the Properties Browser.
- Bring the 3D Graphics window to the front.
- Click Start (
 ) in the Animation toolbar to animate the scenario.
 - Click Reset (
 ) when you are finished.
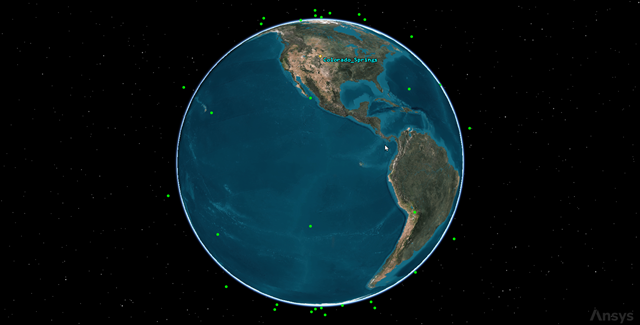
Walker Constellation
Inserting a Chain object
A chain is a list of objects (either individual or grouped into constellations or satellite collection subsets) in order of access.
- Insert a Chain object (
 ) using the Define Properties () method.
 - Select the Basic - Definition page when the Properties Browser opens.
Selecting the start and end objects
The first step in building your Chain (![]() ) object is selecting the start and end objects of the chain.
) object is selecting the start and end objects of the chain.
- Click the Start Object: ellipsis (
 ).
). - Select AllSatellites (
 ) in the Select Object dialog box.
 - Click to close the Select Object dialog box.
- Click the End Object: ellipsis (
 ).
). - Select Colorado_Springs () in the Select Object dialog box.
- Click to close the Select Object dialog box.
- Click to accept your changes and to keep the Properties Browser open.
Building connections
The next step is to build the Chain (![]() ) object connections.
) object connections.
- Click in the Connections panel.
- Click the From Object: ellipsis ().
- Select AllSatellites () in the Select Object dialog box.
- Click to close the Select Object dialog box.
- Click the To Object: ellipsis ().
- Select Colorado_Springs () in the Select Object dialog box.
- Click to close the Select Object dialog box.
- Click to accept your changes and to close the Properties Browser.
Renaming the Chain object
- Right-click on Chain () in the Object Browser.
- Select Rename in the shortcut menu.
- Rename Chain1 () to LeoSats_to_COS.
Generate a complete chain access report
Generate a Complete Chain Access report to analyze whether or not you have coverage during your scenario analysis period. A complete chain access reports the time intervals for which the chain is completed. These intervals are computed by overlapping all the strand accesses.
- Right-click on LeoSats_to_COS () in the Object Browser.
- Select Report & Graph Manager... (
 ) in the shortcut menu.
 - Select the Complete Chain Access (
 ) report in the Styles list when the Report & Graph Manager opens.
 - Click .
- Examine the data.
- Close the report when finished.
- Click to close the Report & Graph Manager.
Your analysis period is 24 hours or 86400 seconds. Do you have access from the constellation of satellites to your ground site?
Lifetime Tool
If the satellites do not conduct any maneuvers to stay in orbit, then after a period of time the surveillance satellites fall out of orbit and enter the atmosphere. You can view this information using the Lifetime tool which estimates the amount of time a satellite can be expected to remain in orbit before atmospheric drag and other perturbations cause it to decay.
Since all the satellites in Leo_Sats (![]() ) constellation have similar orbits, you can use the Lifetime Tool and Leo_Sat (
) constellation have similar orbits, you can use the Lifetime Tool and Leo_Sat (![]() ) to estimate how long the new constellation of satellites should remain in orbit.
) to estimate how long the new constellation of satellites should remain in orbit.
The algorithms behind the Lifetime tool are designed to compute an estimate of duration of time that a satellite will remain in orbit when re-entry is not imminent. This tool is not designed to produce a precise time or location of re-entry. Full fidelity orbit propagation methods such as those available in HPOP and Astrogator are better suited for re-entry prediction. The Lifetime tool is available only for Satellites orbiting Earth.
- Clear the LeoSats_To_COS () check box in the Object Browser.
- Clear the Leo_Sats () check box in the Object Browser.
- Select the Leo_Sat () check box in the Object Browser.
- Select Leo_Sat () in the Object Browser.
- Open the Satellite menu item.
- Select Lifetime... .
- Click when the Life time tool opens.
- Examine the results in the Information dialog box.
- Click to close the Information dialog box.
- Click to close the Lifetime tool.
The information predicts how long the satellite remains in orbit without any adjustments.
Generate a TLE file
With a better understanding of the mission and the assets in the mission, you can extract the satellite's orbital information into a TLE file. This is a standard format type for predicting the positioning of a satellite over a length of time. You can use this data format to further the analysis in other tools or to share the results. You will use the Generate TLE tool to create your file.
- Select Leo_Sat () in the Object Browser.
- Open the Satellite menu item.
- Select the Generate TLE... .
- Click in the Reports panel of the Generate TLE tool.
- Close the report when finished.
- Click to close the Generate TLE tool.
Clicking provides the TLE set generated using the Generate TLE tool. You can save this report if desired for later use.
With your TLE file you can remodel this orbit in a new scenario or share it to expand your research.
Summary
You used a Satellite Collection (![]() ) object and the Walker Tool to create a constellation of satellites. You represented the entire constellation of satellites as a single object in STK which provided basic visualization, a minimal memory footprint, and efficient save and load operations. You inserted a Place (
) object and the Walker Tool to create a constellation of satellites. You represented the entire constellation of satellites as a single object in STK which provided basic visualization, a minimal memory footprint, and efficient save and load operations. You inserted a Place (![]() ) object which functioned as your ground site to which the satellites will pass information to in the future. You inserted a Chain (
) object which functioned as your ground site to which the satellites will pass information to in the future. You inserted a Chain (![]() ) object which allowed you to determine when satellites in the constellation had access to the ground site. You used to Lifetime Tool to obtain an approximate time when the seed satellite of your constellation will reenter the Earth's atmosphere. You ended the scenario by creating a TLE of the seed satellite that can be used in other scenarios.
) object which allowed you to determine when satellites in the constellation had access to the ground site. You used to Lifetime Tool to obtain an approximate time when the seed satellite of your constellation will reenter the Earth's atmosphere. You ended the scenario by creating a TLE of the seed satellite that can be used in other scenarios.
Saving your work
- Close any open reports, tools and properties.
- Save (
 ) your work.