Part 4:
STK Pro, STK Premium (Air), STK Premium (Space), or STK Enterprise
You can obtain the necessary licenses for this tutorial by contacting AGI Support at support@agi.com or 1-800-924-7244.
The results of the tutorial may vary depending on the user settings and data enabled (online operations, terrain server, dynamic Earth data, etc.). It is acceptable to have different results.
Capabilities covered
This lesson covers the following STK Capabilities:
- STK Pro
Problem Statement
Engineers and operators often need resources to prepare visual presentations for briefings, talks, speeches and demonstrations. In this scenario, an aircraft is flying an important mission that you wish to simulate using a video and an STK Visual Data File.
Solution
Upon completion of this tutorial, you will learn how to:
- Create a simple movie that can be embedded in a PowerPoint presentation or played for an audience.
- Convert an STK scenario into a visual data file (VDF).
- Display the VDF in STK Viewer, which does not require an STK license.
- Create a first-rate briefing experience for both the presenter and the audience.
What you will learn
Upon completion of this tutorial, you will be able to:
- Make movies with STK
- Create Visual Data Files
- Use STK Viewer
Video guidance
Watch the following video. Then follow the steps below, which incorporate the systems and missions you work on (sample inputs provided).
Creating a new scenario
Create a new scenario.
- Launch STK (
 ).
). - Click
 Create a Scenarioin the Welcome to STK dialog box.
 - Enter the following in the STK: New Scenario Wizard:
- When you finish, click .
- Click Save (
 ) once the scenario loads. A folder with the same name as your scenario is created for you in the location specified above.
 - Verify the scenario name and location and click .
| Option | Value |
|---|---|
| Name | STK_Movies_VDFs |
| Location | Default |
| Start | 1 Mar 2023 23:00:00.000 |
| Stop | + 4 hrs |
Save (![]() ) often during this lesson!
) often during this lesson!
Post-typhoon aerial photography flight route
You will simulate an aircraft's flight route across Japanese airspace. Your aircraft will fly over the following islands and cities in the order shown:
- Naha, Okinawa
- Amami Oshima, Kagoshima
- Minamidaito, Okinawa
- Back to Naha, Okinawa
Inserting Naha Airport as a Place object
- Select Place (
 ) in the Insert STK Objects Tool.
 - Select the Search by Address () method.
- Click
- Type Naha Airport in the Enter an address or other search criteria below field in the STK: Insert by Address dialog box.
- Select Naha Airport, Japan (latitude 26.19583, longitude 127.64583).
- Click .
The Insert by Address option requires an internet connection. If you do not have an internet connection, you can select the Define Properties option and set the lat/lon manually.
Inserting Amami Oshima as a Place object
- Type Amami in the Enter an address or other search criteria below field.
- Select Amami, Japan (latitude 28.37724 longitude 129.49374).
- Click .
Inserting Minamidaito as a Place object
- Type Minamidaito in the Enter an address or other search criteria below field.
- Select Minamidaito, Japan (latitude 25.82889 longitude 131.23187).
- Click .
- Click to close the STK: Insert by Address dialog box.
Using the Label Declutter option
Label Declutter moves labels away from the central body and towards the viewer, keeping the labels from being obscured by the terrain.
- Click Properties (
 ) in the 3D Window Defaults tool bar.
 - Select the Details page when the Properties Browser opens.
- Select the Enable check box in the Label Declutter panel.
- Click to accept your change and to close the Properties Browser.
Inserting an Aircraft object
You will insert an Aircraft (![]() ) object. Adjust the altitude, speed, turn radius, and attitude.
) object. Adjust the altitude, speed, turn radius, and attitude.
- Insert an Aircraft (
 ) object using the Insert Default () method.
 - Right-click Aircraft1 () in the Object Browser.
- Select Rename.
- Rename Aircraft1 () to PhotoMission.
- Bring the 2D Graphics window to the front.
- Maximize the 2D Graphics window.
- Zoom in to the 2D Graphics window so that all three Place () objects are visible and centered.
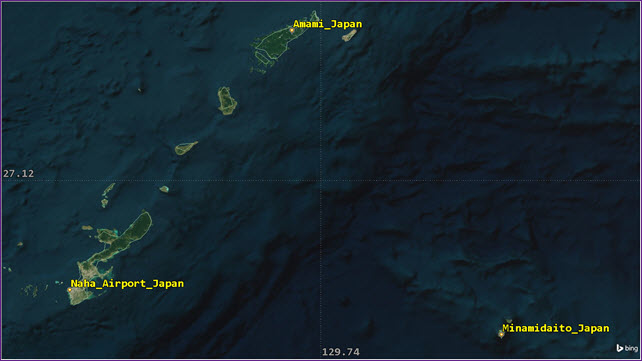
Maximized View of Islands
Modifying the Aircraft object's properties
- Right-click PhotoMission () in the Object Browser.
- Select Properties ().
- Select the Basic - Route page when the Properties Browser opens.
- Open the Reference drop-down menu in the Altitude Reference panel.
- Select MSL (Mean Sea Level).
- Bring the 2D Graphics window to the front by clicking the 2D Graphic... tab near the bottom of STK.
Clicking the tab is a safe way to bring the 2D Graphics window to the front when you have an Aircraft (![]() ) object's properties open and you are on the Basic - Route page. If you inadvertently click the 2D window map, you will create a waypoint.
) object's properties open and you are on the Basic - Route page. If you inadvertently click the 2D window map, you will create a waypoint.
Creating waypoints for the Aircraft object
To keep things simple and focus on movie making and creating VDFs, you'll use the "clicking the 2D Graphics window" method to create waypoints for PhotoMission (![]() ). By clicking the 2D Graphics window, you won't fly to precise locations. You'll fly to the point you clicked. Start at Naha.
). By clicking the 2D Graphics window, you won't fly to precise locations. You'll fly to the point you clicked. Start at Naha.
- Click as close as you can to the Naha Place () object symbol's point in the 2D Graphics window.
- Click as close as you can to the Amami Place () object symbol's point.
- Click as close as you can to the Minamidaito Place () object symbol's point.
- Click as close as you can to the Naha Place () object symbol's point.
- Return to PhotoMission's () properties by clicking the PhotoMission... tab () below the 2D Graphics window.
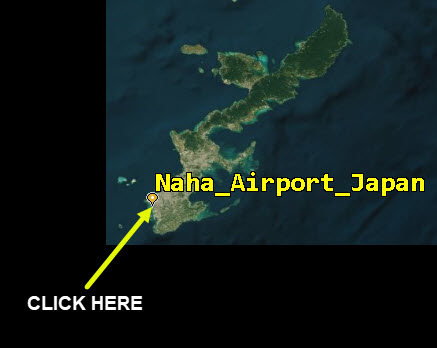
Click the Place Object Symbol's Sharp Point
Due to the default turn radius, your waypoints won't be overhead of Amami or Minamidaito. You'll fix that shortly.
Adjusting the aircraft's altitude, speed, and turn radius
Adjust the altitude, speed, and turn radius.
- Click .
- Select the Altitude, Speed, and Turn Radius check boxes in the Set All Grid Values dialog box.
- Set the following:
- Click to close the Set All Grid Values dialog box.
- Click to save your changes and to keep the Properties Browser open.
- Return to the 2D Graphics window.
| Option | Value |
|---|---|
| Altitude | 10000 ft |
| Speed | 200 mi/hr |
| Turn Radius | 1 km |
Notice that by creating a smaller turn radius, PhotoMission is much closer to the waypoints. You could further adjust them in the 3D Graphics window using the 3D Object Editing tool if desired.
Adjusting the attitude
Define the attitude profile for PhotoMission (![]() ) by using a coordinated turn.
) by using a coordinated turn.
- Return to PhotoMission's () properties ().
- Select the Basic - Attitude page.
- Open the Type drop-down menu in the Basic panel.
- Select Coordinated Turn.
- Click to save your changes and to keep the Properties Browser open.
Changing the Aircraft object's model
PhotoMission's (![]() ) model is a glTF (GL Transmission Format) model that looks similar to a Boeing 737. Here, you will learn to change it to a smaller model that resembles a two-engine turbo prop aircraft.
) model is a glTF (GL Transmission Format) model that looks similar to a Boeing 737. Here, you will learn to change it to a smaller model that resembles a two-engine turbo prop aircraft.
- Select the 3D Graphics - Model page.
- Click the Model File ellipsis (
 ) in the Model panel.
 - Select the commuter.glb file in the File dialog box.
- Click .
- Click to save your changes and to keep the Properties Browser open.
- Select the Basic - Route page.
Preparing the Scene
There are many ways to create a movie inside of STK. For the purposes of this movie, you'll use just one of them.
The second point (waypoint) is when PhotoMission (![]() ) is over Amami_Japan (
) is over Amami_Japan (![]() ). You will make a movie that begins ten (10) seconds prior to and ends ten (10) seconds after the waypoint's time. Jump to the waypoint's time. Your time will be different than the time showed in the example.
). You will make a movie that begins ten (10) seconds prior to and ends ten (10) seconds after the waypoint's time. Jump to the waypoint's time. Your time will be different than the time showed in the example.
- Go to the Time cell of point two.
- Click in the cell to select the time.
- Press Ctrl + C (copy) on your keyboard.
- Highlight the time in the Current Scenario Time field in the Animation Toolbar.
- Press Ctrl + V (paste) on your keyboard.
- Press the Enter key on your keyboard.
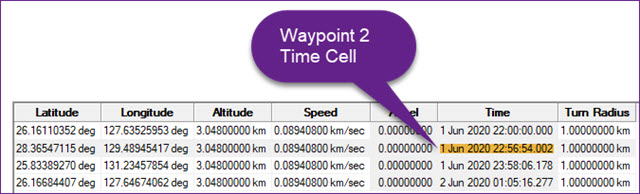
Waypoint 2 Time Cell
Viewing in 3D
- Bring the 3D Graphics window to the front
- Right-click PhotoMission () in the Object Browser.
- Select Zoom To.
- Using your mouse, set up the view so that you can see both PhotoMission () and Amami_Japan ().
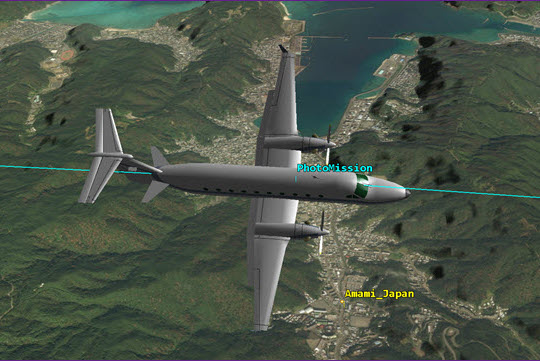
PhotoMission and Amami_Japan Example
Editing PhotoMission's properties
- Return to PhotoMission's () properties ().
- Select the 2D Graphics - Attributes page.
- Clear the following check boxes in the Inheritable Settings panel:
- Inherit from Scenario
- Show Route
- Show Route Marker
- Click to save your changes and to keep the Properties Browser open.
- Bring the 3D Graphics window to the front.
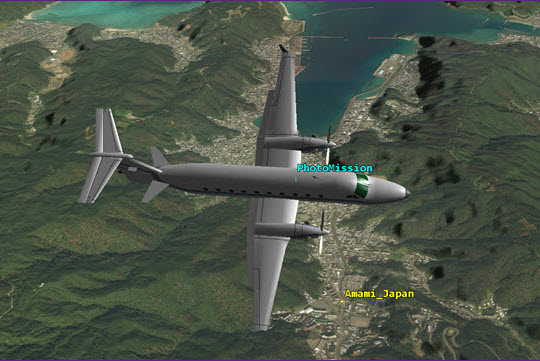
PhotoMission Without Flight Route Line
3D Graphics Data Display
Placing important dynamic data that is displayed on the 3D Graphics window enhances both the movie and the presentation.
- Return to PhotoMission's () properties ().
- Select the 3D Graphics - Data Display page.
- Select the Show check box for Show LLA Position (Latitude, Longitude, Altitude). You can make changes to its Position and Appearance if desired.
- Click to accept your changes and to close the Properties Browser.
3D Graphics window size
The 3D Graphic window has to be set at certain sizes when you make a movie. For instance, a good size to set the window for a movie you'll place on a PowerPoint slide is 640 x 480. This isn't the only size you can use, but for this scenario, stick with this. If your 3D Graphics window is maximized, you need to restore the window to normal size.
- Return to the 3D Graphics window.
- Ensure the window returns to its normal size by clicking the icon for Restore the window to normal size.
Setting Animation Time
Earlier, you set your animation time to the second waypoint, which is in the Current Scenario Time field. You will start the movie 10 (ten) seconds prior to that time. The following is an example of what to do:
- Assume the time in the Current Scenario Time field is 1 Mar 2023 23:56:20.123.
- Round down ten seconds earlier to the nearest integer 1 Mar 2023 23:56:10.000.
Now apply this to your scenario.
- Round down the time by ten seconds in the Animation Toolbar Current Scenario Time field.
- Press Enter on your keyboard.
- Make sure you're satisfied with your view. Once you start recording the movie, do not touch the 3D Graphics window.
Creating a Stored View
- Click Stored Views (
 ) in the 3D Graphics window toolbar.
 - Click in the Stored View: 3D Graphics 1 - Earth dialog box.
- Set the View Name to "Movie Time".
- Click to close the the Stored View: 3D Graphics 1 - Earth dialog box.
- Click X Real-time Animation Mode (
 ) in the Animation toolbar.
By creating this view, if you were to Reset (![]() ) your scenario, you can quickly jump back to this time and view in the 3D Graphics window.
) your scenario, you can quickly jump back to this time and view in the 3D Graphics window.
Using the Movie Timeline Plugin
The Movie Timeline Plugin helps you record animations from STK. You can also record a movie using 3D Graphics window properties where It is found on the Record Movie page. In this scenario, use the Movie Timeline Plugin. There are a lot of features in the Movie Timeline Plugin, but to keep things simple, you'll use the Record from the Movie Timeline button.
- Open the View menu at the top of STK.
- Select Toolbars in the drop-down menu.
- Select Movie Timeline in the second drop-down menu. You should now see the Movie Timeline toolbar.
- Click Record (
 ) in the Movie Timeline tool bar.
Movie Wizard
The Movie Wizard will help you walk through important steps in creating your movie.
On the left side are pages starting with Filename & Format. For a straightforward way to make a movie, follow the sequence below from top to bottom.
Choosing a directory and format for your movie
Save your movie in your scenario directory using H.264 format.
- Select the Filename & Format page.
- Click in the Choose the filename to use during movie recording panel.
- Browse to your scenario folder (e.g., C:\Users\<username>\Documents\STK_ODTK 13\STK_Movies_VDFs).
- Change File name to any name you desire (e.g., First Movie.h264).
- Click .
- Leave the format as a H.264 (.mp4).
- Click .
Selecting a graphics window to record
You can select which window you are recording. You're recording the 3D Graphics window.
- Ensure the 1 - 3D Graphics 1 - Earth option is selected.
- Click .
Changing the resolution
Here, you resize the 3D Graphics window using preset sizes.
- Open the Preset drop-down menu in the Choose the resolution of the recorded movie panel.
- Select Large.
- Click .
For this to work, the 3D Graphics window needs to be restored to normal size (which you accomplished previously). If your 3D Graphics window is maximized, you will receive a "WINDOW SIZE MISMATCH" error.
This is a very common mistake that people make. If you receive this error, you will need to restore the 3D Graphics window to normal size.
Using advanced camera controls
If you're making a more advanced movie using paths created with the 3D Camera Control Toolbar, you would select the path you want to record.
- Ensure your 3D Graphics window is using your stored view. If required, return to the 3D Graphics window toolbar, extend the Stored Views drop-down menu to select Movie Time.
- Return to the Movie Wizard.
- Select None (use current view).
- Click .
Setting the video time and length
Take your time on this page. It's important to follow these steps:
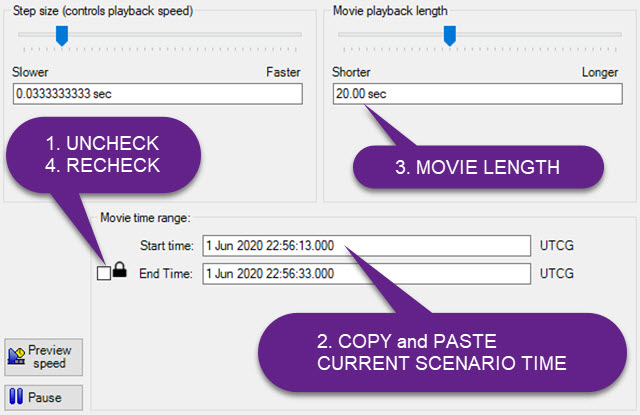
Time & Length Steps
- Clear the black lock (
 ) check box.
 - Copy (Ctrl + C) the time in the Current Scenario Time field.
- Paste (Ctrl + V) it in the Start time field of the Movie time range section.
- Highlight the time and units in the Shorter / Longer field of the Movie playback length section.
- Enter the value 20 into the Shorter / Longer field.
- Press the Tab key on your keyboard. This will automatically enter sec (seconds) and change the End Time in the Movie time range section to twenty (20) seconds past the Start time.
- Select the black lock () check box.
- Click .
Setting the video size and quality
In the 3D Graphics window, aliasing is the process by which smooth curves and other lines become jagged because the resolution of the graphics device or file is not high enough to represent a smooth curve. Antialiasing is a technique for diminishing jagged stair-step-like lines that you want to be smooth.
- Extend the Anti-aliasing drop-down menu to view the settings.
- Leave the default setting of 3x3 - Good Quality.
- In the Recorded image quality, and estimated file size field, change Quality to High Quality @ 1080. This adjusts the bitrate and changes the estimated maximum size of the recorded movie.
- Click .
Starting your recording
Here you can view the summary and go back to make any changes you feel are necessary. Remember, it's a good idea not to manipulate the 3D Graphics window once the recording begins.
You can enable the Record in parallel option to use STK's Parallel Computing ability.
- Click () once you are prepared to record. Sit back and wait until the recording is complete.
- Click when you are prompted to view the recording.
- When you are finished admiring your Oscar-winning creation, close the media player and return to STK.
- Click in the Movie Wizard.
Resetting the scenario animation time
In the Movie Wizard, creating the start and stop time of your movie sets those times in the Scenario (![]() ) objects Basic - Time Animation field. It's a good idea to reset these time so that you can animate your complete analysis time (in this case four hours).
) objects Basic - Time Animation field. It's a good idea to reset these time so that you can animate your complete analysis time (in this case four hours).
- Open STK_Movies_VDFs (
 ) properties ().
 - Select the Basic - Time page.
- Select the following check boxes in the Animation panel:
- Use Analysis Start Time
- Use Analysis Stop Time
- Click to select your changes and close the Properties Browser.
Creating reports with your video
When you create a video of your scenario for a presentation or briefing, you can generate reports using STK to support your claims. Create a couple of reports that you can use in a briefing:
- Right-click PhotoMission () in the Object Browser.
- Select Access (
 ) in the drop-down menu.
 - When the Access tool opens, select all three Place () objects in the Associated Objects list.
- Click
 .
. - Click in the Reports panel.
Saving as Quick Reports
- Click Save as quick report (
 ) in the access report tool bar.
 - Close the access report.
- Click in the Reports panel.
- Click Save as quick report () in the AER report tool bar.
- Close the AER report and the Access Tool.
Converting a Visual Data File (VDF)
You can convert your STK 3D scenarios to Visual Data (.vdf) files so that you can do the following:
- Display them in STK Viewer:
- Load and edit them in STK Viewer:
- Load, edit, and save them as a scenario file (.sc) in STK:
Checking your scenario folder
- Open Windows File Explorer.
- Browse to your scenario folder (e.g., C:\Users\<username>\Documents\STK_ODTK 13\STK_Movies_VDFs).
- Close Windows File Explorer.
- Reset (
 ) the scenario.
 - Zoom To PhotoMission ().
- Save () your scenario.
Other than the movie you stored here, all the files you see are being used in the STK scenario. The more objects in your scenario, the more files you will see here. When you create a VDF of your scenario, it combines all these files into one file.
Creating a VDF
The VDF Setup tool is small, but there's a lot going on.
- Open the File menu at the top of STK.
- Select VDF Setup...
- Select the Exclude Install Files check box when the VDF Setup for Scenario STK_Movies_VDFs dialog box opens.
- Click for each time the Question window appears.
- Look at Custom/User data. Use this to select the scenario files and non-STK files (.doc and .XLS files, for example) to be included with the VDF file.
- Look at Quick Reports For STK Viewer. These reports will be available if using STK Viewer during your presentation.
- Click
- Ensure the Save in location points to your scenario folder.
- Click .
Enable Exclude Install Files to reduce the VDF size by excluding files that are part of the STK install from the VDF.
Opening STK Viewer
STK Viewer is an application for displaying the visual results of analyses performed and authored by STK users. When you install any STK application package, STK Viewer is also installed on your computer. Anyone can download STK Viewer from the AGI Website for free and install it on a different computer.
- Minimize STK.
- Double-click STK Viewer 12 on your Desktop.
- Accept the licensing agreement if it's the first time opening STK Viewer.
Opening the VDF
- Open the File menu when STK Viewer opens.
- Select Open... in the drop-down menu.
- Click STK Viewer User when the Open Package dialog box appears.
- Open the STK_Movies_VDFs folder.
- Open the STK_Movies_VDFs.vdf file.
- Explore STK Viewer.
- Close STK Viewer once you are done.
This takes you to the default folder for saving your scenarios. If you are storing your scenarios in a different location, you will need to browse to that location.
STK Viewer only shows the 3D Graphics window. If you explore, you'll find that your stored views and quick reports are available. During the briefing preparation, you can create multiple stored views showing scenes important to your audience. You can save multiple quick reports of data and graphs available for the presentation. Animation functionality is available too.
Another great feature of STK Viewer is that you can embed it into PowerPoint and Web Pages.
Summary
![]() ) object, building its flight route, and changing the model to match the actual mission aircraft. Preparing the movie scene, you removed lines and points, kept labels, and created a 3D Graphics data display to enhance situational awareness showing important latitude, longitude and altitude data dynamically. Setting the 3D Graphics window to normal size, you created a stored view of the time and view of when the movie would start and what you wanted to see in the movie.
) object, building its flight route, and changing the model to match the actual mission aircraft. Preparing the movie scene, you removed lines and points, kept labels, and created a 3D Graphics data display to enhance situational awareness showing important latitude, longitude and altitude data dynamically. Setting the 3D Graphics window to normal size, you created a stored view of the time and view of when the movie would start and what you wanted to see in the movie.
Continue to Lesson Five: Introduction to Connect.
On your own
Throughout the tutorial, hyperlinks were provided that pointed to in-depth information of various subjects. Now's a good time to go back through this tutorial and view that information. Create new movies using paths and articulations. Change settings in the Movie Wizard to see how they change the quality of your movie. Learn how embedding STK viewer into PowerPoint and web pages enhances these media forms. Explore and have fun!