Tutorial |
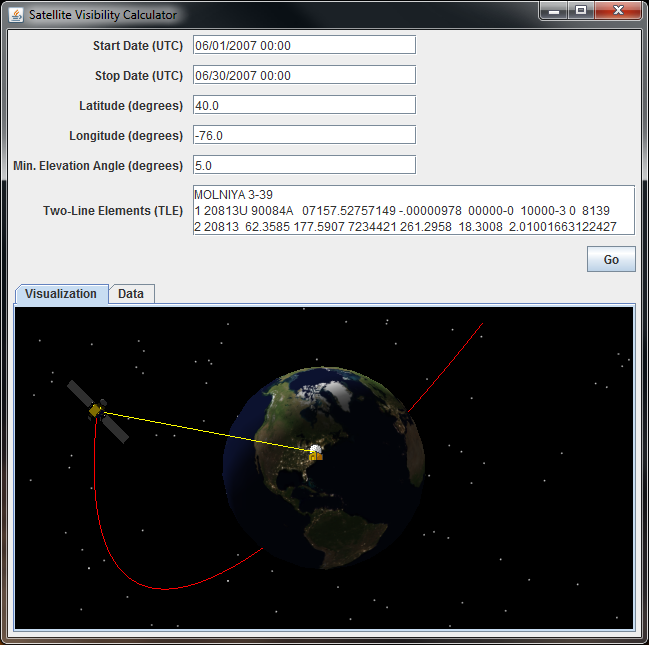
This tutorial takes you step by step through the process of using DME Component Libraries to develop a Java application in Eclipse, or any other Java IDE. When you are finished, you will have created a Satellite Visibility Calculator that lets you generate a schedule of viewing opportunities for a selected satellite from a specified location, including the entry and departure azimuth of each visibility interval:
Among other things, this application provides a good illustration of the use of the classes and methods that DME Component Libraries makes available for computing access (visibility) between objects.
Setting up the project includes adding references to DME Component Libraries and importing data files to be used in azimuth calculations and visualization.
Create a new project in your Java IDE of choice, naming it whatever you like. In Eclipse, this is done by choosing New, then Java Project from the File menu.
After your project is created, you'll need to add the DME Component Libraries JAR files to your project's classpath. In Eclipse, this is done by right-clicking your project, and choosing Build Path, then Configure Build Path.... In the resulting dialog, choose the Libraries tab, then click Add External JARs..., navigate to your DME Component Libraries JARs, then select them all, and click OK.
You will also need to configure the location of the Insight3D native library. In Eclipse, this is also done in the Configure Build Path... dialog. Find the agi.foundation.graphics JAR file in the list, expand it, select Native library location, click Edit, click External Folder..., navigate to the directory where your DME Component Libraries JARs are located, and select it. The native DLL is also in this directory, next to the JARs.
Copy your AGI.Foundation.lic file (either a temporary license from AGI support or the license you purchased) into the project as well. Place it in the top level of your new project's source directory. In Eclipse, if you used the defaults when creating your project, this will be a folder called src. Make sure that the file appears in the src folder in Eclipse by selecting your project and pressing F5, or right-clicking and choosing Refresh.
Copy facility.png and hs601.mdl into the directory that will be the working directory of your application when you run it. In Eclipse, this is the project directory itself. These files are used to represent the facility and the satellite for the visualization component of the application. facility.png can be found in the Examples\HowTo\Data\Markers subdirectory under the DME Component Libraries install location, and hs601.mdl can be found in Examples\HowTo\Data\Models.
The user interface for this application is shown at the beginning of the tutorial. Consult that illustration as necessary when creating the controls.
At the top right corner of each of the code blocks below is a copy icon. Simply click that icon to place the code block on the clipboard, then paste the code into the appropriate location in your source code file. |
Create a subclass of JFrame named VisibilityCalculator. If you are using an IDE with a graphical layout builder tool, you can use it to create and layout the necessary controls. Otherwise, see below for some basic layout code which you can use instead.
Create a constructor for VisibilityCalculator which sets the title to "Satellite Visibility Calculator", sets the default close operation to EXIT_ON_CLOSE, then creates the following controls:
A JTextField named startDateBox, with a JLabel containing the text "Start Date (UTC)"
A JTextField named stopDateBox, with a JLabel containing the text "Stop Date (UTC)"
A JTextField named latitudeBox, with a JLabel containing the text "Latitude (degrees)"
A JTextField named longitudeBox, with a JLabel containing the text "Longitude (degrees)"
A JTextField named elevationBox, with a JLabel containing the text "Min. Elevation Angle (degrees)"
A JTextArea named tleBox, with 3 rows, with a JLabel containing the text "Two-Line Elements (TLE)"
A JButton named goButton, with text "Go"
A JTabbedPane to contain the Insight3D control and the tabular data.
An Insight3D control.
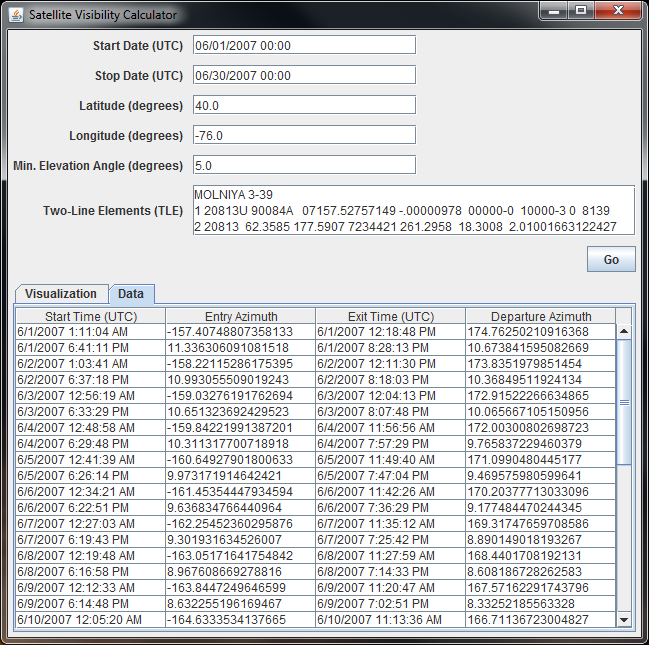
A JTable named table, with a custom table model of type ViewingOpportunitiesTableModel, and a corresponding JScrollPane. (see the code below for clarity)
Inside the VisibilityCalculator constructor, add a new action listener for the Go button, and call the method performCalculation, which will be defined below. Add a call to the method setupVisualization (also defined below), which will create objects needed for the Insight3D visualization of the results. Put try/catch blocks around the calls to performCalculation and setupVisualization, which will display any exception information in a dialog, and prevent the error from crashing the program.
Javaprivate JTextField startDateBox; private JTextField stopDateBox; private JTextField latitudeBox; private JTextField longitudeBox; private JTextField elevationBox; private JTextArea tleBox; private JButton goButton; private JTabbedPane resultsPane; private ViewingOpportunitiesTableModel tableModel; private JTable table; public VisibilityCalculator() { setDefaultCloseOperation(JFrame.EXIT_ON_CLOSE); setTitle("Satellite Visibility Calculator"); Container contentPane = getContentPane(); contentPane.setLayout(new GridBagLayout()); Insets defaultInsets = new Insets(5, 5, 5, 5); GridBagConstraints labelConstraints = new GridBagConstraints(); labelConstraints.insets = defaultInsets; labelConstraints.gridx = 0; labelConstraints.anchor = GridBagConstraints.LINE_END; GridBagConstraints controlConstraints = new GridBagConstraints(); controlConstraints.insets = defaultInsets; controlConstraints.gridx = 1; controlConstraints.anchor = GridBagConstraints.LINE_START; contentPane.add(new JLabel("Start Date (UTC)"), labelConstraints); startDateBox = new JTextField(20); contentPane.add(startDateBox, controlConstraints); contentPane.add(new JLabel("Stop Date (UTC)"), labelConstraints); stopDateBox = new JTextField(20); contentPane.add(stopDateBox, controlConstraints); contentPane.add(new JLabel("Latitude (degrees)"), labelConstraints); latitudeBox = new JTextField(20); contentPane.add(latitudeBox, controlConstraints); contentPane.add(new JLabel("Longitude (degrees)"), labelConstraints); longitudeBox = new JTextField(20); contentPane.add(longitudeBox, controlConstraints); contentPane.add(new JLabel("Min. Elevation Angle (degrees)"), labelConstraints); elevationBox = new JTextField(20); contentPane.add(elevationBox, controlConstraints); contentPane.add(new JLabel("Two-Line Elements (TLE)"), labelConstraints); tleBox = new JTextArea(3, 40); JScrollPane tleBoxScrollPane = new JScrollPane(tleBox); contentPane.add(tleBoxScrollPane, controlConstraints); GridBagConstraints buttonContraints = new GridBagConstraints(); buttonContraints.anchor = GridBagConstraints.LINE_END; buttonContraints.insets = defaultInsets; buttonContraints.gridx = 0; buttonContraints.gridwidth = GridBagConstraints.REMAINDER; goButton = new JButton("Go"); contentPane.add(goButton, buttonContraints); resultsPane = new JTabbedPane(); resultsPane.setPreferredSize(new Dimension(575, 350)); Insight3D insight = new Insight3D(); resultsPane.addTab("Visualization", insight); tableModel = new ViewingOpportunitiesTableModel(); table = new JTable(tableModel); JScrollPane scrollPane = new JScrollPane(table); table.setFillsViewportHeight(true); resultsPane.addTab("Data", scrollPane); GridBagConstraints resultsConstraints = new GridBagConstraints(); resultsConstraints.fill = GridBagConstraints.BOTH; resultsConstraints.insets = defaultInsets; resultsConstraints.gridx = 0; resultsConstraints.weightx = 0.5; resultsConstraints.weighty = 0.5; resultsConstraints.gridwidth = GridBagConstraints.REMAINDER; contentPane.add(resultsPane, resultsConstraints); goButton.addActionListener(new ActionListener() { @Override public void actionPerformed(ActionEvent e) { try { performCalculation(); } catch (Exception ex) { showErrorDialog(ex); } } }); try { setupVisualization(); } catch (Exception ex) { showErrorDialog(ex); } pack(); }
Create class named Main, with a main method, which - on the Event Dispatch Thread - constructs a VisibilityCalculator, and sets it to be visible.
Javapublic class Main { public static void main(String[] args) { SwingUtilities.invokeLater(new Runnable() { @Override public void run() { new VisibilityCalculator().setVisible(true); } }); } }
In this section we will add the code necessary to run the application. In the next section we will run it.
First, add the following variable declarations to the class definition to store user input values, to render primitives in the scene, and compute data for the animation:
Java// for user input values. private double longitude; private double latitude; private double minimumElevationAngle; private TwoLineElementSet tle; private JulianDate startDate; private JulianDate endDate; // for animation. private ModelPrimitive satellite; private MarkerBatchPrimitive facility; private PolylinePrimitive orbitLine; private PolylinePrimitive accessLine; private List<Cartesian> orbitPoints; // for access computation and animation update. private Platform satellitePlatform; private Platform facilityPlatform; private PointEvaluator satellitePositionEvaluator; private AxesEvaluator satelliteOrientationEvaluator; private PointEvaluator facilityInertialEvaluator; private TimeIntervalCollection accessIntervals;
Then, we need to create a class to hold data about satellite visibility periods, which will be our results. Make a new nested class ViewingOpportunity within VisibilityCalculator:
Javaprivate static class ViewingOpportunity { public JulianDate StartDate; public JulianDate EndDate; public double ApproachAzimuth; public double DepartureAzimuth; }
Next, we need to create the custom Swing table model we referred to above, which will allow us to easily display a list of ViewingOpportunity objects in tabular form. Make this class a nested class within VisibilityCalculator:
Javaprivate static class ViewingOpportunitiesTableModel extends AbstractTableModel { private static final long serialVersionUID = 1L; private List<ViewingOpportunity> viewingOpportunities = new ArrayList<ViewingOpportunity>(); private static final String[] labels = new String[] { "Start Time (UTC)", "Entry Azimuth", "Exit Time (UTC)", "Departure Azimuth" }; @Override public int getColumnCount() { return labels.length; } @Override public String getColumnName(int column) { return labels[column]; } @Override public int getRowCount() { return viewingOpportunities.size(); } @Override public Object getValueAt(int rowIndex, int columnIndex) { switch (columnIndex) { case 0: return viewingOpportunities.get(rowIndex).StartDate.toGregorianDate().toString(); case 1: return viewingOpportunities.get(rowIndex).ApproachAzimuth; case 2: return viewingOpportunities.get(rowIndex).EndDate.toGregorianDate().toString(); case 3: return viewingOpportunities.get(rowIndex).DepartureAzimuth; default: return null; } } public void setViewingOpportunities(List<ViewingOpportunity> viewingOpportunities) { this.viewingOpportunities = viewingOpportunities; fireTableDataChanged(); } }
This class represents the model for a table containing 4 columns, and one row per ViewingOpportunity class. When the setViewingOpportunities method is called after we compute our results, the fireTableDataChanged method will cause the entire JTable to be redrawn, displaying the new results.
Create the showErrorDialog method that we referred to earlier.
Javaprivate static void showErrorDialog(Exception e) { e.printStackTrace(); StringWriter sw = new StringWriter(); e.printStackTrace(new PrintWriter(sw)); JTextArea textArea = new JTextArea(sw.toString()); JScrollPane scrollPane = new JScrollPane(textArea); scrollPane.setPreferredSize(new Dimension(700, 300)); textArea.setEditable(false); JOptionPane.showMessageDialog(null, scrollPane, "Unhandled Exception", JOptionPane.ERROR_MESSAGE); }
Because Insight3D is not thread-safe, it is important to avoid letting any exception propagate out into the AWT Event Dispatching Thread and terminate it.
Create the setupVisualization method that we referred to earlier.
Javaprivate void setupVisualization() { // Get the Earth central body - we need it to compute the approach and // departure azimuths, the position of the satellite in the earth's reference // frame, and the satellite's orientation axis. EarthCentralBody earth = CentralBodiesFacet.getFromContext().getEarth(); // Create satellite model and polylines for the scene. satellite = new ModelPrimitive("hs601.mdl"); satellite.setReferenceFrame(earth.getInertialFrame()); orbitLine = new PolylinePrimitive(PolylineType.LINE_STRIP, SetHint.FREQUENT); orbitLine.setReferenceFrame(earth.getInertialFrame()); accessLine = new PolylinePrimitive(PolylineType.LINES, SetHint.FREQUENT); accessLine.setReferenceFrame(earth.getInertialFrame()); // Create marker to represent the facility in the scene. facility = new MarkerBatchPrimitive(SetHint.INFREQUENT); facility.setRenderPass(MarkerBatchRenderPass.TRANSLUCENT); facility.setTexture(SceneManager.getTextures().fromUri("facility.png")); // Create the list of points for the orbit polyline. orbitPoints = new ArrayList<Cartesian>(); // Add TimeChanged event handler to the SceneManager SceneManager.addTimeChanged(new EventHandler<TimeChangedEventArgs>() { @Override public void invoke(Object sender, TimeChangedEventArgs e) { timeChanged(sender, e); } }); }
To get the central body, we call the getFromContext method to get an instance of CentralBodiesFacet from the calculation context, then use Earth (get) property, which returns an instance of EarthCentralBody.
The satellite is represented visually by a ModelPrimitive constructed using a MDL file.
The lines representing the satellite's orbit and access to the facility are defined by PolylinePrimitive. The orbit line is constructed with PolylineType.LINE_STRIP because each point will be connected to the previous one via a line segment. The access line is constructed with PolylineType.LINES because it will only be one line segment defined by two points, the location of the satellite and the location of the facility. Both lines are constructed with SetHint.FREQUENT because each primitive will be updated with a new set of points every time the TimeChanged (add / remove) event is raised.
A MarkerBatchPrimitive was chosen to represent the facility because it will stay a constant pixel size on the Earth however far the camera may be from the point. It is constructed with SetHint.INFREQUENT because it is not changed after being added to the scene. The texture is loaded using the Texture2DFactory obtained from the SceneManager.
The list of points for the orbit line is constructed.
An event handler (see below) is attached to the TimeChanged (add / remove) event to be notified when the SceneManager.Time (get / set) property changes.
Create the performCalculation method that we referred to earlier from the Go button's action listener.
Javaprivate void performCalculation() { startDate = GregorianDate.parse(startDateBox.getText()).toJulianDate(); endDate = GregorianDate.parse(stopDateBox.getText()).toJulianDate(); latitude = Double.parseDouble(latitudeBox.getText()); longitude = Double.parseDouble(longitudeBox.getText()); minimumElevationAngle = Double.parseDouble(elevationBox.getText()); tle = new TwoLineElementSet(tleBox.getText()); EarthCentralBody earth = CentralBodiesFacet.getFromContext().getEarth(); // Create an SGP4 propagator to propagate the TLE. Sgp4Propagator propagator = new Sgp4Propagator(tle); // Create a Platform for the satellite, including a Point representing the // position as reported by the propagator. The propagator produces raw // ephemeris, while the Point enables the results of propagation to work with // the GeometryTransformer in order to observe the ephemeris in different // reference frames. satellitePlatform = new Platform(); PropagatorPoint point = propagator.createPoint(); satellitePlatform.setLocationPoint(point); satellitePlatform.setOrientationAxes(new AxesVehicleVelocityLocalHorizontal(earth.getInertialFrame(), point)); // Create a facility at the view location. The longitude and latitude of the // facility's location are specified using radians, so convert degrees to // radians. Since we don't care about the orientation of the facility, we just use // Axes.Root. facilityPlatform = new Platform(); Cartographic location = new Cartographic(Trig.degreesToRadians(longitude), Trig.degreesToRadians(latitude), 0.0); facilityPlatform.setLocationPoint(new PointCartographic(earth, location)); facilityPlatform.setOrientationAxes(Axes.getRoot()); // Call method GetViewingOpportunities to calculate the viewing opportunities // from the input parameters. List<ViewingOpportunity> opportunities = getViewingOpportunities(); // Give the list of viewing opportunities to the table model for display. tableModel.setViewingOpportunities(opportunities); // Update the animation in the Insight3D component. updateVisualization(); }
JulianDate instances are created from the date and time values parsed from the user input, and double values for latitude, longitude and minimum elevation angle are parsed, along with the user-entered TLE. These values are then used in the getViewingOpportunities and createAccessEvaluator methods, presented below.
An Sgp4Propagator is created to propagate the TLE, a Platform object representing the satellite is created, and the LocationPoint (get / set) property is configured with the output of the propagator's createPoint method.
Another Platform representing the facility is created, and its LocationPoint (get / set) property is configured with a PointCartographic, which is created using Earth and a Cartographic object containing the user-entered latitude and longitude values (converted to radians using the degreesToRadians method) and a value of 0 for altitude.
The getViewingOpportunities method (see below) is called to populate a list of ViewingOpportunity objects containing start and end times and approach and departure azimuth values for each visibility period.
The resulting list is set in our custom table model, which will handle the redisplay of the data in the table.
The updateVisualization method (see below) is called to reset the animation to account for any new data that was entered.
 Note
NoteThis exercise is intended only to illustrate the use of selected DME Component Libraries types. It does not necessarily follow coding standards that would apply to a fully developed application. Among other things, the above code includes only minimal error handling. Also, the code uses hard-coded strings, making localization to another language and/or locale difficult.
Add a method to retrieve information about visibility periods:
Javaprivate List<ViewingOpportunity> getViewingOpportunities() { EarthCentralBody earth = CentralBodiesFacet.getFromContext().getEarth(); // Use the CreateAccessEvaluator method below to create an AccessEvaluator object. AccessEvaluator accessEval = createAccessEvaluator(); // Compute the time intervals when the viewing location is able to see the // satellite. AccessQueryResult accessResult = accessEval.evaluate(startDate, endDate); accessIntervals = accessResult.getSatisfactionIntervals(); // Get an evaluator to find the topographic azimuth, elevation, and range of the // satellite as observed by the viewing location. We'll use this evaluator to // evaluate the AER at the start and end of each viewing opportunity interval. VectorTrueDisplacement vector = new VectorTrueDisplacement(facilityPlatform.getLocationPoint(), satellitePlatform.getLocationPoint()); MotionEvaluator1<AzimuthElevationRange> aerEvaluator = earth.getAzimuthElevationRangeEvaluator(vector); List<ViewingOpportunity> results = new ArrayList<ViewingOpportunity>(); // Copy the output intervals to the return structure. for (TimeInterval interval : accessIntervals) { ViewingOpportunity opportunity = new ViewingOpportunity(); opportunity.StartDate = interval.getStart(); opportunity.EndDate = interval.getStop(); // Compute the azimuth of the satellite observed from the viewing location at // the start of the interval. AzimuthElevationRange aer = aerEvaluator.evaluate(interval.getStart()); opportunity.ApproachAzimuth = Trig.radiansToDegrees(aer.getAzimuth()); // Compute the azimuth of the satellite observed from the viewing location at // the end of the interval. aer = aerEvaluator.evaluate(interval.getStop()); opportunity.DepartureAzimuth = Trig.radiansToDegrees(aer.getAzimuth()); results.add(opportunity); } // Return the ViewingOpportunity instances. return results; }
We now begin to make direct use of several DME Component Libraries types. In the above code:
The createAccessEvaluator method (described below) is called to create a AccessEvaluator.
We now compute the visibility intervals. First, the evaluate method is called, passing the JulianDate values parsed above, which returns a AccessQueryResult object. Then, the SatisfactionIntervals (get) property is retrieved, which contains the time intervals over which access is valid.
An evaluator is needed to compute azimuth from the viewing location at the beginning and end of each visibility interval. We get one by calling the getAzimuthElevationRangeEvaluator method, passing the LocationPoint (get / set) properties of the two Platform objects (the satellite and facility) participating in the visibility computations, which returns a MotionEvaluator1<T>.
Finally, we iterate through the TimeIntervalCollection<T> containing the access intervals and create a list of ViewingOpportunity objects. For each interval of access, we convert the start and end date of each interval to a human-readable value in UTC, then evaluate the azimuth-elevation-range evaluator, by calling the evaluate-agi.foundation.time.JulianDate-int- method, to calculate the AzimuthElevationRange at the beginning and end of each interval. We then convert the azimuth to degrees, by calling the radiansToDegrees method, and store the information in our list of ViewingOpportunity objects.
Add the access computation method that was called by the previous method:
Javaprivate AccessEvaluator createAccessEvaluator() { // Create an Access constraint requiring that the satellite be above a particular // elevation angle relative to the local horizontal plane of the facility. ElevationAngleConstraint elevationAngleConstraint = new ElevationAngleConstraint(); elevationAngleConstraint.setMinimumValue(Trig.degreesToRadians(minimumElevationAngle)); elevationAngleConstraint.setMaximumValue(Constants.HalfPi); // Create the link for the ElevationAngleConstraint. It does not matter which is // the transmitter and which is the receiver, but the elevation angle constraint // must be applied to the facility. elevationAngleConstraint.setConstrainedLink(new LinkInstantaneous(satellitePlatform, facilityPlatform)); elevationAngleConstraint.setConstrainedLinkEnd(LinkRole.RECEIVER); //Create the access evaluator. An access evaluator generally needs a specified //observer. This is because access computations with light time delays can cause //different platforms to have different time intervals for the same constraints. //However, AccessQueries that are purely made out of instantaneous links (like here) //do not need a specified observer. return elevationAngleConstraint.getEvaluator(); }
This method returns the AccessEvaluator object needed by the getViewingOpportunities method. In the above code:
An ElevationAngleConstraint object is created, and its MinimumValue (get / set) property is configured with the user-entered value for the minimum elevation angle for visibility (converted to radians). See AccessConstraint for more information on the different types of access constraints.
We create a LinkInstantaneous object connecting the Platform objects representing the satellite and facility, then use that link to configure the ConstrainedLink (get / set) property of the ElevationAngleConstraint. Since the constraint is meant to apply to the facility, which is the receiver in our link, we set the ConstrainedLinkEnd (get / set) property to LinkRole.RECEIVER.
Finally, an AccessEvaluator is created from the constraint.
Add a method to update the Insight3D visualization:
Javaprivate void updateVisualization() { // Reset the Scene in case the button was pressed more than once. resetScene(); EarthCentralBody earth = CentralBodiesFacet.getFromContext().getEarth(); // Get the starting position and orientation of the satellite and set the global // evaluators for the TimeChanged event handler. satellitePositionEvaluator = GeometryTransformer.observePoint(satellitePlatform.getLocationPoint(), earth.getInertialFrame()); satelliteOrientationEvaluator = GeometryTransformer.getAxesTransformation( satellitePlatform.getOrientationAxes(), earth.getInertialFrame().getAxes()); facilityInertialEvaluator = GeometryTransformer.observePoint(facilityPlatform.getLocationPoint(), earth.getInertialFrame()); Cartesian satellitePosition = satellitePositionEvaluator.evaluate(startDate); UnitQuaternion satelliteOrientation = satelliteOrientationEvaluator.evaluate(startDate); satellite.setPosition(satellitePosition); satellite.setOrientation(satelliteOrientation); // Set the scale once, then add it to the Scene. satellite.setScale(Math.pow(10, 5)); SceneManager.getPrimitives().add(satellite); // Set the position once, then add it to the Scene. Cartographic facilityPosition = new Cartographic(Trig.degreesToRadians(longitude), Trig.degreesToRadians(latitude), 0.0); facility.setCartographic(earth, Arrays.asList(facilityPosition)); SceneManager.getPrimitives().add(facility); // Add the satellites initial position to the set of orbit points. orbitPoints.add(satellitePosition); SceneManager.getPrimitives().add(orbitLine); // Set up animation times. SimulationAnimation animation = (SimulationAnimation) SceneManager.getAnimation(); if (animation.getIsAnimating()) animation.reset(); animation.setTimeStep(new Duration(0, 5.0)); animation.setStartCycle(SimulationAnimationCycle.CONTINUE); animation.setEndCycle(SimulationAnimationCycle.LOOP); animation.setStartTime(startDate); animation.setEndTime(endDate); animation.setTime(startDate); // Start animation. animation.playForward(); }
Call the resetScene method (defined below) to remove the primitives from the scene in case the Go button has been clicked more than once.
Get a PointEvaluator that calculates the satellite's position in the Earth's inertial frame. This evaluator will be used to find the current position of the satellite at the current animation time.
Get a AxesEvaluator that calculates the rotation from the satellite's orientation to the Earth's inertial axes. This evaluator will be used to find the current orientation of the satellite at the current animation time.
Set the position and orientation of the primitive representing the satellite, and set the scale so it is visible while rotating the Earth, and add it to the list of primitives in the SceneManager to be rendered in the scene.
Set the position of the facility from the input latitude and longitude. The setCartographic method is used to set the position of the marker, and the marker is added to the list of primitives in the SceneManager to be rendered in the scene.
Add the satellites initial position to the set of orbit points, but we do not yet call the set method on the polyline because we only have one point in the polyline, which will generate an exception. The polyline is updated below in the TimeChanged (add / remove) event handler.
Configure the SceneManager.Animation (get / set) to set the StartTime (get / set), EndTime (get / set), and Time (get / set) properties based on the user input values, and configure other details of the animation. Call the playForward method to start the animation.
Add a method to reset the scene:
Javapublic void resetScene() { // If a satellite has been added to the SceneManager, // then all three primitives were added. if (SceneManager.getPrimitives().contains(satellite)) { SceneManager.getPrimitives().remove(satellite); SceneManager.getPrimitives().remove(facility); SceneManager.getPrimitives().remove(orbitLine); } // The polyline from the satellite to the facility is not always included // in the Scene, so must have its own check. if (SceneManager.getPrimitives().contains(accessLine)) { SceneManager.getPrimitives().remove(accessLine); } // Remove the current line representing the orbit. orbitPoints.clear(); }
Add the TimeChanged (add / remove) event handler:
Javaprivate void timeChanged(Object sender, TimeChangedEventArgs message) { // Should not execute if the scene is not animating so the event does not // interfere with the AccessComputation. if (satellitePositionEvaluator != null && satelliteOrientationEvaluator != null) { // Set the current position and orientation of the satellite at the current // time. satellite.setPosition(satellitePositionEvaluator.evaluate(message.getTime())); satellite.setOrientation(satelliteOrientationEvaluator.evaluate(message.getTime())); // Add the point to the list of polyline points. orbitPoints.add(satellite.getPosition()); orbitLine.set(orbitPoints); // If the satellite has access to the facility at the current time, render // a polyline from the satellite to the facility. if (accessIntervals.contains(message.getTime())) { List<Cartesian> accessPoints = new ArrayList<Cartesian>(); accessPoints.add(satellite.getPosition()); accessPoints.add(facilityInertialEvaluator.evaluate(message.getTime())); accessLine.set(accessPoints, Arrays.asList(Color.YELLOW, Color.YELLOW), RenderPassHint.OPAQUE); if (!SceneManager.getPrimitives().contains(accessLine)) { SceneManager.getPrimitives().add(accessLine); } } else { // Otherwise, remove any polyline from the satellite to the facility if it // exists. if (SceneManager.getPrimitives().contains(accessLine)) { SceneManager.getPrimitives().remove(accessLine); } } } }
Use the PointEvaluator to evaluate the position of the satellite at the current time, and the AxesEvaluator to evaluate its orientation. Set the position and orientation of the primitive representing the satellite, add the position to the list of orbit line points, and update the polyline primitive.
Call the TimeIntervalCollection.contains to determine whether the satellite has access to the facility at the current time, which determines whether to draw a line representing access between the satellite and facility.
If access is valid, create a list of Cartesian representing the positions of the facility and the satellite. Call the set method on the polyline representing access line to set the points and colors of the line. If the SceneManager does not contain the polyline already, then add it to the collection of primitives.
Otherwise, remove the access line from the SceneManager if it exists in the primitives collection.
We are now ready to test the application and see how it works:
Run the application in your IDE. In Eclipse, you can right-click the file containing Main in the Package Explorer, and select Run As, then Java Application.
Enter a date/time range, the latitude and longitude of the viewing site and the minimum elevation angle, i.e. the minimum angle above the horizon at which the satellite can be viewed.
Enter a Two-Line Element Set (TLE) to define the satellite's orbit. Numerous TLEs can be found at the CelesTrack website on the Current NORAD Two-Line Element Sets page. Simply copy and paste the TLE of interest into the text box.
TLE for testing: If you are not connected to the internet, or would like to test the application quickly without going online, the following TLE has tested successfully for a date range of October 1-31, 2016, a latitude of 40 degrees, a longitude of -76 degrees, and a minimum elevation angle of 5 degrees:
MOLNIYA 3-51
1 26867U 01030A   16284.58766364  .00798847 -62131-5  35507-3 0  9994
2 26867  62.4193 114.3286 6896909 268.1116  18.5859  2.87669386116495
Click the Go button.
If no results display, check the console for any exceptions, try another TLE or adjust your date/time range, viewing location and/or elevation angle.
A simple application has been used here to prevent the tutorial from becoming overly complex or lengthy. For more ambitious uses of DME Component Libraries see the other included Example Applications.