Data Source Importer
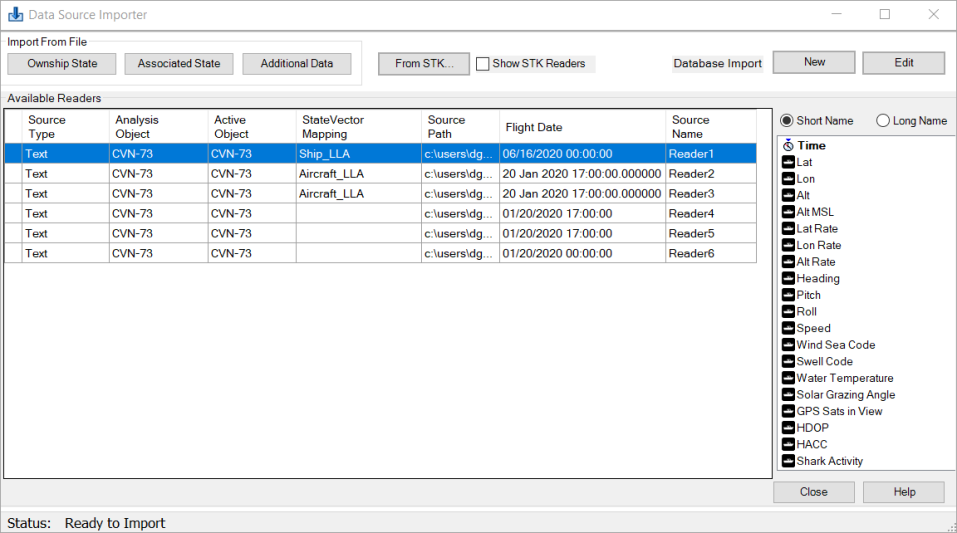
The Data Import Tool is the primary interface to link test data into a TETK scenario. When data sources are imported, TETK determines what data elements are available to load into the tool and displays this list for you.
The Available Readers section lists the readers currently loaded into the scenario and pertinent data such as Source Type, Analysis Object, State Vector Mapping, Source Path, Flight Date, and Source Name.
By default, readers for Analysis objects that were created from STK objects are hidden to avoid cluttering the display. STK Readers can be shown by enabling the Show STK Readers check box. For more information about STK Data Readers, see the STK Data Reader or the TETK Text Readers topic.
Navigating the Data Source Importer Screen
The table below describes the various buttons and options that are available on the Data Source Importer screen:
| Option | Description |
|---|---|
| Ownship State | Enables you to import external files that are used to generate ephemeris for the Analysis Object. |
| Associated State | Enables you to import external files that are used to generate ephemeris for objects that are not Ownships, for example, loading ephemeris data of target aircraft. Note that objects imported and created with this option use the model switching preferences to select a model, unless one is specified in the import dialog. |
| Additional Data | Enables you to import external files that are used for tasks that do not require that ephemeris be generated. |
| From STK... | Enables you to promote existing STK objects to analysis objects. If importing Facilities or Targets, you may be prompted to set the Analysis Time period. |
| Database Import | Clicking the and buttons enables you to import or edit data from a database, which supplies the data for a Data Reader Plugin. For details on using this feature, refer to the topic Importing Data from a Database. |
Importing a File
After clicking one of these buttons, a file selection box displays. You can choose one or more files to import. If you import a single file and it contains an AircraftID column, it may contain data for more than one object if the TSPI mapping specifies the ID column. If you import more than one file, then a prompt displays for the disposition of each file.
Additional Options
You can multi-select rows within the Data Import screen. You can also right-click a row to display a menu that provides the following options:
| Option | Description |
|---|---|
| Open File | Opens the file shown in the source path column using the operating system default application. |
| Open Containing Folder | Opens a file explorer to the directory containing the source path. |
| Apply Filter | Opens the same track filter ability as the Tracks Workflow. This is only available for ATC items from CTDF or text files. |
| Preview File | Displays a dialog box showing the name of the data, path, epoch, line count, number of column, etc. The button expands the dialog to show the row count, min/max, and units for each column. |
| Delete | Deletes the object from the Data Import Page and from STK. |
| Reload | Displays a file explorer, which enables you to reload existing or new data files from the Data Import screen. Reloading a new data file requires the mapped data columns to match the original source data. When performing a reload, all calculated or created scalars and Fight Analysis Tool elements refresh and update based on the selected data source. |
| View Import Properties | Opens a read-only version of the relevant import dialog displaying the settings used to initially create the data reader. |
After importing data, the right panel populates with the column names for the users data. You can select to display the Short Name or Long Name of these columns. The default selection is determined in the TE Settings page.
When importing data, TETK Toolkit will attempt to use the highest level of date precision available. See Appendix B - Date Handling for more information
Importing Ownship State
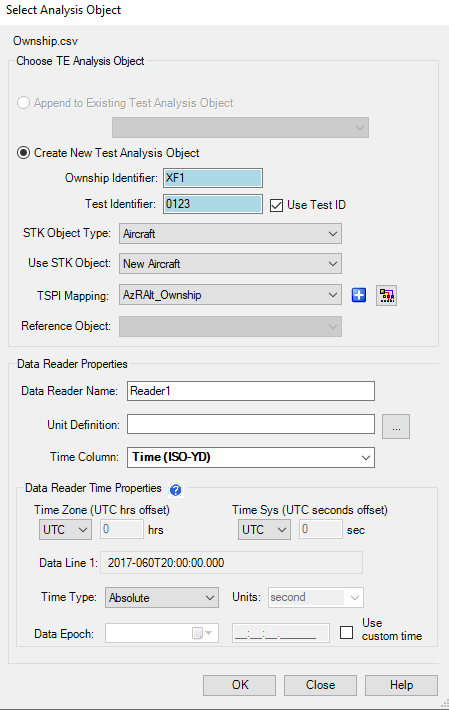
After selecting a file for import you are presented with the Select Analysis Object panel.
The tables below describes the fields of the Select Analysis Panel and how they are used:
| Field | Description |
|---|---|
| Append to Existing Test Analysis Object | If ephemeris for a vehicle is contained in multiple files this option may be selected and the ephemeris will be added to the existing object. |
| Create New Test Analysis Object | A new Analysis object will be created with the Ownship Identifier and Test Identifier separated by an underscore. The above example would create an aircraft named XF1_0123. The Test Identifier may be suppressed by unchecking Use Test ID. |
These fields will auto-populate if the file contains the Aircraft Metadata tag or Test Metadata tag. If an aircraft is imported with a TSPI mapping that has an AircraftID specified the AircraftID will be used for Ownship Identifier.
| Field | Description | |
|---|---|---|
| STK Object Type | Set the STK object type to be used for the Analysis Object. We currently support Aircraft, Satellites, Ships, Missiles, Launch Vehicles, and Ground Vehicles. The default model for the selected object type will be used if a switching preference isn’t satisfied. | |
| Use STK Object | Enables you to select an existing STK object of the specified type that has not been promoted to an Analysis Object. If the object has any preexisting ephemeris it will be replaced by whatever ephemeris is in the file. | |
| TSPI Mapping |
All valid TSPI Mappings for the file about to be imported are displayed here. If the combo box is empty a new mapping must be created by clicking the + button. You should review the mappings listed and choose the appropriate one. A valid mapping means that all fields in the mapping are in the data, not that all fields in the data are in the mapping.
TSPI mappings that contain an AircraftId will prevent you from naming the object. If you wish to define an object name, the mapping cannot contain AircraftId. |
|
| Reference Object | When importing Ownship or Associated State data, if the data is in XYZ or AzElR, then you must select an STK reference object to which the TSPI will be attached. | |
| Data Reader Name | A unique name may be provided for the data reader to be created. This name is displayed in the data importer. | |
| Unit Definition |
If the file about to be imported doesn’t contain units a unit definition file can be specified by clicking the Ellipsis button.
It is recommended that unit definition file names match the name of the associated TSPI file in the same directory. This will cause this field to auto-populate. For example: Ownship.csv would have an Ownship.def unit definition file. |
|
| Time Column | Enables you to specify which column in the file should be used for time. Columns that have a valid time mapping are presented in bold text. If a valid time mapping does not exist, you are prompted to create a mapping after clicking OK. | |
| Time Zone | Enables you to specify the time zone to use as an hours offset from UTC. | Note: Epoch metadata in file should be provided in UTC. |
| Time System | Enables you to specify the time system to use. The supported systems are UTC (default), GPSG, TAIG, and Other. | |
| Offsets | Use these fields to specify a local time offset. | |
| Data Line 1 | Displays the first row of the mapped time column from the file. | |
| Time Type |
Specifies if the selected time column is an Absolute Time format or a Relative Time format. |
|
| Units |
Only active if the Time type is set to Relative. Currently supports Day, Hour, Minute, Second, Millisecond, Nanosecond, HMS, DHMS, or Day Seconds. |
|
| Data Epoch | Becomes active after Time Type is set to Relative. All formats require you to set the date that the data started. For all formats other than HMS, DHMS, Day Seconds or DD-MMM-YYYY, the start time can be specified. Select the Use Custom Time check box to specify the start time. Fractional seconds default to a value of 0. | |
| Use Custom Time Step | Selecting this check box enables you to define a custom time in H:M:S.sss format. |
Upon completing the necessary fields and clicking OK, you will be prompted to set the scenario time span to that of the object if this is the first analysis object. If this is an additional analysis object, the prompt will enable you to set the scenario time span to the overall time span of current analysis objects. If you have more than one analysis object in the file and you choose this object, it will be the last object.
You can import the same file more than once with different TSPI Mapping and Time Column data. This is useful when multiple sets of data are in the same file.
Importing Associated State
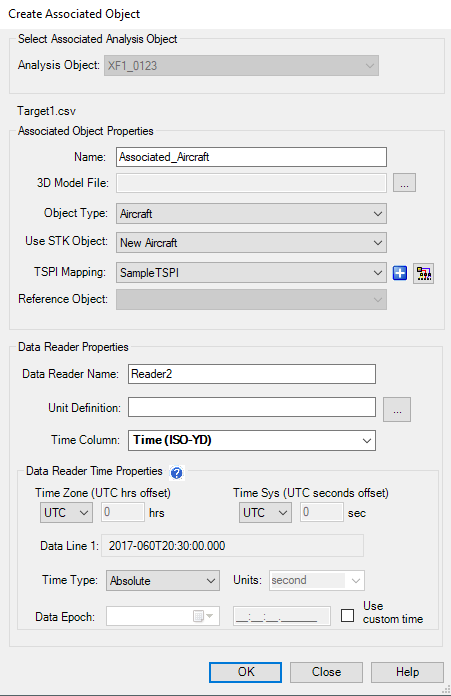
After selecting a file for import you are presented with the Create Analysis Object panel.
The tables below describes the fields of this panel and how they are used:
| Field | Description |
|---|---|
| Analysis Object | Analysis object to which the file should be associated. |
| Name | Name to be used for the associated object. |
| 3D Model File | Specify the model to be used. Note that when a model file is specified, the model switching preferences are overriden. |
| Object Type | Set the STK object type to be used for the Analysis Object. We currently support Aircraft, Satellites, Ships, Missiles, Launch Vehicles, and Ground Vehicles. |
| Use STK Object | Allows you to select an existing STK object of the specified type that has not been promoted to an Analysis Object. If the object has any preexisting ephemeris it will be replaced by whatever ephemeris is in the file. |
| TSPI Mapping | All valid TSPI Mappings for the file being imported is displayed here. If the combo box is empty, a new mapping must be created by clicking the button. |
| Data Reader Name | A unique name may be provided for the data reader about to be created. This name will be displayed in the data importer. |
| Unit Definition |
If the file about to be imported doesn’t contain units a unit definition file can be specified by clicking the Ellipsis button.
It is recommended that unit definition file names match the name of the associated TSPI file in the same directory. This will cause this field to auto-populate. For example, Ownship.csv would have an Ownship.def unit definition file in the same directory. |
| Time Column | Enables you to specify which column in the file should be used for time. Columns that have a valid time mapping will presented in bold text. If a valid time mapping does not exist you are prompted to create a mapping after clicking OK. |
| Time Zone | Enables you to specify the time zone to use as an hours offset from UTC. |
| Time System | Enables you to specify the time system to use. The supported systems are UTC (default), GPSG, TAIG, and Other. |
| Time Type |
Specifies if the selected time column is an Absolute Time format or a Relative Time format. |
| Units | Only active if the Time type is set to Relative. Currently supports Day, Hour, Minute, Second, Millisecond, Nanosecond, HMS, DHMS, or Day Seconds. |
| Data Epoch | Becomes active after the time type is set to Relative. All formats require you to set the date that the data started. For all formats other than HMS, DHMS, Day Seconds or DD-MMM-YYYY, the start time can be specified. Select the Use Custom Time check box to specify the start time. Fractional seconds default to a value of 0. If a flight date/time is not specified in the file then the GUI will populate with the current analysis time period. |
| Use Custom Time Step | Selecting this check box enables you to define a custom time in H:M:S.sss format. |
You can import the same file more than once with different TSPI Mapping and Time Column data. This is useful when multiple sets of data are in the same file.
Importing Additional Data
The table below describes the fields of the Select Analysis Object panel and how they are used:
| Field | Description |
|---|---|
| Analysis Object | Analysis object to which the file should be associated. |
| Data Reader Name | A unique name may be provided for the data reader about to be created. This name will be displayed in the data importer. |
| Unit Definition |
If the file about to be imported doesn’t contain units a unit definition file can be specified by clicking the Ellipsis button.
It is recommended that unit definition file names match the name of the associated TSPI file in the same directory. This will cause this field to auto-populate. For example, Ownship.csv would have an Ownship.def unit definition file in the same directory. |
| Time Column | Enables you to specify which column in the file should be used for time. Columns that have a valid time mapping will be presented in bold text. If a valid time mapping does not exist you are prompted to create a mapping after clicking OK. |
| Time Zone | Enables you to specify the time zone to use as an hours offset from UTC. |
| Time System | Enables you to specify the time system to use. The supported systems are UTC (default), GPSG, TAIG, and Other. |
| Time Type | Specifies whether the selected time column is an Absolute Time format or a Relative Time format. |
| Units | Only active if the Time type is set to Relative. Currently supports Day, Hour, Minute, Second, Millisecond, Nanosecond, HMS, DHMS, or Day Seconds. |
| Data Epoch | Becomes active once time type is set to Relative. All formats require you to set the date that the data started. For all formats other than HMS, DHMS, Day Seconds or DD-MMM-YYYY, the start time can be specified. Select the check box to specify the start time. If a flight date/time is not specified in the file then the GUI will populate with the current analysis time period. Fractional seconds default to a value of 0. |