Tutorial |
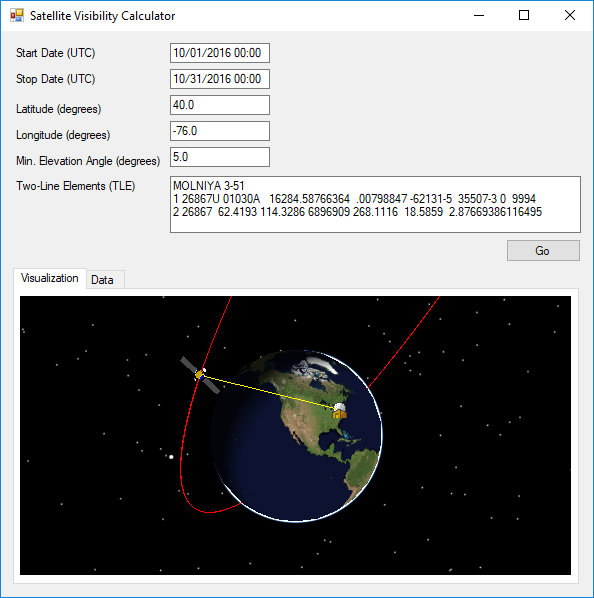
This tutorial takes you step by step through the process of using DME Component Libraries to develop a Windows application in Visual Studio. When you are finished, you will have created a Satellite Visibility Calculator that lets you generate a schedule of viewing opportunities for a selected satellite from a specified location, including the entry and departure azimuth of each visibility interval:
Among other things, this application provides a good illustration of the use of the classes and methods that DME Component Libraries makes available for computing access (visibility) between objects.
Setting up the project includes adding references to DME Component Libraries and importing data files to be used in azimuth calculations and visualization.
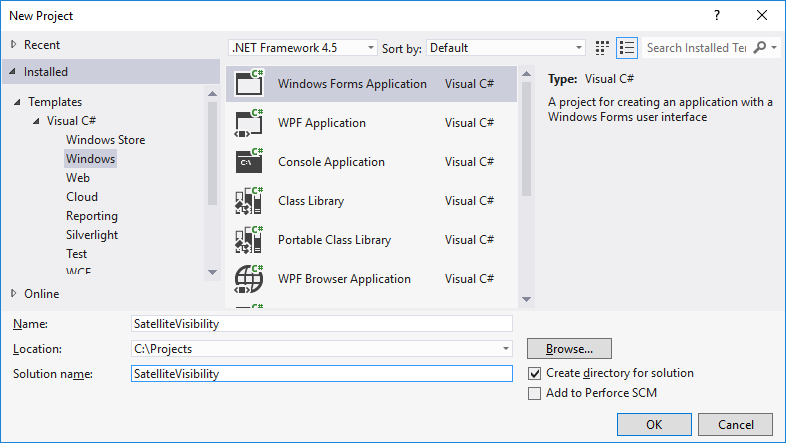
In Visual Studio 2017 or newer, select New, then Project... from the File menu.
In the New Project dialog, check to make sure that Framework drop-down is set to .NET Framework 4.6.2 or newer, then select Visual C# - Windows templates, and choose the Windows Forms Application template. Give your project a name, and click OK.
In the Solution Explorer, change the name of Form1.cs to a name based on your application name, such as SatelliteVisibility.cs. If a dialog appears asking if you want to perform a corresponding rename throughout the project, click Yes.
In the Solution Explorer, right-click on the References folder, and select Add Reference....
In the Add Reference dialog, click the Browse tab, find the Assemblies folder at the DME Component Libraries install location, select all the DLL files which start with AGI.Foundation, and click OK.
Right-click on the project in the Solution Explorer, select Add, then select Existing Item... from the context menu.
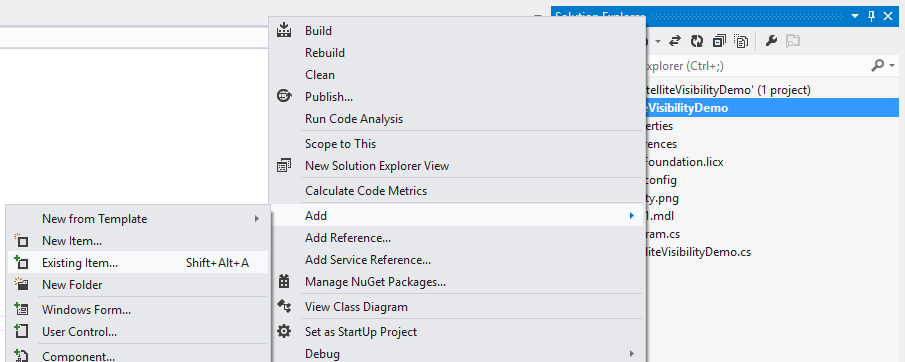
Set the filter to All Files (*.*), then browse to the Assemblies subdirectory under the DME Component Libraries install location, and select licenses.licx.
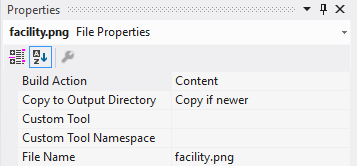
Also add facility.png and hs601.mdl, following the same procedure used to add the license file. These files are used to represent the facility and the satellite for the visualization component of the application. facility.png can be found in the Examples\HowTo\Data\Markers subdirectory under the DME Component Libraries install location, and hs601.mdl can be found in Examples\HowTo\Data\Models. After adding each file, select the file in the Solution Explorer and, in its Properties dialog, set the Copy to Output Directory property to Copy if newer.
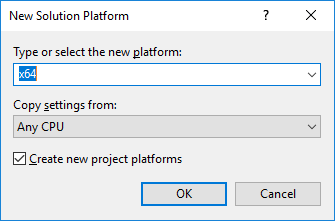
Configure the project to build a 64-bit application, because Insight3D only supports 64-bit. Select Build, Configuration Manager. Open the Active solution platform list, and select New....

Add a new x64 solution platform, and make sure the Create new project platforms checkbox is checked.
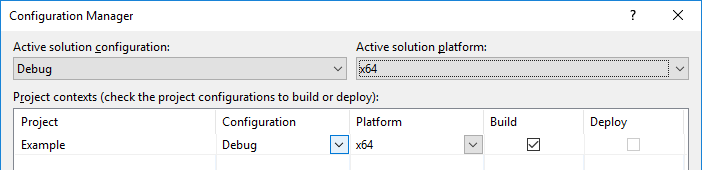
The result should be that your project is set to x64, as seen below.
The user interface for this application is shown at the beginning of the tutorial. Consult that illustration as necessary when sizing and positioning the controls you add to the Windows form.
The principal source file for your application should now be open in design view. Resize the form to approximately 600 x 600.
 Tip
TipSelect the form, open the Properties Window (from the View menu), and scroll down (as necessary) to the Size property to see the dimensions. When you are finished, it is a good idea to keep the Properties Window open. Its contents will change as you select different controls in design view.
Change the form's Text property to "Satellite Visibility Calculator".
Place 2 MaskedTextBox controls in the upper left area of the form (see above illustration) and place a Label to the left of each of them.
Place 3 TextBox controls immediately below the MaskedTextBox controls, and place a Label to the left of each of them.
Edit the Text properties of the 5 labels, from top to bottom, as follows:
Start Date (UTC)
Stop Date (UTC)
Latitude (degrees)
Longitude (degrees)
Min. Elevation Angle (degrees)
Select the topmost MaskedTextBox, find its Name property in the Properties Window, and change it to "StartBox". Similarly, rename the other MaskedTextBox to "StopBox"
Rename the 3 TextBox controls, from top to bottom, as "LatitudeBox", "LongitudeBox" and "ElevationBox".
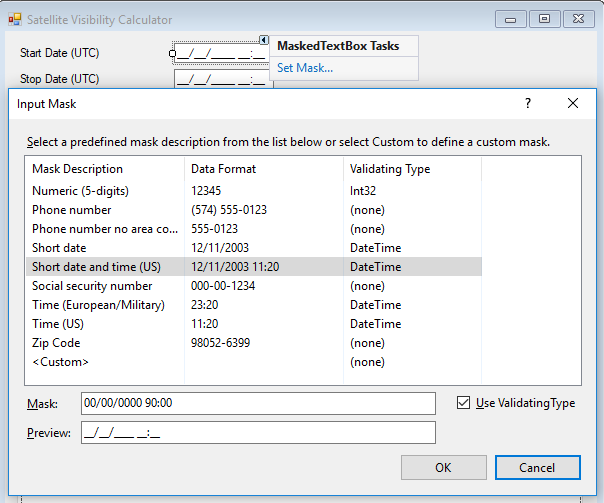
Select the topmost MaskedTextBox, click on the small triangle in the upper right corner of the control, and select Set Mask... from the context menu that appears. In the Input Mask dialog, select Short date and time (US), and click OK.
Similarly, set the mask for the other MaskedTextBox.
Add a new Label to the form, below the other 5, and change its Text property to "Two-Line Elements (TLE)".
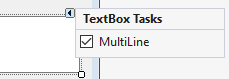
Add a TextBox to the right of the new Label, extending to the right edge of the form (see above illustration), and name it "TLEBox". Select the TextBox, click on the small triangle in its upper right corner, and enable the Multiline checkbox in the context menu.
Resize the TextBox so that it will accommodate 2-3 lines of text.
Add a Button, position it at a convenient location (e.g. where shown in the illustration), name it "GoButton", and change its Text property to "Go".
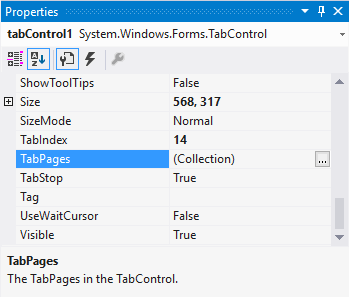
Add a TabControl, covering the bottom area of the form.
Select the TabPages field in the Properties window of the TabControl. Click the ... button that appears as shown below.
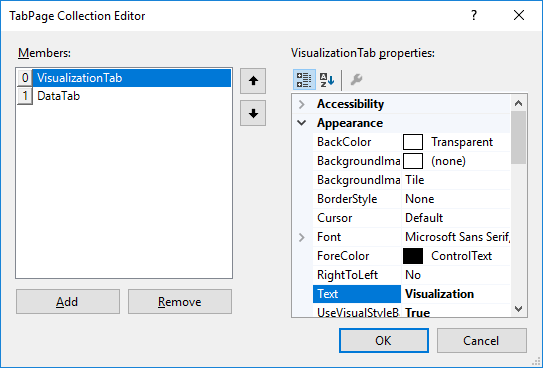
In the TabPage Collection Editor, set the Text property of the first tab to Visualization and the Text property of the second tab to Data.
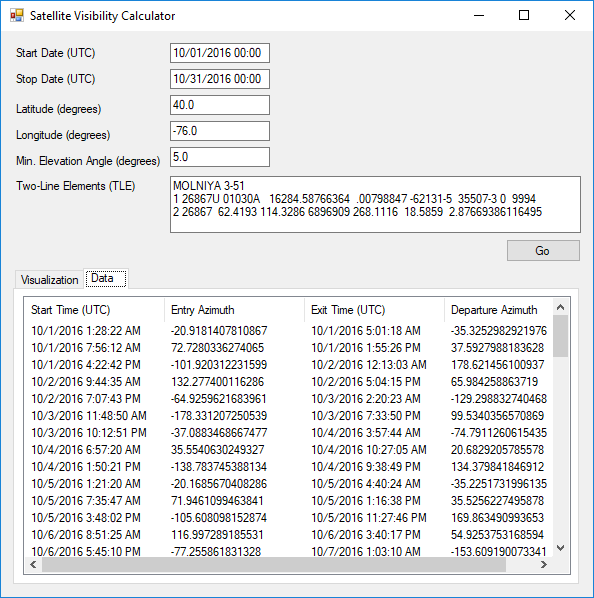
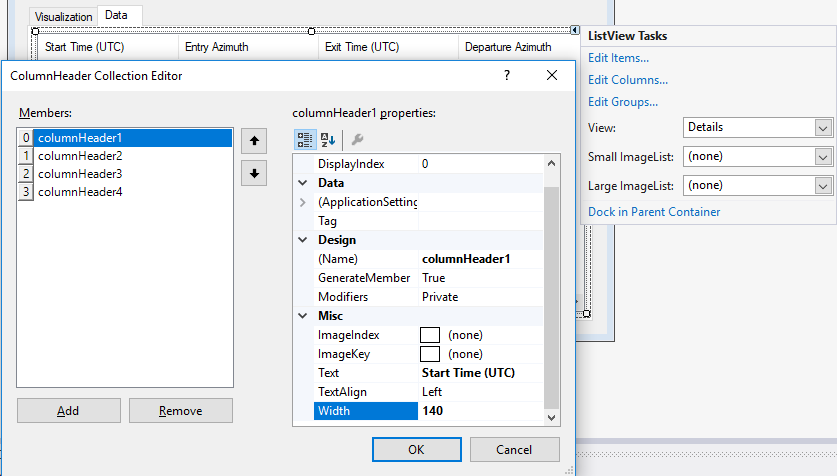
Add a ListView control to the second tab of the TabControl, covering the entire TabPage, and name it "OutputBox".
Select the ListView, click on the small triangle in its upper right corner, and, in the context menu that appears, select Details as the View option. Then click Edit Columns to display the ColumnHeader Collection Editor. Click the Add button to add the first column header, then set its Text property to "Start Time (UTC)" and its Width to about 140.
Click the Add button again, set the Text property of the new column to "Entry Azimuth", and set its width to about 140. Similarly, add "Exit Time (UTC)" and "Departure Azimuth" columns, each with a width of about 140. Click OK when you are done.
In this section we will add the code necessary to run the application. In the next section we will run it.
At the top right corner of each of the code blocks below is a copy icon. Simply click that icon to place the code block on the Windows clipboard, then paste the code into the appropriate location in your source code file. Note that, for clarity, the code blocks given here sometimes include code fragments that have already been inserted automatically by Visual Studio, such as the signature of a method and the closing curly brace. When copying these code blocks into your project, be sure to overwrite those fragments. |
Right-click the form in design view and select View Code to expose the class definition.
In the block of using directives at the top of the page, add the directives necessary to support the classes, methods and properties used in the application:
C#using System; using System.Collections.Generic; using System.Drawing; using System.Windows.Forms; //Add using directives for the DME Component Libraries namespaces: using AGI.Foundation; using AGI.Foundation.Access; using AGI.Foundation.Access.Constraints; using AGI.Foundation.Celestial; using AGI.Foundation.Coordinates; using AGI.Foundation.Geometry; using AGI.Foundation.Graphics; using AGI.Foundation.Graphics.Advanced; using AGI.Foundation.Platforms; using AGI.Foundation.Propagators; using AGI.Foundation.Time;
Add the following variable declarations at the beginning of the class definition to store user input values, to render primitives in the scene, and compute data for the animation:
C#// for user input values. private double longitude; private double latitude; private double minimumElevationAngle; private TwoLineElementSet tle; private JulianDate startDate; private JulianDate endDate; // for animation. private ModelPrimitive satellite; private MarkerBatchPrimitive facility; private PolylinePrimitive orbitLine; private PolylinePrimitive accessLine; private List<Cartesian> orbitPoints; // for access computation and animation update. private Platform satellitePlatform; private Platform facilityPlatform; private PointEvaluator satellitePositionEvaluator; private AxesEvaluator satelliteOrientationEvaluator; private PointEvaluator facilityInertialEvaluator; private TimeIntervalCollection accessIntervals; private Insight3D Insight3D;
In the constructor, following the call to InitializeComponent(), create the Insight3D control and add it to the VisualizationTab:
C#Insight3D = new Insight3D(); Insight3D.Location = new System.Drawing.Point(3, 6); Insight3D.Name = "Insight3D"; Insight3D.Size = new Size(551, 279); VisualizationTab.Controls.Add(Insight3D);
In design view, double-click on the Start Date MaskedTextBox to expose its MaskInputRejected event handler, and modify it as follows:
C#private void StartBox_MaskInputRejected(object sender, MaskInputRejectedEventArgs e) { MessageBox.Show("Time is specified incorrectly."); }
Similarly modify the MaskInputRejected event handler for the Stop Date MaskedTextBox.
In design view, double-click the form and modify its Load event handler as follows:
C#private void SatelliteVisibility_Load(object sender, EventArgs e) { // Get the Earth central body - we need it to compute the approach and departure azimuths, // the position of the satellite in the earth's reference frame, and the satellite's // orientation axis. EarthCentralBody earth = CentralBodiesFacet.GetFromContext().Earth; // Create satellite model and polylines for the scene. satellite = new ModelPrimitive("hs601.mdl"); satellite.ReferenceFrame = earth.InertialFrame; orbitLine = new PolylinePrimitive(PolylineType.LineStrip, SetHint.Frequent); orbitLine.ReferenceFrame = earth.InertialFrame; accessLine = new PolylinePrimitive(PolylineType.Lines, SetHint.Frequent); accessLine.ReferenceFrame = earth.InertialFrame; // Create marker to represent the facility in the scene. facility = new MarkerBatchPrimitive(SetHint.Infrequent); facility.RenderPass = MarkerBatchRenderPass.Translucent; facility.Texture = SceneManager.Textures.FromUri("facility.png"); // Create the list of points for the orbit polyline. orbitPoints = new List<Cartesian>(); // Add TimeChanged event handler to the SceneManager SceneManager.TimeChanged += TimeChanged; }
To get the central body, we call the GetFromContext method to get an instance of CentralBodiesFacet from the calculation context, then use Earth property, which returns an instance of EarthCentralBody.
The satellite is represented visually by a ModelPrimitive constructed using a MDL file.
The lines representing the satellite's orbit and access to the facility are defined by PolylinePrimitive. The orbit line is constructed with PolylineType.LineStrip because each point will be connected to the previous one via a line segment. The access line is constructed with PolylineType.Lines because it will only be one line segment defined by two points, the location of the satellite and the location of the facility. Both lines are constructed with SetHint.Frequent because each primitive will be updated with a new set of points every time the TimeChanged event is raised.
A MarkerBatchPrimitive was chosen to represent the facility because it will stay a constant pixel size on the Earth however far the camera may be from the point. It is constructed with SetHint.Infrequent because it is not changed after being added to the scene. The texture is loaded using the Texture2DFactory obtained from the SceneManager.
The list of points for the orbit line is constructed.
An event handler (see below) is attached to the TimeChanged event to be notified when the SceneManagerTime property changes.
In design view, double-click the Go button and modify its Click event handler as follows:
C#private void GoButton_Click(object sender, EventArgs e) { try { //Parse the text input from the boxes on the form into appropriate //class instances and store them in private variables. startDate = GregorianDate.Parse(StartBox.Text).ToJulianDate(); endDate = GregorianDate.Parse(StopBox.Text).ToJulianDate(); latitude = double.Parse(LatitudeBox.Text); longitude = double.Parse(LongitudeBox.Text); minimumElevationAngle = double.Parse(ElevationBox.Text); tle = new TwoLineElementSet(TLEBox.Text); EarthCentralBody earth = CentralBodiesFacet.GetFromContext().Earth; // Create an SGP4 propagator to propagate the TLE. Sgp4Propagator propagator = new Sgp4Propagator(tle); // Create a Platform for the satellite, including a Point representing the position // as reported by the propagator. The propagator produces raw ephemeris, while the // Point enables the results of propagation to work with the GeometryTransformer in // order to observe the ephemeris in different reference frames. satellitePlatform = new Platform(); PropagatorPoint point = propagator.CreatePoint(); satellitePlatform.LocationPoint = point; satellitePlatform.OrientationAxes = new AxesVehicleVelocityLocalHorizontal(earth.InertialFrame, satellitePlatform.LocationPoint); // Create a facility at the view location. The longitude and latitude of the facility's // location are specified using radians, so convert degrees to radians. // Since we don't care about the orientation of the facility, we just // use Axes.Root. facilityPlatform = new Platform(); Cartographic location = new Cartographic(Trig.DegreesToRadians(longitude), Trig.DegreesToRadians(latitude), 0.0); facilityPlatform.LocationPoint = new PointCartographic(CentralBodiesFacet.GetFromContext().Earth, location); facilityPlatform.OrientationAxes = Axes.Root; // Call method GetViewingOpportunities to calculate the viewing opportunities from // the input parameters. List<ViewingOpportunity> opportunities = GetViewingOpportunities(); // Clear all items from the Output box before writing anything new. OutputBox.Items.Clear(); // Write each viewing opportunity to the output box on the form. foreach (ViewingOpportunity opportunity in opportunities) { ListViewItem item = new ListViewItem(new[] { opportunity.StartDate.ToString(), opportunity.ApproachAzimuth.ToString(), opportunity.EndDate.ToString(), opportunity.DepartureAzimuth.ToString(), }); OutputBox.Items.Add(item); } // Update the animation in the Insight3D component. UpdateVisualization(); } catch { // If any of the input values could not be parsed... MessageBox.Show("Check your input values!"); } }
JulianDate instances are created from the date and time values parsed from the user input, and double values for latitude, longitude and minimum elevation angle are parsed, along with the user-entered TLE. These values are then used in the GetViewingOpportunities and CreateAccessQuery methods, presented below.
An Sgp4Propagator is created to propagate the TLE, a Platform object representing the satellite is created, and the LocationPoint property is configured with the output of the propagator's CreatePoint method.
Another Platform representing the facility is created, and its LocationPoint property is configured with a PointCartographic, which is created using Earth and a Cartographic object containing the user-entered latitude and longitude values (converted to radians using the DegreesToRadians method) and a value of 0 for altitude.
The GetViewingOpportunities method (see below) is called to populate a list of ViewingOpportunity objects containing start and end times and approach and departure azimuth values for each visibility period.
The data in each ViewingOpportunity object is displayed line by line in the ListView control on the GUI form.
The UpdateVisualization method (see below) is called to reset the animation to account for any new data that was entered.
NoteThis exercise is intended only to illustrate the use of selected DME Component Libraries types. It does not necessarily follow coding standards that would apply to a fully developed application. Among other things, the above code includes only minimal error handling. Also, the message box code uses hard-coded strings, making localization to another language and/or locale difficult.
Add the following class to hold data about satellite visibility periods:
C#public struct ViewingOpportunity { public GregorianDate StartDate; public GregorianDate EndDate; public double ApproachAzimuth; public double DepartureAzimuth; }
NoteThe above code block and the ones that follow are to be added to the class definition, e.g. after the click event handler for the Go button.
Add a method to retrieve information about visibility periods:
C#public List<ViewingOpportunity> GetViewingOpportunities() { EarthCentralBody earth = CentralBodiesFacet.GetFromContext().Earth; // Use the CreateAccessQuery method below to create an AccessQuery object. AccessQuery access = CreateAccessQuery(); //Create the access evaluator. An access evaluator generally needs a specified //observer. This is because access computations with light time delays can cause //different platforms to have different time intervals for the same constraints. //However, AccessQueries that are purely made out of instantaneous links (like here) //do not need a specified observer. AccessEvaluator evaluator = access.GetEvaluator(); // Compute the time intervals when the viewing location is able to see the satellite. AccessQueryResult accessResult = evaluator.Evaluate(startDate, endDate); accessIntervals = accessResult.SatisfactionIntervals; // Get an evaluator to find the topographic azimuth, elevation, and range of the satellite // as observed by the viewing location. We'll use this evaluator to evaluate the AER at the // start and end of each viewing opportunity interval. VectorTrueDisplacement vector = new VectorTrueDisplacement(facilityPlatform.LocationPoint, satellitePlatform.LocationPoint); MotionEvaluator<AzimuthElevationRange> aerEvaluator = earth.GetAzimuthElevationRangeEvaluator(vector); List<ViewingOpportunity> results = new List<ViewingOpportunity>(); // Copy the output intervals to the return structure. foreach (TimeInterval interval in accessIntervals) { ViewingOpportunity opportunity = new ViewingOpportunity(); // Convert the start and stop dates of the interval to UTC GregorianDate instances for // human-readable display. opportunity.StartDate = interval.Start.ToGregorianDate(); opportunity.EndDate = interval.Stop.ToGregorianDate(); // Compute the azimuth of the satellite observed from the viewing location // at the start of the interval. AzimuthElevationRange aer = aerEvaluator.Evaluate(interval.Start); opportunity.ApproachAzimuth = Trig.RadiansToDegrees(aer.Azimuth); // Compute the azimuth of the satellite observed from the viewing location // at the end of the interval. aer = aerEvaluator.Evaluate(interval.Stop); opportunity.DepartureAzimuth = Trig.RadiansToDegrees(aer.Azimuth); results.Add(opportunity); } // Return the ViewingOpportunity instances return results; }
We now begin to make direct use of several DME Component Libraries types. In the above code:
The CreateAccessQuery method (described below) is called to create an AccessQuery, and an AccessEvaluator is created from the AccessQuery.
We now compute the visibility intervals. First, the Evaluate method is called, passing the JulianDate values parsed above, which returns a AccessQueryResult object. Then, the SatisfactionIntervals property is retrieved, which contains the time intervals over which access is valid.
An evaluator is needed to compute azimuth from the viewing location at the beginning and end of each visibility interval. We get one by calling the GetAzimuthElevationRangeEvaluator method, passing the LocationPoint properties of the two Platform objects (the satellite and facility) participating in the visibility computations, which returns a MotionEvaluator<T>.
Finally, we iterate through the TimeIntervalCollection<T> containing the access intervals and create a list of ViewingOpportunity objects. For each interval of access, we convert the start and end date of each interval to a human-readable value in UTC, then evaluate the azimuth-elevation-range evaluator, by calling the Evaluate(JulianDate) method, to calculate the AzimuthElevationRange at the beginning and end of each interval. We then convert the azimuth to degrees, by calling the RadiansToDegrees method, and store the information in our list of ViewingOpportunity objects.
Add the access computation method that was called by the previous method:
C#public AccessQuery CreateAccessQuery() { // Create an Access constraint requiring that the satellite be above a particular elevation // angle relative to the local horizontal plane of the facility. ElevationAngleConstraint elevationAngleConstraint = new ElevationAngleConstraint(); elevationAngleConstraint.MinimumValue = Trig.DegreesToRadians(minimumElevationAngle); elevationAngleConstraint.MaximumValue = Constants.HalfPi; //Create a new link between the satellite and facility, and assign that link to the //elevation angle constraint. Then specify that the elevation angle constraint applies //to the receiving end of the link (the facility). LinkInstantaneous link = new LinkInstantaneous(satellitePlatform, facilityPlatform); elevationAngleConstraint.ConstrainedLink = link; elevationAngleConstraint.ConstrainedLinkEnd = LinkRole.Receiver; return elevationAngleConstraint; }
This method returns the AccessQuery object needed by the GetViewingOpportunities method. In the above code:
An ElevationAngleConstraint object is created, and its MinimumValue property is configured with the user-entered value for the minimum elevation angle for visibility (converted to radians). See AccessConstraint for more information on the different types of access constraints.
Finally, we create a LinkInstantaneous object connecting the Platform objects representing the satellite and facility, then use that link to configure the ConstrainedLink property of the ElevationAngleConstraint. Since the constraint is meant to apply to the facility, which is the receiver in our link, we set the ConstrainedLinkEnd property to LinkRole.Receiver.
Add a method to update the Insight3D visualization:
C#private void UpdateVisualization() { // Reset the Scene in case the button was pressed more than once. ResetScene(); EarthCentralBody earth = CentralBodiesFacet.GetFromContext().Earth; // Get the starting position and orientation of the satellite and set the global evaluators // for the TimeChanged event handler. satellitePositionEvaluator = GeometryTransformer.ObservePoint(satellitePlatform.LocationPoint, earth.InertialFrame); satelliteOrientationEvaluator = GeometryTransformer.GetAxesTransformation(satellitePlatform.OrientationAxes, earth.InertialFrame.Axes); facilityInertialEvaluator = GeometryTransformer.ObservePoint(facilityPlatform.LocationPoint, earth.InertialFrame); Cartesian satellitePosition = satellitePositionEvaluator.Evaluate(startDate); UnitQuaternion satelliteOrientation = satelliteOrientationEvaluator.Evaluate(startDate); satellite.Position = satellitePosition; satellite.Orientation = satelliteOrientation; // Set the scale once, then add it to the Scene. satellite.Scale = 1e5; SceneManager.Primitives.Add(satellite); // Set the position once, then add it to the Scene. Cartographic facilityPosition = new Cartographic(Trig.DegreesToRadians(longitude), Trig.DegreesToRadians(latitude), 0.0); facility.SetCartographic(earth, new[] { facilityPosition }); SceneManager.Primitives.Add(facility); // Add the satellites initial position to the set of orbit points. orbitPoints.Add(satellitePosition); SceneManager.Primitives.Add(orbitLine); // Set up animation times. SimulationAnimation animation = (SimulationAnimation)SceneManager.Animation; if (animation.IsAnimating) animation.Reset(); animation.TimeStep = new Duration(0, 5.0); animation.StartCycle = SimulationAnimationCycle.Continue; animation.EndCycle = SimulationAnimationCycle.Loop; animation.StartTime = startDate; animation.EndTime = endDate; animation.Time = startDate; // Start animation. animation.PlayForward(); }
Call the ResetScene method (defined below) to remove the primitives from the scene in case the Go button has been clicked more than once.
Get a PointEvaluator that calculates the satellite's position in the Earth's inertial frame. This evaluator will be used to find the current position of the satellite at the current animation time.
Get a AxesEvaluator that calculates the rotation from the satellite's orientation to the Earth's inertial axes. This evaluator will be used to find the current orientation of the satellite at the current animation time.
Set the position and orientation of the primitive representing the satellite, and set the scale so it is visible while rotating the Earth, and add it to the list of primitives in the SceneManager to be rendered in the scene.
Set the position of the facility from the input latitude and longitude. The SetCartographic method is used to set the position of the marker, and the marker is added to the list of primitives in the SceneManager to be rendered in the scene.
Add the satellites initial position to the set of orbit points, but we do not yet call the Set method on the polyline because we only have one point in the polyline, which will generate an exception. The polyline is updated below in the TimeChanged event handler.
Configure the SceneManagerAnimation to set the StartTime, EndTime, and Time properties based on the user input values, and configure other details of the animation. Call the PlayForward method to start the animation.
Add a method to reset the scene:
C#public void ResetScene() { // If a satellite has been added to the SceneManager, // then all three primitives were added. if (SceneManager.Primitives.Contains(satellite)) { SceneManager.Primitives.Remove(satellite); SceneManager.Primitives.Remove(facility); SceneManager.Primitives.Remove(orbitLine); } // The polyline from the satellite to the facility is not always included // in the Scene, so must have its own check. if (SceneManager.Primitives.Contains(accessLine)) { SceneManager.Primitives.Remove(accessLine); } // Remove the current line representing the orbit. orbitPoints.Clear(); }
Add the TimeChanged event handler:
C#private void TimeChanged(object sender, TimeChangedEventArgs message) { // Should not execute if the scene is not animating so the event does not interfere // with the AccessQuery. if (satellitePositionEvaluator != null && satelliteOrientationEvaluator != null) { // Set the current position and orientation of the satellite at the current time. satellite.Position = satellitePositionEvaluator.Evaluate(message.Time); satellite.Orientation = satelliteOrientationEvaluator.Evaluate(message.Time); // Add the point to the list of polyline points. orbitPoints.Add(satellite.Position); orbitLine.Set(orbitPoints); // If the satellite has access to the facility at the current time, render // a polyline from the satellite to the facility. if (accessIntervals.Contains(message.Time)) { List<Cartesian> accessPoints = new List<Cartesian> { satellite.Position, facilityInertialEvaluator.Evaluate(message.Time) }; accessLine.Set(accessPoints, new[] { Color.Yellow, Color.Yellow }, RenderPassHint.Opaque); if (!SceneManager.Primitives.Contains(accessLine)) { SceneManager.Primitives.Add(accessLine); } } else { // Otherwise, remove any polyline from the satellite to the facility if it exists. if (SceneManager.Primitives.Contains(accessLine)) { SceneManager.Primitives.Remove(accessLine); } } } }
Use the PointEvaluator to evaluate the position of the satellite at the current time, and the AxesEvaluator to evaluate its orientation. Set the position and orientation of the primitive representing the satellite, add the position to the list of orbit line points, and update the polyline primitive.
Call the TimeIntervalCollectionContains to determine whether the satellite has access to the facility at the current time, which determines whether to draw a line representing access between the satellite and facility.
If access is valid, create a list of Cartesian representing the positions of the facility and the satellite. Call the Set method on the polyline representing access line to set the points and colors of the line. If the SceneManager does not contain the polyline already, then add it to the collection of primitives.
Otherwise, remove the access line from the SceneManager if it exists in the primitives collection.
We are now ready to test the application and see how it works:
Build the application and run it (press F5 or select Start Debugging from the Debug menu).
Enter a date/time range, the latitude and longitude of the viewing site and the minimum elevation angle, i.e. the minimum angle above the horizon at which the satellite can be viewed.
Enter a Two-Line Element Set (TLE) to define the satellite's orbit. Numerous TLEs can be found at the CelesTrack website on the Current NORAD Two-Line Element Sets page. Simply copy and paste the TLE of interest into the text box.
TLE for testing: If you are not connected to the internet, or would like to test the application quickly without going online, the following TLE has tested successfully for a date range of October 1-31, 2016, a latitude of 40 degrees, a longitude of -76 degrees, and a minimum elevation angle of 5 degrees:
MOLNIYA 3-51
1 26867U 01030A   16284.58766364  .00798847 -62131-5  35507-3 0  9994
2 26867  62.4193 114.3286 6896909 268.1116  18.5859  2.87669386116495
Click the Go button.
If no results (and no error messages) display, try another TLE or adjust your date/time range, viewing location and/or elevation angle.
A simple application has been used here to prevent the tutorial from becoming overly complex or lengthy. For more ambitious uses of DME Component Libraries, see the other included Example Applications.